Friends-on-boardwalk-photoshop

How to remove your ex from a photo: Adobe Photoshop tutorial

By Wacom |

We’ve all been there – you’ve got a great group of friends, but one of them has a partner that doesn’t quite mesh with the rest. Finally, what everyone was quietly hoping for happens: that friend has decided to move on!

Here’s a quick and easy Adobe Photoshop tutorial from Kyle Runciman, Product Marketing Manager at Wacom, on how you can remove that “ex-friend” from a photo. Watch the video below for the tutorial, or read on for a summary. Don’t forget to use your Wacom Intuos tablet to make the selecting and masking a breeze!

Tips and tricks on how to completely remove a person from a group photo.

Note: not every group photo is created equal. Some are going to be way more difficult than this. In this example here, we’ve got a group of six people walking on the beach. We’ve got a nice blue sky, with not too much cloud or sunlight to deal with. If there’s more complexity, you might need a more complex process.

Also, enough time has passed where it’s almost certainly safe to remove this person from the image, but just in case they come back into the picture – literally – create a duplicate of the original and keep that as your safety net.

So there are three main areas we’re going to look at in this process.

  1. Borrowing from other areas of the image
  2. Stacking layers and using layer masking to hide certain things
  3. Final cleanup with shadows

Here’s our original image:

Friends-on-boardwalk-photoshop

Borrowing from other areas

The first step is to grab the rectangular marquee tool. Grab a large selection of everybody on the left that we want to keep in the photo. Hit Cmd-J or Ctrl-J to place that selection on a new layer.

Then hit Cmd-T or Ctrl-T to to open up the transform tool. Hold shift grab a corner, and pull the people on the left over toward the people on the right, covering the “ex,” so everyone appears to be at a uniform scale. Then reposition a bit by dragging.
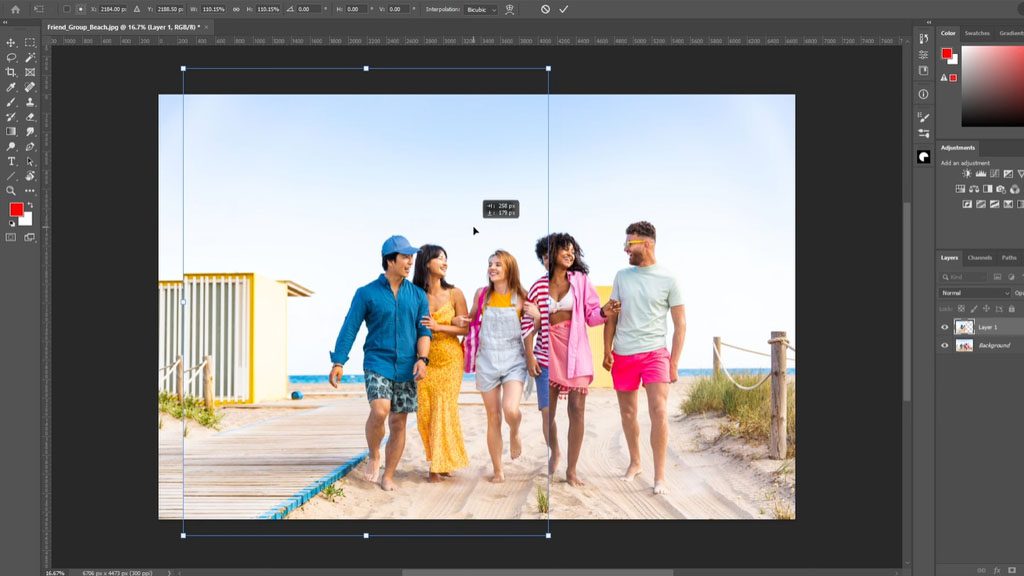
Friends-on-boardwalk in Adobe Photoshop

Stacking layers and using layer masking

Next, add a layer mask to your new layer by clicking on new layer mask icon in the bottom right. That will reveal a white thumbnail next to that layer, which is our mask. Now with layer masks, we know that white reveals and black conceals. So we’re going to grab the black paint brush, making sure the pressure sensitivity icon is selected, which changes the size of the brush depending on how hard we’re pressing the pen down.

Zoom in a little bit and paint with the black brush to quickly hide as much of the “ex” as possible – remember we can always come back and fine tune this. Zoom back out to make sure you’re not missing any information that we want to have in the final image. And then we can sort of really zoom in and get the fine detail work around the hand. If you hide too much, switch to a white paint brush to reveal anything you didn’t want hidden.

The person is almost completely removed, but there are a couple more things – gaps between people can be solved by copying elements of the background such as the sky or, in this example, the yellow structure in the background, and using layers to keep bits and pieces of the “ex” hidden.

You’ll also have a line in the background where the initial copy and paste happened – that can be solved with some simple but diligent erasing!
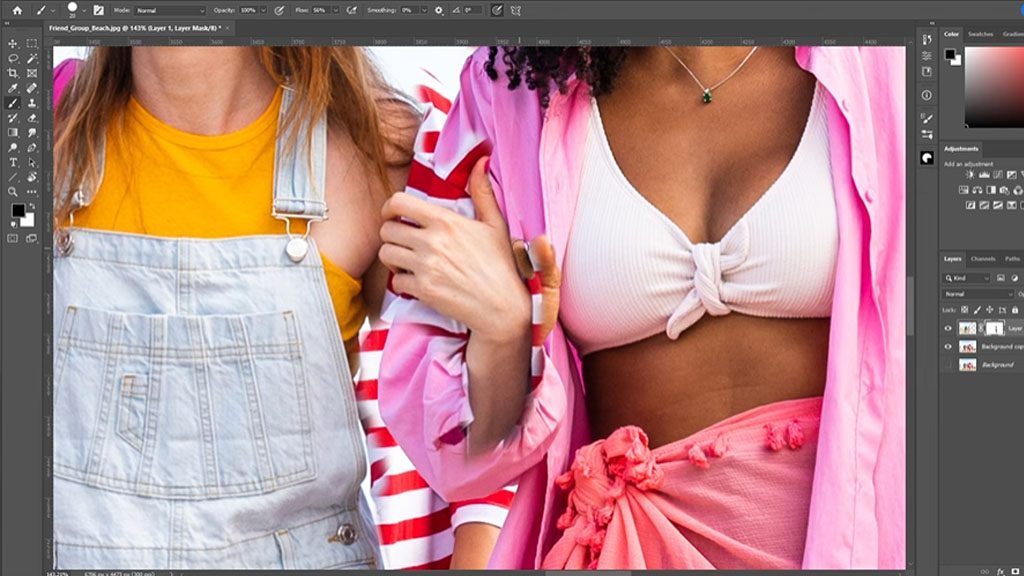
Clean up shadows in Adobe Photoshop

Cleanup with shadows

Finally, we’re going to have to work on the shadows to make the new image look realistic. Create a new layer and use a big, soft airbrush. Take a sample from an existing shadow for its color, just so that the skin tones are similar the shadow.

Based on where the sun is and where shadows already appear, you’ll just need to paint in some shadows, primarily between the two people in the middle who were smooshed together. Build up some color and some shade. You can erase with a hard eraser to cut back on the overspray. You might want to switch the layer to a multiply blend mode, as well – this does make your shadow a little bit darker, though, so we can crank down the opacity a little bit.
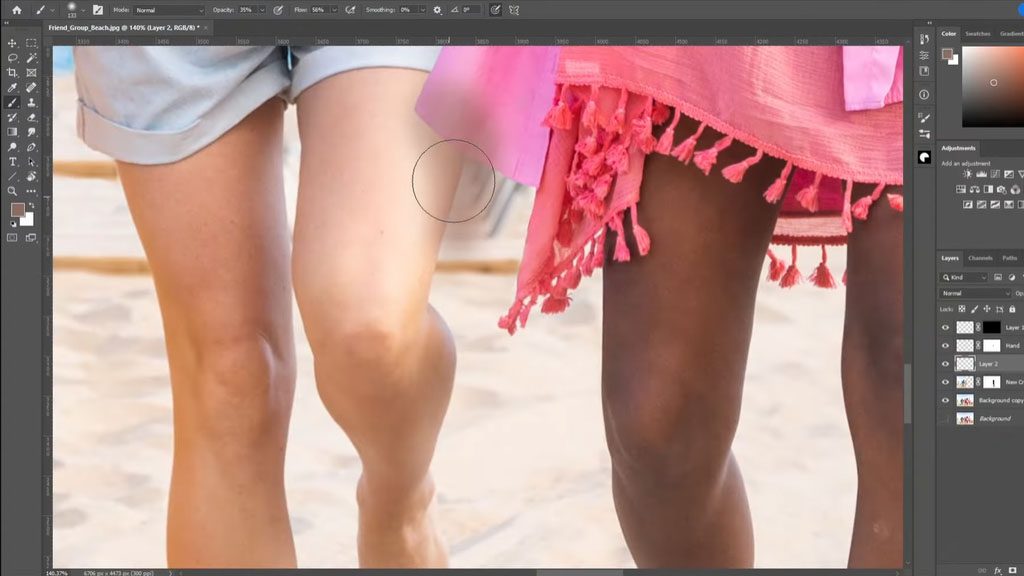
Clean-up-shadows in Adobe Photoshop

The final product

And there we go. The distant memory has been removed! We borrowed some elements from the pictures on either side, some sky, scaled up the three friends on the left, brought them over to the couple, used layer masks to paint and remove the person in the red and white shirt, cleaned up some of the edges, added some shadows, painted in some details.

Not all these projects are going to be as straightforward as this. Some might be way more difficult. But this is a pretty good idea of how we go about removing somebody from a photograph!

Remove person from photo in adobe photoshop

Related posts:

Connect with Wacom on Social

We know that to reach your ultimate creative flow, your tools need to work, and work together💡⁣
We also know that accidental clicks and awkward shortcuts can get in the way. That's why we redesigned the new Intuos Pro's layout, making it more ergonomic and intuitive. With mechanical dials and ExpressKeys positioned along the top, the new Intuos Pro fees more natural and easier to use with your keyboard.⁣
Learn more about the new through the link in our bio. ⁣
Now available at the Wacom estore. ⁣
#WacomIntuosPro #IntuosPro⁣
⁣
144 3
Where are you working from these days?⁣
The coffee shop? The airport? Or are you soaking up sun and getting creative  on a beach somewhere? 🥐🌴☕🎒⁣
#CreativesOnTheGo #WacomMovink #CreativeProfessionals
171 2
🎬 “Time is a luxury I don’t have as a director. With Wacom Intuos Pro, I can sketch my ideas in seconds.” – @hazdazzle , filmmaker, game director & co-founder of HaZimation⁣
⁣
From storyboarding films to directing game cinematics, HaZ needs tools that match his fast-paced workflow. The new Wacom Intuos Pro gives him the precision and speed to bring his vision to life, exactly how he imagines it.⁣
⁣
Tap the link in bio to learn more!⁣
⁣
#WacomIntuosPro #IntuosPro
75 0
What's the best piece of advice you've ever received professionally as a creative? ⁣
For @ricardoalvesj the best advice he ever received was to invest in personal work.⁣
⁣
Balancing a full-time job while dedicating time to your own projects can be challenging, but it’s key to developing your artistic voice. Personal work allows you to showcase your true potential beyond collaborative projects and stand out in your field.⁣
#CreativeJourney #CreativeProfessionals #Wacom
65 2
With the latest Wacom Intuos Pro, fluidity is at your fingertips, empowering you to create seamlessly, elevate your retouching, and boost productivity.⁣
⁣
For high-end retoucher and digital artist @sefmccullough success lies in minimizing friction, getting the work done with as little resistance as possible.⁣
⁣
Check out how the new Wacom Intuos Pro is an essential part of reducing that friction in digital work. ⁣
⁣
Ready to upgrade your toolkit and let your creativity flow? Head to the Wacom estore. 💻🎨⁣
#WacomIntuosPro #IntuosPro #PenTablet #WacomTablet
120 6
🚨 Unboxing the Wacom Movink 🚨⁣
Get an up-close look at Wacom's cutting-edge portable pen display! 🎨✨⁣
⁣
🔹 Ultra-Portable Design – Light & slim for artists on the go.⁣
🔹 Stunning OLED Display – 13.3" Full HD with 95% Adobe RGB accuracy.⁣
🔹 Wacom Pro Pen 3 – Customizable switches & 60° tilt for precision.⁣
🔹 Enhanced Multi-Touch – Smooth navigation and interaction.⁣
🔹 ExpressKeys – Quick access to shortcuts.⁣
🔹 Simple USB-C Connectivity – Easy setup with just one cable.⁣
⁣
Perfect for artists looking for performance and portability in one sleek package! ⁣
⁣
Thank you @collinchan for the video. ⁣
#WacomMovink  #DigitalArt #drawingtablet
849 19
Creative block? Nah, let’s break free! ✨ Shake up your routine and let spontaneity fuel your flow with a trusty companion by your side. Whether you’re outdoors or in a new spot, #WacomMovink’s vibrant colors and seamless portability bring your studio with you, wherever inspiration takes you! 🎨💡⁣
Learn more about Movink through the link in our bio!⁣
#Movink #DigitalArt #CreativeLife #ArtOnTheGo #CreativesOnTheGo #CreativeProfessionals
142 4
Don't be shy, ADMIT YOU HAVE A TINY PENCIL! 🙈⁣
⁣
There aren't too many rules to being an artist but, here are some you should probably think twice about. Thanks @lplucas for always reminding us that even in art you've got to do the time if you do the crime. ⁣
⁣
#createwithwacom #wacom #wacommovink #movink
2426 27
Taking a moment to reflect on some lessons learned with @allisonoliviamoon. 🫖📷
What are some lessons you've learned in your creative journey? What has helped you keep it magical?
#madewithwacom #wacomone #photoediting #artistlife #artistsoninstagram
119 0
Need help controlling your Wacom pen pressure? We got u? ⁣
#WacomPen #WacomTablet #DrawingDisplay #PressureSensitivity
331 1
How to draw lips with @lplucas 👄💋🤭😆
Do you have any cool tips for achieving amazing lips? 
#drawingtips #madewithwacom #digitalart #artistlife
1856 16
This error message is only visible to WordPress admins
Error: There is no connected business account for the user .