

Get comfortable with digital painting with these simple and helpful tips.
In this guest post (and in the below video), artist James Joyce gives beginning digital painters advice: what does he wish he’d known when he first started out on his digital painting journey?
Introduction
In the early days of Microsoft Paint, there was little to worry about as a digital artist. You couldn’t use a drawing tablet, and the program itself was limited to basic functions. Craig Mullins, considered the father of digital painting, has said that even at its inception, Photoshop wasn’t even considered as potential software for illustrators. Now, it runs the industry with thousands of exception digital artists in tow.
Now, Photoshop is just one of many kinds of software artists can use to paint digitally. The options available in each are truly overwhelming. I’m trying to learn Clip Studio Paint myself, and I’m baffled by everything that you can do. It’s exciting, but it feels like there’s a steep learning curve. It can be helpful to have a couple of simple tips in your toolbelt to make the experience smoother and more enjoyable.
1. Paint inside a clean selection
I’m not sure where I learned to do this, but it’s my FAVORITE technique by far! On a clean layer, create a shape with any brush. Then create a new layer and alt+click between the new one and the previous layer you just made. That new layer will only allow marks to appear where you created the shape on the previous one. It masks the shape on the original layer so you can’t paint outside the lines of the shape you created.
This has so many benefits that it almost feels like cheating! You can make large sweeping brushstrokes knowing that it will retain the shape from the layer below. You can add shadow and light around the exact edge of the shape without worrying about straying marks. You can paint inside the silhouette of a character without making changes to the background. It’s an extremely clean way to paint and lets you do things you would never get away with working traditionally.
2. Your gear matters
Most people will tell you that gear doesn’t matter, but that’s not entirely true. While there is a larger selection of brands that sell drawing tablets than ever before, not all are created equal. And unfortunately, if you opt for a cheaper tablet, you can get so used to it that the better version you were waiting to save up for won’t ever feel comfortable – at least not without putting in a lot of work to make up for that discomfort.
My first tablet was a Medium sized Wacom Intuos 4. I bought a Wacom tablet because I was told they were the best in the market. While this article is written for Wacom, I still believe that they’re the best on the market today. I approached them specifically to sponsor my videos because I love their products. Not to mention, the people I’ve worked with at Wacom are incredible. My current tablet is their Intuos Pro, and I couldn’t imagine painting with anything else.
Digital painting can be done on any tablet, but it’s worth saving for a high-quality product for the best return on your investment. If you’re an artist, you’re a lifelong customer and it will make a difference in the long run.
3. Stop using your phone
I won’t lie, seeing people paint on their phone is pretty incredible. However, it’s going to limit your ability to learn the array of skills you need to become a professional artist. Don’t get me wrong, you could get really good drawing on a little screen and the skills will translate to a bigger device, but once you start painting bigger, that’s when you’ll run into problems.
Drawing in a variety of sizes helps you become accustomed to proportions and if you’re stuck on a very small screen, chances are your drawings are one size fits all. If you have to go with a phone-like screen, try getting a tablet like an iPad.
Get creative inspiration direct to your inbox
Sign up for the Wacom Creative Newsletter for tips, tricks, news, and offers that will excite your imagination.
4. Control your edges
Edge control is a big thing for painters. They can communicate form, focus, and guide the viewers eye across your composition. How well you control the edges of your painting will determine how much of an impact it has on the viewer. Beginners tend to overlook that there are tools dedicated to blending. I know when I first started, all I used was a soft brush to manually blend edges. There is a better way.
In Photoshop you have the mixer brush and in Clip Studio you have the blending tool. The mixer brush feels like it pulls the virtual paint on top of each other, and it feels extremely artificial. Some artists don’t even bother to use it and instead opt for what I did as a beginner, using the different types of brushes to achieve different kinds of edges.
Clip Studio’s blending tool, on the other hand, is a whole different ball game. It feels like the colors are mixing in a soft and fluid manner. It feels elegant and natural, despite knowing I’m throwing around virtual paint.
Control of your edges is one of the fundamentals of painting. If Clip Studio can make that experience easy and smooth, I’m all for it (and you should be too).
5. You only need one tool to start
The brush tool is literally all you need when you try your hand at digital painting. These programs are immense and can be overwhelming for beginners. Just focus on the fact that all you need is one tool, the brush tool.
As you get comfortable using the brush, start to add things to your repertoire slowly. Adjust the settings on your brush for a different experience. Try using the eraser tool if you make a mistake. Adjust the levels to make a greater impact with the lighting and colors. There are dozens of tools, filters, brushes, and options available to you. You don’t have to use them all at once, but you should explore as you get more and more comfortable with each tool you use.
Widen your skill set and add a small layer of complexity to your process as you get comfortable with the program you decide to use.
6. Check your monitor for nits
The first time I noticed a problem with my monitor was when I finished a winter-themed Calvin and Hobbes illustration. I noticed a discrepancy between the painting on my laptop vs my desktop monitor. The values and colors were noticeably different.
Nits are a unit of measurement that describe how bright a display is. On that day, I found out that the nits on my desktop monitor were significantly lower than the nits on my laptop, causing me to squish all my values. I was painting in a lower range of the value scale. Not only did it severely impact my learning (how to accurately spot and choose values/colors) it ruined the final impact of my illustration.
Thankfully, as a digital painting, a few adjustments to the levels and some minor color correction brought it back to normal. I am still shocked that my eyes had gotten so used to the squished values on my desktop monitor I thought I was seeing a full range of values from light to dark. When in fact, the range of values was limited.
Take great care in ensuring that when you choose a monitor it has a sufficient number of nits, preferably 500 or more, to see the full range of values/colors properly.
7. Composition is queen
Kings are overrated. Composition is queen in the world of art! It should be the first thing you think about when you’re making an illustration. Composition is what draws a viewer into the image and makes it compelling enough to stick around. There’s an emotional connection that happens because of the way it was designed.
A simple change in eye level can communicate vastly different moods and emotional responses. When something as small as that can change the impact of a painting so profoundly, you need to understand how to design it to your benefit. Many artists these days tend to make simple pinup poses that have little to no impact to the viewer. If all you want to do is draw pretty faces, straight on, with little to no emotion, that’s perfectly fine. But if you want to make an emotional impact in yourself and the viewer, you need a great composition.

Shop Wacom Products
Visit the Wacom eStore to find the perfect tools for your next project.
8. You don’t need to start traditionally
There seems to be a wild misconception from professional artists that you should be drawing traditionally before you switch to digital. If you want to be a digital artist and start painting, then do it. You don’t have to wait until you cross some imaginary skill threshold as a traditional artist before you switch to digital.
However, you might want to practice as if you’re working traditionally. The learning will be more impactful. For example, if all you’re used to is having the lasso or liquify tool to fix your work, your muscle memory will always remember how to do the mistake. It’ll start to create bad habits in your process. When you’re sitting down to learn, try to limit your use of special tools. When you’re creating illustrations for yourself, or work, then allow for more of those helpful shortcuts.
9. There’s more than one solution
The library of digital tools is massive. Programs like Photoshop and Clip Studio have so many features that there tends to be more than one way to do the same thing or something similar.
Not only that, but we all approach problems differently. Yes, we have fundamentals, but not everyone draws the head the same way. Yet we still have thousands of beautiful faces created by artists of varying methods. Some people like to add circles to outline the eye sockets and some people like to go straight in and paint a face starting from the right eye.
You don’t need to look for the perfect way to paint something, you just need to do it. If you want to learn a new way to paint something, and potentially learn something cool in the process, try it out. Enjoy your creative process by sampling the many different flavors of how to create!
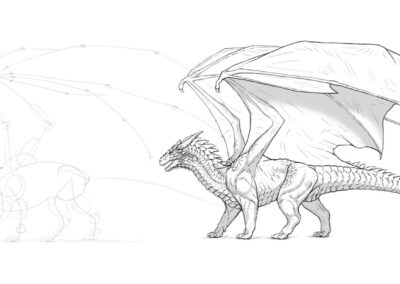
10. Make your image look good from far away
If you can make your illustration look incredible as a thumbnail, you’re halfway to a masterpiece. In the time you spend creating an illustration or work of art, the details are generally where you spend most of your time. If the thumbnail looks terrible, no amount of detail is going to save it. Slow down in the beginning so you don’t add detail to a weak foundation.
There are times when I browse art and the thumbnail really draws me in. When I click on the thumbnail and see the painting, it’s a little jarring when the final piece has less impact. This isn’t a failure of the artist. They are close to a breakthrough. Solve the important half of the equation first – the composition – and you’ll soon figure out the rest.
Bonus: Take advantage of checkpoints
A final bonus tip that I love to take advantage of is non-destructive artwork. Having the ability to make art that’s non-destructive is what makes digital artwork so powerful.
If you work traditionally and create a character design, you only get that one figure to try out one design. You have to redraw the entire figure all over again to work through a new idea.
If you work digitally, you can copy the layer as many times as you want and try out as many designs as you wish. You can change the design on your figure entirely, alter the colors, or maybe reposition the right leg to try a new pose. You can do all this with the original figure still intact. It would take hours to do traditionally, what you can explore digitally.
Start your digital painting journey!
Getting my hands on a Wacom tablet for the first time was like a dream. I was too scared to do any real artwork of my own, so I colored pages of manga until I got used to the tablet enough to start my own artistic journey. I hope this article gives you the courage to dive right in and learn a few tricks right off the bat. Digital painting is a thrilling experience, and these tips will only be the building blocks to your rise as professional artist.
About the author:
James is an artist from Maine who resides in California. He’s been drawing for over 10 years, and knows that learning to draw feels like a long and hard journey. That’s why he created Zephyer – to give artists a healthy creative process that nurtures their growth. He aims to create a new educational framework designed to help artists discover the best ways to learn to draw. James uses traditional tools along with his Wacom Cintiq 16 and Wacom Intuos Pro to improve and create his designs.


