

Maybe you’ve been using Adobe Photoshop for a while, or maybe you’re just getting started. There are many ways to do every type of edit in the software, as well as all kinds of tips, tricks, and hacks to do things more simply and easily. But setting up your tools and equipment is an important first step.
In this tutorial, Unmesh Dinda of popular Youtube channel PiXimperfect will walk you through the steps of setting up a Wacom Intuos Pro for photo editing. His motto for approaching all ergonomics-related matters is “The lesser the effort, the better,” meaning that tablet functions should always be set to their most expedient shortcuts. Many of the ones he sets are geared towards making the brush controls more accessible, brush work being the bread and butter of the kind of color corrections and blemish removal he does the most in Adobe Photoshop.
Note: this tutorial was originally recorded a few years ago, so some of the keyboard commands, menu locations, and look and feel of both Adobe Photoshop and Wacom Tablet Properties may be slightly different. The general concepts, however, should be the same.
Key Tip: “Always make sure that you change the shortcuts application-wise. You cannot have the Photoshop shortcuts on your regular desktop while you’re browsing on Google Chrome. You want different shortcuts for [different software programs]”
Before even getting started, Dinda reminds everyone to make sure you’re using the latest Wacom drivers for your tablet, and to possibly turn off Windows Ink – it can sometimes affect your performance. This was mostly an issue with older versions of Windows and Adobe Photoshop, but if you’re having issues, it might help.
Step 1: Setting up the pen
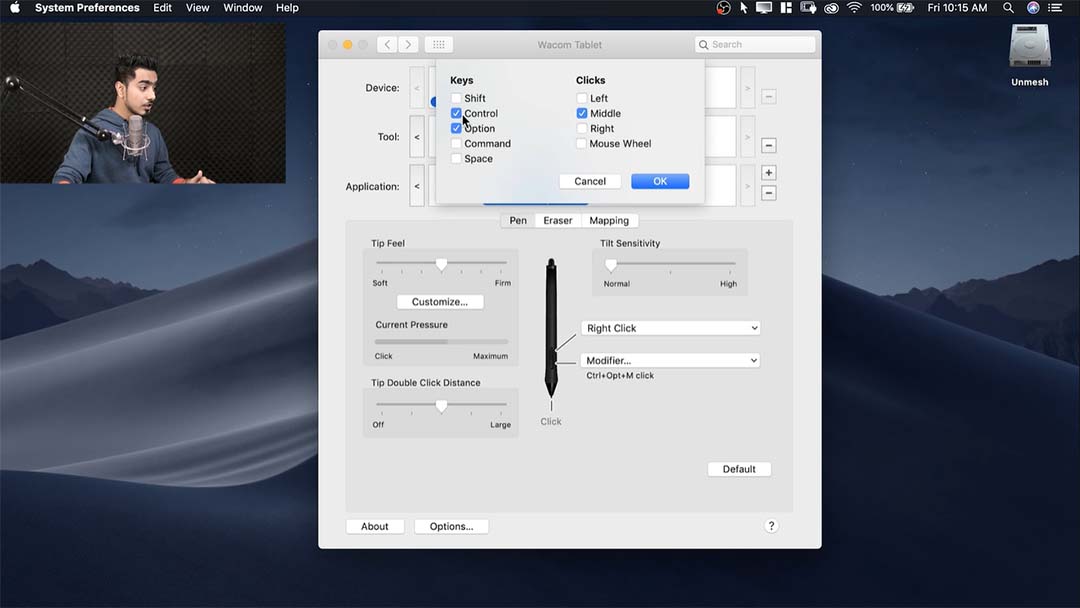
In the first section, he shows us how to set up the pen through Wacom Tablet Properties. After showing us how to create program-specific shortcuts through the Tablet Properties panel, he assigns the bottom button on the pen to Left Alt + Right click (on a Mac, Control + Option + Middle click). This means that in order to change brush size and hardness, all he has to do is press the bottom tablet button, hover the pen over the tablet, and move the brush to the left or right to control size, or up and down to control hardness.
Finally, he sets the top button to Right Click alone, as this is a necessary feature in any program.
Step 2: Setting up the keyboard
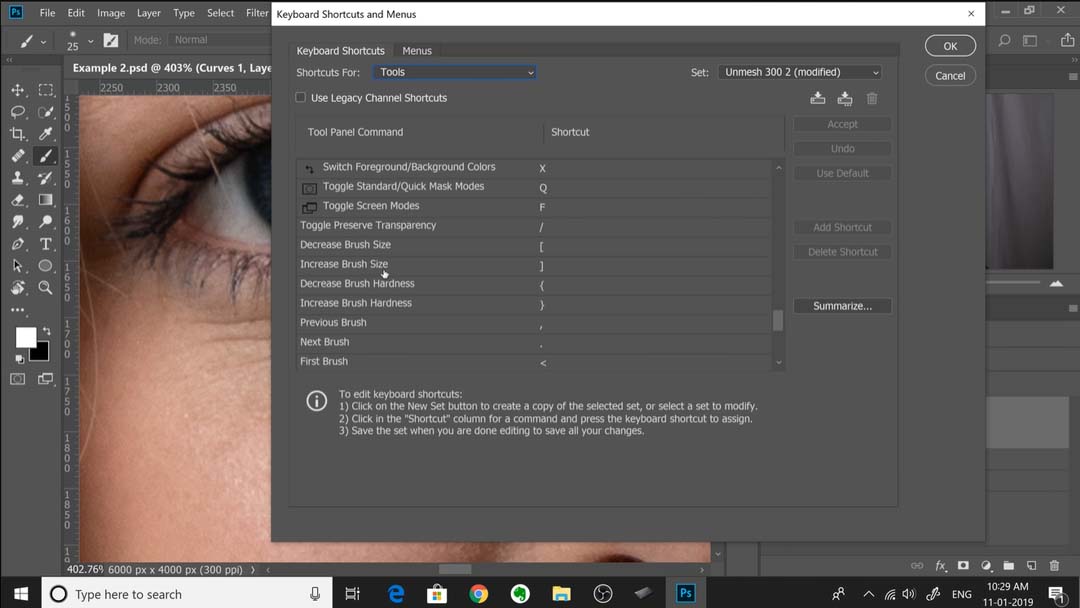
Brush Size is already set to left and right brackets by default, but for right-handed users, that means you’ll have to remove your hand off the tablet to hit those keys, which goes against the principle of “lesser effort.” So he suggests setting W and E to Brush Size, so you can change it with your left hand without lifting your brush from the surface. Note: E is set to Eraser by default, though, so if you have a Wacom pen that doesn’t come with a built-in eraser, like the Pro Pen 3, you might want to skip this step.
Key tip: Holding the keyboard shortcut will switch to that tool for only as long as you’re holding it, as opposed to pressing it once to switch to the tool. Then you’ll be returned to your old tool.
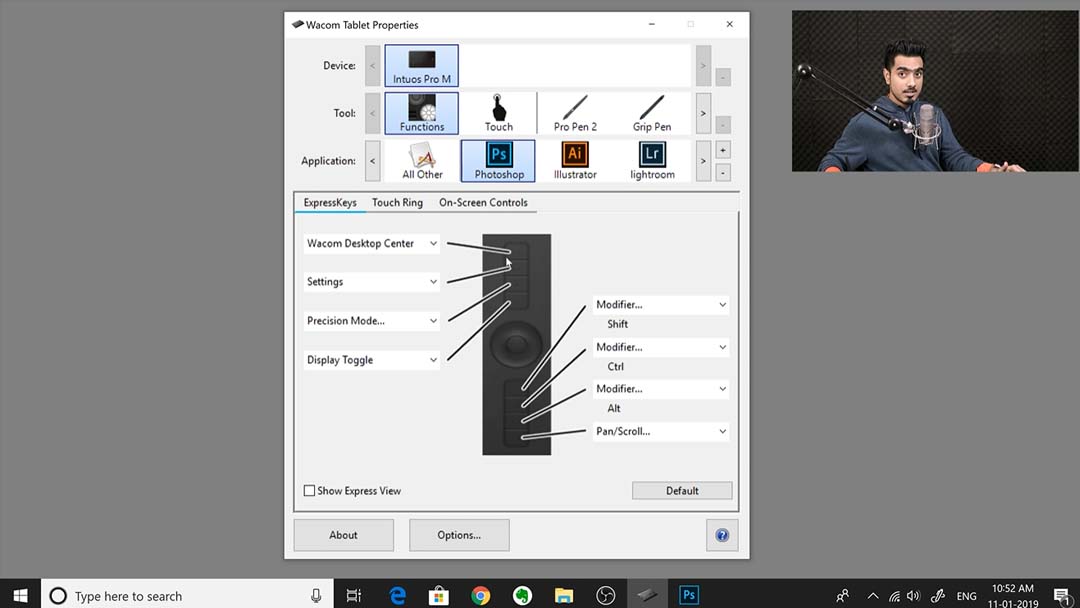
3. Setting up the ExpressKeys
It’s up to you which shortcuts you’ll want to assign to which keys; everyone has their own individualized workflow. How many you’ll even have to work with depends on your device, as well. But here are the ones Dinda recommends.
The first two he dials in are Step Forward and Step Backward — advanced versions of Undo and Redo, which I think we can all agree are mandatory tools to have close at hand. He sets a third to Ctrl+0 (Mac: Command+0), which zooms the canvas out to fit on the screen, so he can quickly take a broad look at his canvas to see how each change affects the whole. This is a good idea regardless of the type of digital art you’re doing.
The rest of his choices are somewhat specific to his editing style. One choice I personally found odd was setting several ExpressKeys to control layer functions, including Alt+Brackets to move the active layer up or down, and Ctrl+Alt+Shift+N to create a new one. He even sets a custom shortcut through Photoshop, mapping “Convert To Smart Object” to Ctrl+Alt+Shift+S, then assigns it to his last unused ExpressKey.
Dinda’s workflow leans heavily on converting images and filters to Smart Objects in order to change them nondestructively, though. This is very good practice, but if you don’t do things that way, this is where you might want to diverge from the tutorial.
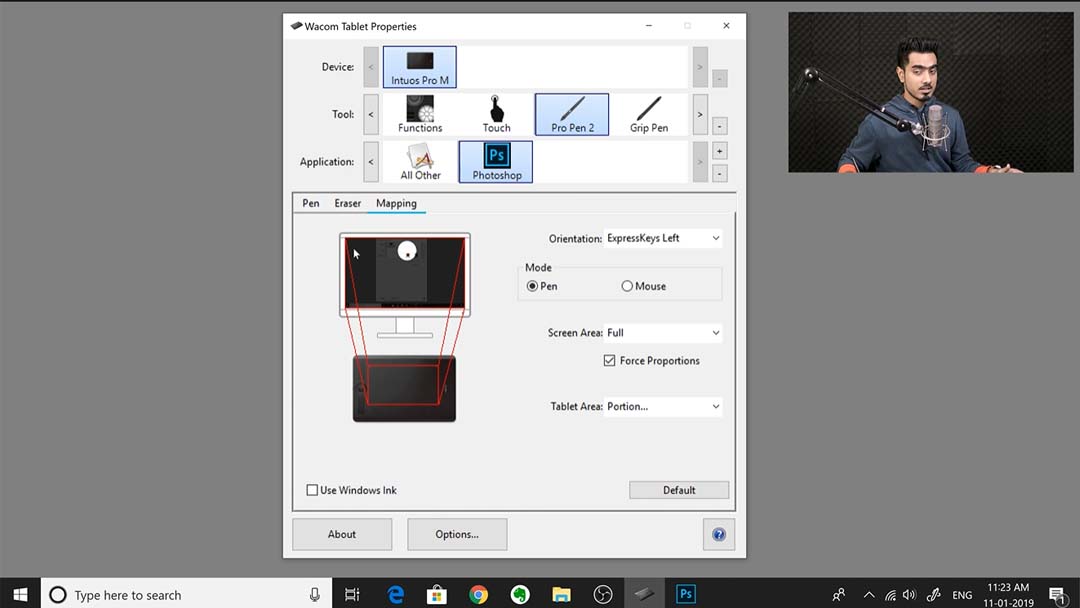
4. Mapping
The next step Dinda moves on to is Mapping. He explains how mapping works, but that setting is really up to you — the smaller active area you map, the less you have to move your hand, but the less precision you will have. What he recommends for everyone, however, is checking the Force Proportions box in the Mapping pane, so that the tablet’s active area matches your screen’s aspect ratio.
He advises to always do this, although a note from me personally: the one time you won’t want to is when using a pen tablet to navigate multiple monitors. It will reduce your tablet’s active area to a narrow horizontal band that represents the aspect ratios of both screens. In that case, you only need to check it for programs where the tablet is mapped to one monitor, such as anywhere you’re actually painting, like Adobe Photoshop.
5. Backing up your tablet settings
The most important tip of the video, he emphasizes, comes at the end: How to back up your tablet settings so you can reload them in case of data loss. Through the Wacom Desktop Center, save your settings to your computer’s, or as he recommends, an external, hard drive.
This video is from four years ago, though. More recent versions of the Wacom driver also allow you to back it up to our cloud through the Wacom Desktop Center, so it’s not as important to keep a copy on an external device. It’s still highly recommended you keep one on your internal drive for quick restoring, though, just in case.


