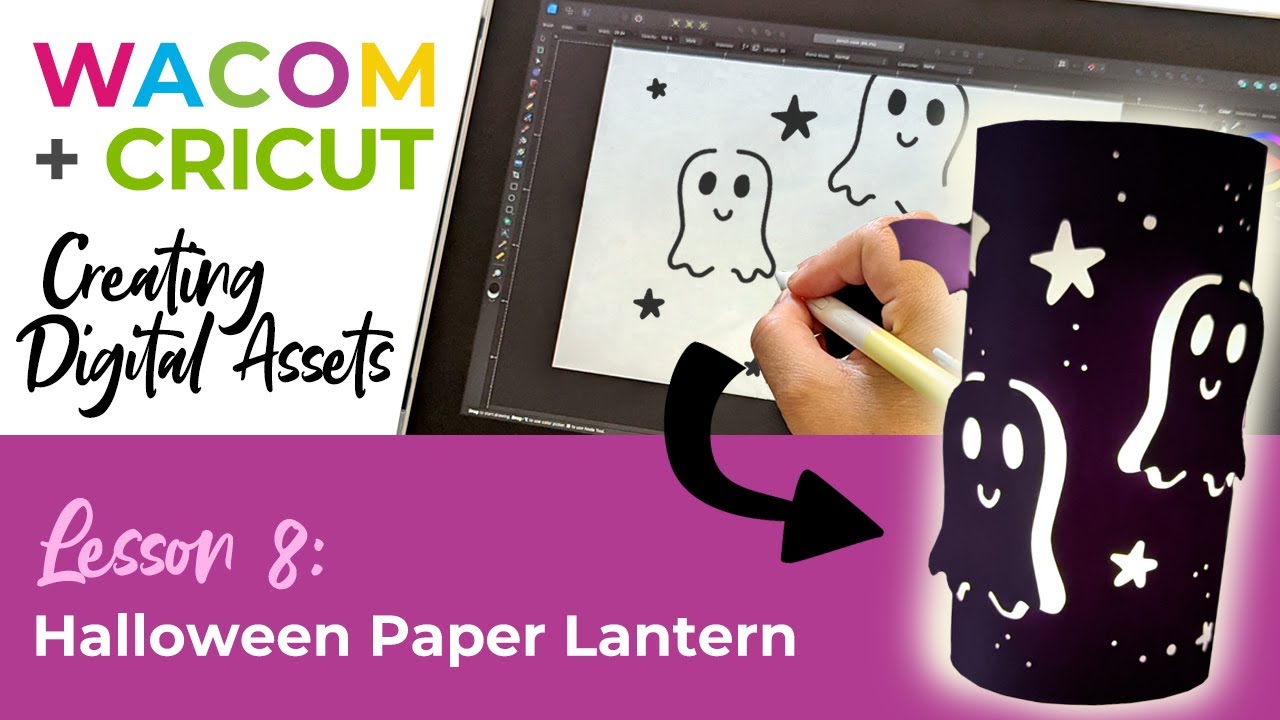
Miniatura del vídeo: Crea una linterna de papel de Halloween con la pen tablet Wacom

Cómo hacer una linterna de papel de Halloween con formas emergentes, utilizando Wacom One y Affinity Designer 

Por Wacom |
20 de octubre de 2023
Fotografía de Heather Cash

En la entrada invitada y el vídeo que aparecen a continuación, la creadora y crafter Heather Cash continúa su serie Wacom + Cricut mostrándote cómo puedes utilizar la pantalla y el software Wacom One lápiz Affinity Designer software -incluido con cada compra de Wacom One - para crear un farolillo de papel de Halloween como proyecto divertido o como regalo. 

Mira el vídeo a continuación, o sigue leyendo para obtener una explicación basada en texto.

Hola, me llamo Heather, y bienvenidos a otro episodio de Wacom + Cricut, mi serie en la que te enseño a crear activos digitales para la Cricut, utilizando tu pen tablet Wacom. Y, por supuesto, me gustaría dar las gracias a Wacom por enviarme esta pen tablet y patrocinar esta serie.

Hoy vamos a crear un Farolillo de Papel de Halloween con formas desplegables.

Primero, consigue tus suministros: 

  • Cartulina de color de 8,5″x11″.
  • Cartulina de vitela transparente de 8,5″x11″.
  • Pegamento pegajoso
  • Cinta de embalar transparente
  • Vela candelita LED

Paso 1: Crea tu linterna SVG

El primer paso es crear tu archivo en Affinity Designer.

Crea tu archivo 

Crea un nuevo archivo en Affinity Designer seleccionando Archivo → Nuevo. Para las dimensiones, introduce 8,5 para la anchura y 6 para la altura. Asegúrate de que en Unidades de documento está seleccionada la opción Pulgadas. Ajusta los PPP a 72 (así te asegurarás de que en Cricut Design Space aparezca con el tamaño correcto). Ahora haz clic en Crear.

¡Empieza a dibujar!

Coge la Herramienta Lápiz de la barra de herramientas de la izquierda. Prueba el tamaño de tu lápiz haciendo algunos trazos de prueba. Si los trazos son demasiado grandes o demasiado pequeños, puedes cambiar el tamaño en la barra de herramientas superior, junto a Anchura.

Dibuja unos cuantos esbozos de personajes de Halloween, y deja su parte central desconectada. Esto es lo que hará que salgan los lados cuando enrolles el papel en forma de cilindro. Si necesitas ajustar algo las formas, puedes coger la Herramienta Nodos de la barra de herramientas y seleccionar nodos individuales para moverlos.

También puedes añadir pequeños agujeros circulares alrededor de tu diseño, para dejar pasar más luz. Coge la Herramienta Elipse de la barra de herramientas de la izquierda, mantén pulsada la tecla Mayús y arrastra para crear un círculo. Puedes duplicar el círculo manteniendo pulsada la tecla Alt y arrastrando el círculo a una nueva posición.
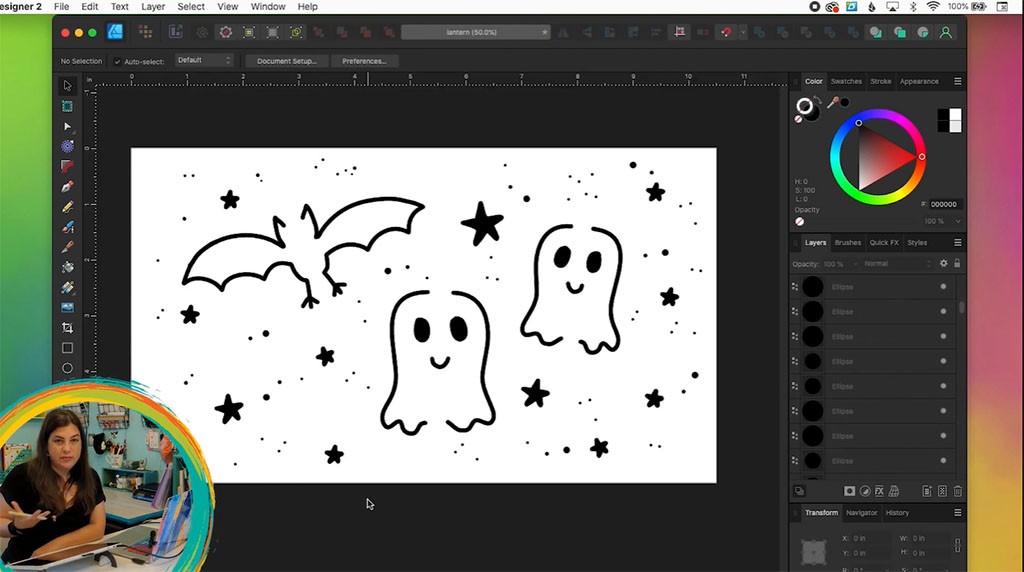
10 20 23 Heather Cash Cricut Linterna 1

Formato para Cricut Design Space

Cuando hayas terminado de diseñar tu farolillo, tendrás que formatearlo todo en formas para Cricut Design Space. Para ello, coge tu Herramienta Mover, selecciona todo y elige capa → Convertir en Curvas. Esto convertirá tus círculos en formas reales, en lugar de "objetos circulares" en Affinity Designer.

Ahora, haz clic en Añadir en la Barra de Herramientas (parecen dos formas y un signo más) para combinarlas todas en una sola forma. A continuación, vamos a ocultar esos círculos para poder trabajar con los demás elementos. Dirígete al Panel de la capa y haz clic en el pequeño punto de color de la capa que contiene todos los círculos para ocultarlos.

A continuación, coge de nuevo la Herramienta Mover y selecciona todo, luego selecciona capa → Expandir trazo. Esto convertirá todas las líneas que has dibujado en formas. A continuación, combínalos todos en una sola forma haciendo clic en el botón Añadir de la barra de herramientas. Necesitamos combinar los círculos y el resto del dibujo en una sola forma, así que dirígete al Panel de capas y muestra la capa círculo (haciendo clic de nuevo en ese punto). A continuación, selecciona todo y haz clic en Añadir. Ahora todo debería tener la misma forma.

Por último, sólo tendremos que crear un rectángulo y luego recortar estas formas del rectángulo. Ve al Panel de Herramientas y coge la Herramienta Rectángulo. Haz un rectángulo del mismo tamaño que el lienzo. Después de crear el rectángulo, puedes hacer que el tamaño sea más exacto yendo al panel Transformar e introduciendo 8,5 para la anchura y 6 para la altura. También puedes poner a 0 las coordenadas X e Y.
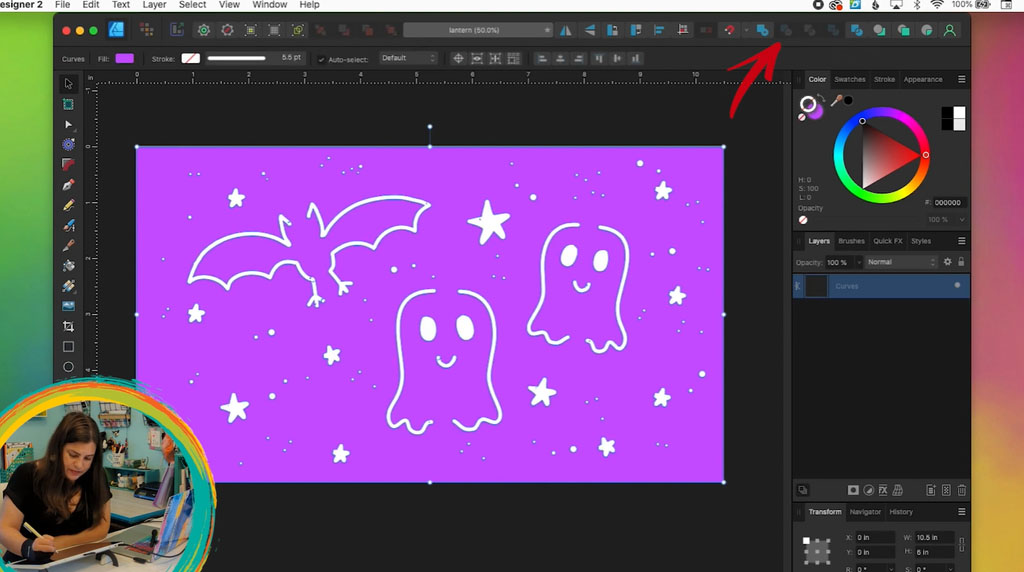
Heather Cash Linterna Cricut 2 1

Ahora, selecciona todo y haz clic en el botón Restar Frente de la barra de herramientas. Esto recortará las formas dibujadas del rectángulo.

Exportar para Cricut Design Space

Primero querrás guardar tu diseño como un archivo de Affinity Designer seleccionando Archivo → Guardar. Luego, puedes exportarlo como SVG para Cricut Design Space. Para ello, selecciona Archivo → Exportar. Elige las siguientes opciones:

  • SVG
  • Preestablecido: SVG (para exportar)
  • Establece Usar PPP en 72
  • Desmarca "Establecer cuadro de vista"
  • Luego haz clic en Exportar.

Paso 2: Recorta tu diseño

Introducir en Cricut Design Space

¡Ahora podemos crear nuestro farolillo! En Cricut Design Space, sube tu nuevo diseño. Ve a Subir, Subir Imagen, Examinar, selecciona tu archivo SVG, haz clic en Abrir y Subir. Haz clic en tu diseño y selecciona Añadir al lienzo.

A continuación, haz clic en Hazlo. Luego, haz clic en Continuar. Asegúrate de que tu Cricut está conectada y de que tu material está configurado como Cartulina, y haz clic en Listo.
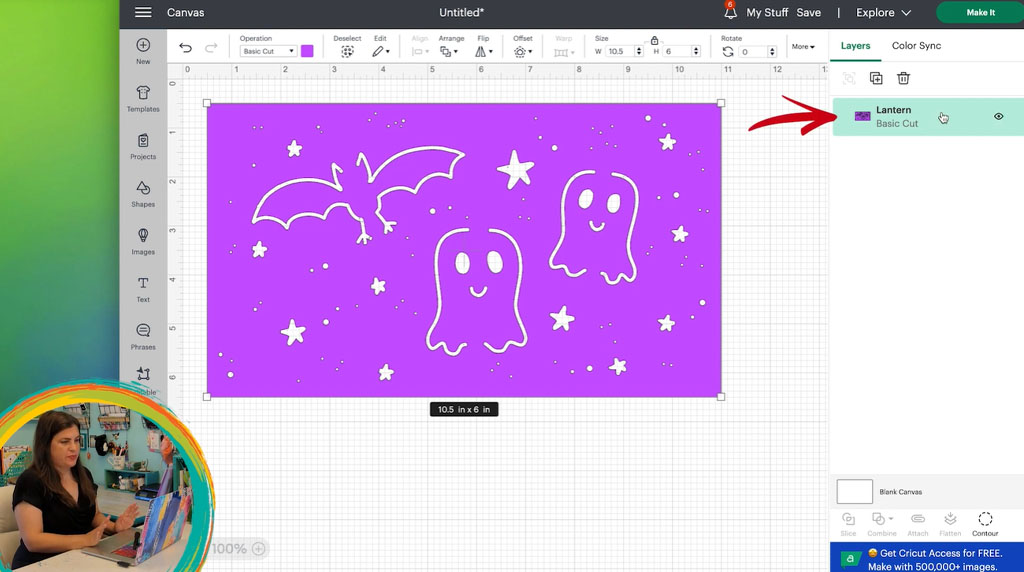
Heather Cash Cricut Linterna 3

Recorta tu diseño

Coloca tu cartulina en la esquina superior izquierda de tu tapete. A continuación, pásalo por tu Cricut, dale la vuelta a la alfombrilla y retira el farolillo recortado terminado. Coloca el rectángulo del farol sobre la vitela y corta un trozo de vitela un poco más pequeño que el farol.

Monta tu linterna

En la parte posterior/interior de la cartulina del farolillo, pega la vitela en su sitio con una fina capa de pegamento pegajoso. Después, aplica pegamento pegajoso en el borde corto del farolillo y enróllalo en forma de cilindro. También puedes hacerlo más seguro añadiendo un poco de cinta de embalar transparente.

¡Disfrútalo!

Ahora, ¡tu linterna está terminada! Puedes poner una votiva en el farolillo y ¡ver cómo se ilumina!
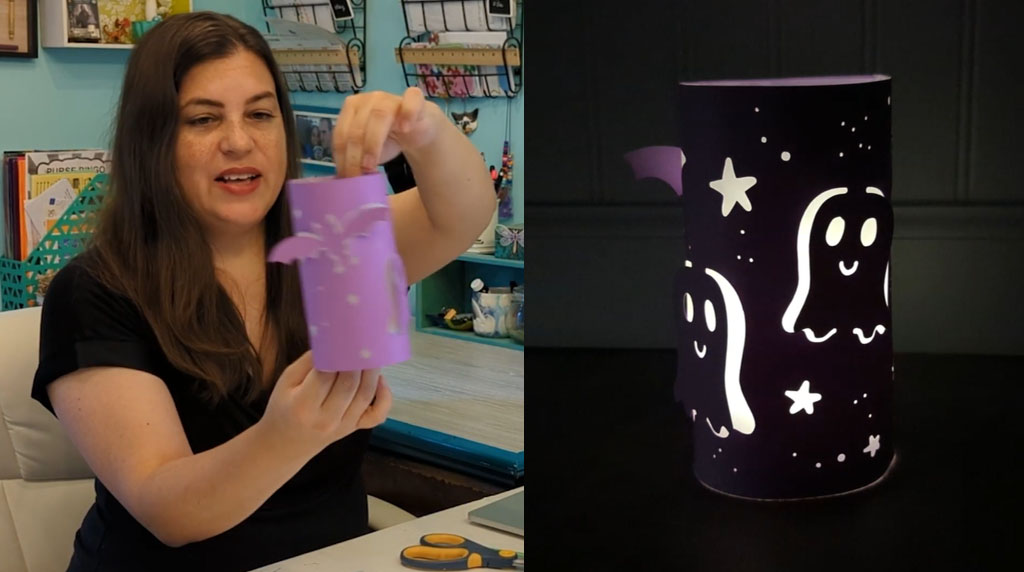
Heather Cash Cricut Linterna 4

Entradas relacionadas:

Making the most of your Wacom with Pablo Muñoz Gómez, Tip 8: Essential Wacom Tools for Teaching

Making the most of your Wacom with Pablo Muñoz Gómez, Tip 8: Essential Wacom Tools for Teaching

How to draw a stylized illustration in Adobe Illustrator, with Kirk Wallace aka Bone Haus

How to draw a stylized illustration in Adobe Illustrator, with Kirk Wallace aka Bone Haus

How To Draw Polar Bears, with Legendary Animator Aaron Blaise

How To Draw Polar Bears, with Legendary Animator Aaron Blaise

The best storyboarding classes on Skillshare

The best storyboarding classes on Skillshare

Conecta con Wacom en las redes sociales

Enjoy this stylized illustration created by @bonehaus inspired by his recent trip to Amsterdam. ⁣ ⁣ He goes full circle, collecting inspiration and reference, sketching in #AdobePhotoshop, illustrating in #AdobeIllustrator, and then right back to #photoshop for finalizing color and texture 🔄✌️⁣ ⁣ Once in Illustrator, Kirk outlines and traces the major shapes of his sketch, then removes the lines and focuses instead on shapes and shadows. ⁣ ⁣ "I start building in more shadows and more details to help separate any of the shapes that are struggling without that outline. I like my art without a ton of outline, so I prefer the challenge of using some shadows and highlights and stuff to separate them.”⁣ - @bonehaus⁣ Head to the #WacomBlog to read the full interview! ⁣ #MadeWithWacom #WacomCintiqPro #DigitalIllustration #adobeillustrator #Photoshop
156 0
El óleo perfecto para tus ideas es tan delgado como un espejo. 🪞🌾 Descubre la magia de Wacom Movink, nuestro primer lienzo digital OLED. Video creado por la maravillosa @martinab.illustrations 🌹 #WacomMovink #creativeprofessionals #creativesonthego #tabletadigital #artedigital
377 4
#WacomSale⁣ The festive season is upon us, and adventure calls! 🏁✈️🌎⁣ Unleash your creativity anywhere with a #WacomMovink.⁣ Shop now through the link in our bio!⁣
110 2
📝 Managing license requests and agreements is an essential part of protecting your work as a professional artist. And in this tutorial we show you how to do it easily. Wacom Yuify allows you to easily view, approve, or reject requests, ensuring your creative rights are secured. Streamlining the process means more control over your art and less hassle. 🔒 Ready to simplify your license management? Register for free at yuify.com *Yuify Licensing is only available in selected regions and may require additional agreements for specific cases not covered by the License Builder. #WacomYuify #Yuify #CreativeRights #DigitalRightsManagement
75 2
🎉✨ December of Giveaways is HERE! ✨🎉 The holiday magic is upon us and we're ecstatic to bring you weekly giveaways throughout the month of December! 🎁 Come back every Friday for your chance to unwrap something amazing! ✨ This week, we're giving away a Wacom Cintiq 16! 🎨 Here's how to enter: 🎅 Follow @wacom and @wacomedu ❤️ Like this post 🌟 Tag a friend + your favorite creator! This week's giveaway ends 12/20 at 9 am PST. Winner will be tagged in this post and ONLY contacted through official Wacom accounts. Please be extra cautious if contacted via DM – make sure the sender is @wacom or @wacomedu before sharing any personal info. 📩 We’ll only ask for your shipping details if you win! Good luck 🍀 #Wacom #WacomForEducation #WacomGiveaway
872 535
Therapeutic break! Let's draw some Winnie stickers with @konistudio on a #WacomOne 13. 🧣❄️🌲 #Wacomworkspace #madewithwacom #artistsoninstagram #artistlife
669 13
How to draw fire without burning yourself 🧯🔥 @lplucas thank you for this important service. Stay cozy and stay safe out there friends ✌️ #madewithwacom #drawingtips #digitalartist #digitalart #wacomtips
132147 98
How do you keep inspired during ordinary days? @buttersketch shares a glimpse into her creative process, full of graphic novels, picture books, music, journaling and art materials. "“I really love bribing myself with new materials,” she confesses with a smile. “I think it helps my brain bypass the anxiety of starting, because now I’m focused on just playing.” - @buttersketch✌️ #Wacomworkspace #WacomMovink #creativeprofessional #artistlife #artistsoninstagram #creativeinspiration
225 2
As an artist, protecting your work can feel impossible. Watermarks distort your art, and even then, they can be removed. Many have felt the frustration of seeing creations copied without credit - and that’s why Wacom Yuify exists ✨ —it adds an invisible mark to your work, keeping it safe and traceable without compromising its beauty. 🔒 Ready to protect your art? Visit Yuify.com for more info. Now available for @escapemotions #WacomYuify #Yuify #CreativeRights #DigitalRightsManagement
146 2
Reimagining everyday objects by adding a little bit of magic is easy with a little ingenuity, patience and curiosity. Thank you @monsieur_arefin for walking us through your process and showing us how you edit using Wacom Intuos Pro 🥰 #madewithwacom #photoshop #photoediting #ConnectedInk2024 #artistsoninstagram
266 5
This week's giveaway is closed now. ✌️✌️✌️ Congratulations @yeseniaropesu, you're the lucky winner. Thanks to everyone who participated. Stay tuned for this week's giveaway coming up soon! 🎉✨ December of Giveaways is HERE! ✨🎉 The holiday magic is upon us and we're ecstatic to bring you FOUR incredible giveaways throughout the month of December! 🎁 Come back every Friday for your chance to unwrap something amazing! ✨ This week, we're starting strong with a Wacom Intuos M – perfect for creative hobbyists and art teachers alike! 🎨 Here's how to enter: 🎅 Follow @wacom and @wacomedu ❤️ Like this post 🌟 Tag a friend + your favorite creator! This week's giveaway ends 12/13 at 9 am PST. Winner will be tagged in this post and ONLY contacted through official Wacom accounts. Please be extra cautious if contacted via DM – make sure the sender is @wacom or @wacomedu before sharing any personal info. 📩 We’ll only ask for your shipping details if you win! Good luck 🍀 #Wacom #WacomForEducation #WacomGiveaway
990 669
The lovely @martinab.illustrations tests the Wacom Movink, taking advantage of the ability to create from anywhere. From your desk, to the cafe, and anywhere ideas may strike, Movink moves with you, so you never stop creating. #wacommovink #creativeprofessionals #creativesonthego #digitalart #artschool
1234 18
Este mensaje de error sólo es visible para los administradores de WordPress
Error: No hay ninguna cuenta conectada para el usuario 17841445048021802.