Convierte una foto en una ilustración con un solo filtro de Photoshop

Convierte una foto en una ilustración con un solo filtro de Photoshop, con PiXimperfect

25 de abril de 2023

Quizá lleves un tiempo utilizando Adobe Photoshop, o quizá estés empezando. Hay muchas formas de hacer cualquier tipo de edición en el software, así como todo tipo de consejos, trucos y hacks para hacer las cosas de forma más sencilla y fácil.

¿Alguna vez has querido tomar una fotografía tuya, o de un amigo o ser querido, y convertirla en una ilustración chula, perfecta para un avatar de perfil de redes sociales o un retrato creativo? En este tutorial, Unmesh Dinda de PiXimperfect utilizará una sola herramienta -llamada Recorte- y sobre todo ajustando un solo deslizador, para convertir una foto suya en una ilustración de estilo vectorial. Mira el vídeo de abajo para ver el tutorial de Adobe Photoshop, o sigue leyendo para ver un resumen de cómo conseguir el efecto.


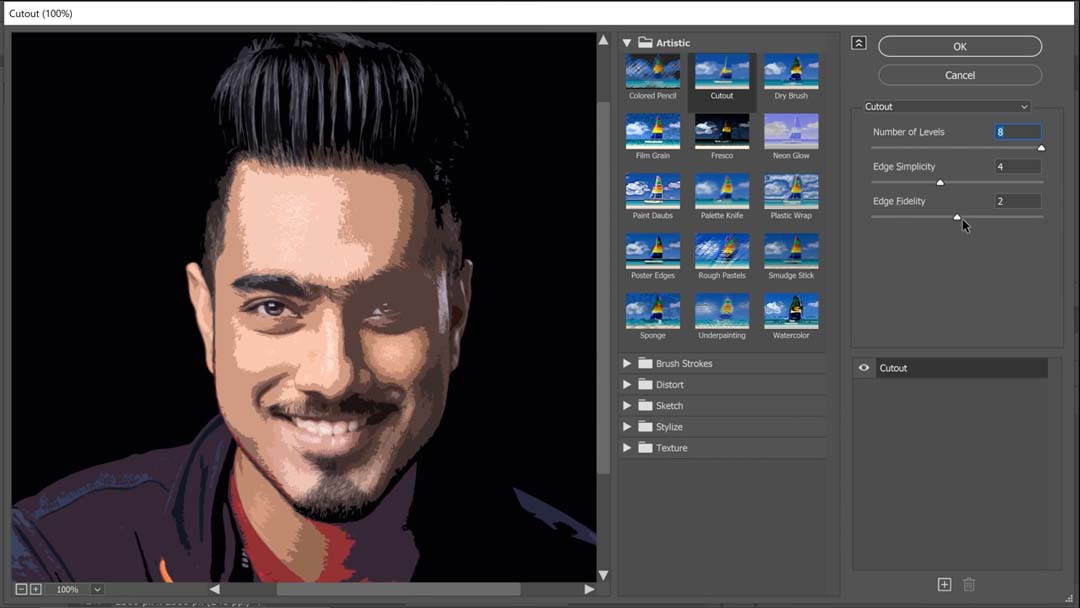
Situado en la Galería de Filtros, Recortar funciona como una versión avanzada del filtro Posterizar, con tres deslizadores: Número de Niveles, Simplicidad de los Bordes y Fidelidad de los Bordes. Éstas dictan la cantidad de detalles y la suavidad de tus bordes.

Paso 1: Objetos inteligentes

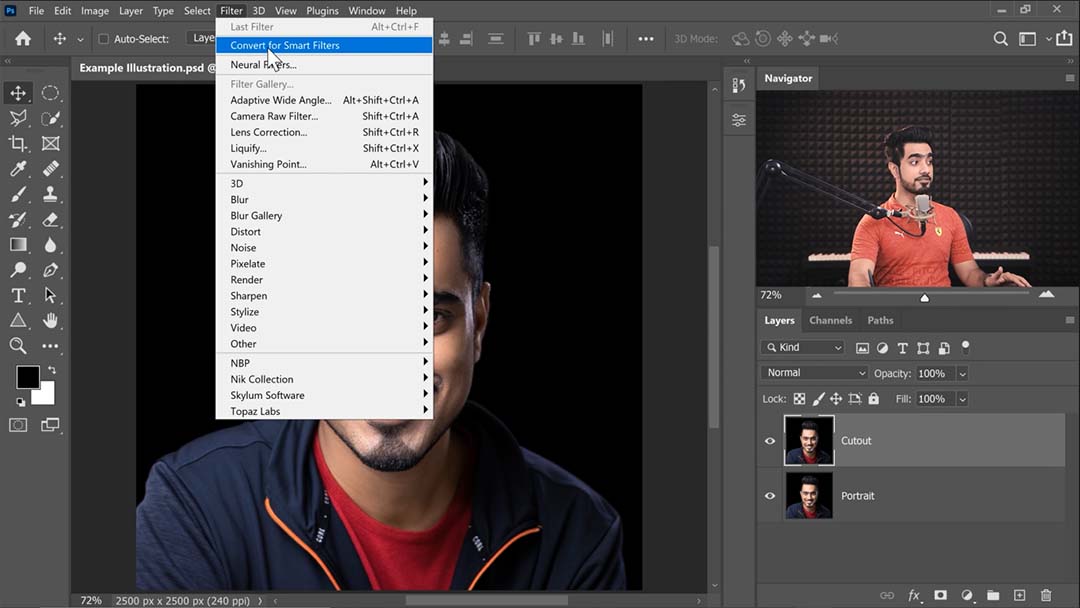
Tras abrir la imagen de origen, lo primero que hace Dinda es duplicar la capa de la imagen, luego ir al menú Filtro y seleccionar "Convertir para Filtros Inteligentes", convirtiendo la nueva capa en un Objeto Inteligente. Para los menos familiarizados con Adobe Photoshop, esto convierte la capa en un "archivo dentro de un archivo": para editarla, la abres en una ventana nueva, luego la guardas y la cierras cuando hayas terminado, como si fuera un proyecto diferente. Esto te permite crear composiciones más complejas que incluyan varias imágenes más pequeñas, manteniéndolas todas editables. Cualquier filtro aplicado a un Objeto Inteligente se aplica naturalmente como Filtro Inteligente, lo que significa que también puede ajustarse en cualquier momento.
PiXimperfect Captura de pantalla PixIllTut1

Paso 2: Aplicar el filtro Recorte

Consejo clave: Si la opción Galería de filtros aparece en gris, es porque tu imagen está en 16 o 32 bits, pero la Galería de filtros sólo puede aplicarse a imágenes en 8 bits. Puedes convertir tu imagen a 8 bits yendo a Modo Imagen > en la barra de menús y seleccionando 8 bits.

Al abrir Galería de filtros, encontrarás Recorte en la primera pestaña, Artística. Una guía de sus deslizadores:

  • Número de Niveles es el equivalente directo más cercano a Posterizar; corta tu imagen en secciones de colores planos.
  • Simplicidad en los bordes es exactamente lo que parece. Dinda describe éste como "el juego principal", convirtiéndolo en su herramienta principal para controlar la ilustración de salida.
  • La Fidelidad de los bordes, el tercer deslizador, es sobre todo un complemento de la Simplicidad de los bordes, ya que controla exactamente la cantidad de detalles finos de la imagen que el filtro intenta conservar sin dejar de reducir el número de colores. Sin embargo, esto hace que las líneas del recorte sean más complejas e irregulares, por lo que Dinda aconseja mantenerlas al mínimo para conseguir un aspecto caricaturesco.
PiXimperfect Captura de pantalla PixIllTut2

Paso 3: Recortes por capas

Dinda pasa a hacer múltiples duplicados de la imagen con filtros de recorte aplicados a distintas intensidades, desde una primera versión muy abstracta, que subraya que debes mantener lo más reducida posible sin dejar de captar el parecido, hasta variantes segunda y tercera más detalladas.

Luego crea una máscara de capa sobre estas últimas, las limpia para que no se vea nada de la capa, y con su Wacom Intuos Pro pen tablet, pinta cuidadosamente sobre las máscaras para que las imágenes más detalladas sólo se vean en las partes del rostro que quiere que queden más definidas.

Paso 4: Pintar correcciones y reflejos

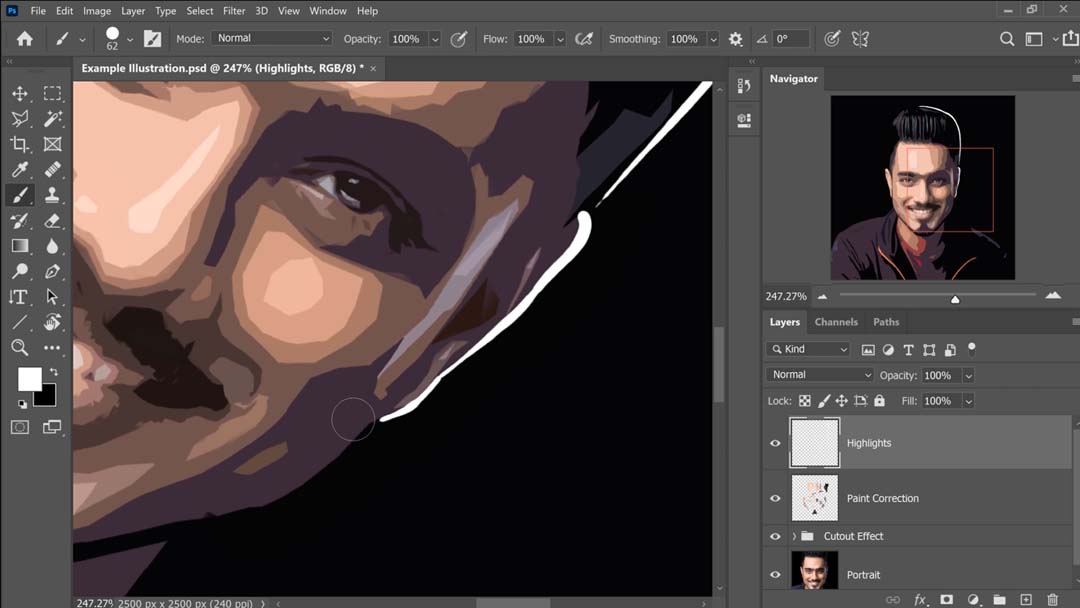
Por último, crea una nueva capa Normal y utiliza un pincel Tamaño Presión Redondo Duro para pintar resaltes en blanco y llevar la ilustración al siguiente nivel.
PiXimperfect Captura de pantalla PixIllTut3

El resultado final es un compuesto de varias versiones de la misma imagen con diferentes ajustes del filtro Recorte aplicados, y una capa adicional para añadir reflejos pintados a mano, pero tiene una coherencia perfecta:

PiXimperfect Captura de pantalla PixIllTut4

También utiliza ampliamente esta técnica en un tutorial relacionado, Transformar retratos en personajes de GTA en Photoshop, que muestra un proceso muy similar, pero con más detalles y pasos adicionales. Así que compruébalo si quieres profundizar más.

Consejo extra: Si tienes un poco de experiencia en pintura digital y quieres que tus formas queden más ordenadas, también puedes aplicar un color con cuentagotas y luego utilizar un Pincel Redondo Duro para rellenar los bordes dentados de las líneas.

CS Jones avatar

Sobre el autor

Cameron "C.S." Jones es un escritor e ilustrador afincado en West-Philly que colabora con Wacom desde hace tres años. Puedes ver más de su trabajo, incluidas la mayoría de sus contribuciones a este blog, en thecsjones.com, o seguirle en Instagram o Twitter.

Entradas relacionadas:

Making the most of your Wacom with Pablo Muñoz Gómez — Tip 10: How to Back Up Your Custom Wacom Settings

Making the most of your Wacom with Pablo Muñoz Gómez — Tip 10: How to Back Up Your Custom Wacom Settings

Making the most of your Wacom with Pablo Muñoz Gómez, Tip 9: Other Wacom devices and features

Making the most of your Wacom with Pablo Muñoz Gómez, Tip 9: Other Wacom devices and features

Making the most of your Wacom with Pablo Muñoz Gómez, Tip 8: Essential Wacom Tools for Teaching

Making the most of your Wacom with Pablo Muñoz Gómez, Tip 8: Essential Wacom Tools for Teaching

How to draw a stylized illustration in Adobe Illustrator, with Kirk Wallace aka Bone Haus

How to draw a stylized illustration in Adobe Illustrator, with Kirk Wallace aka Bone Haus

Conecta con Wacom en las redes sociales

What are your favorite Intuos Pro features? For @adam_theillustrator it's pan scroll, the three finger zoom shortcut, and the toggle display for dual monitors option ✍️✨ #intuospro #wacomtips #wacomtablet #digitalartist #digitalart #adobeillustrator
488 19
This week's giveaway is closed now. ✌️✌️✌️ Congratulations @naviecomet, you're the lucky winner. Thanks to everyone who participated. Stay tuned for this week's giveaway coming up soon! 🎉✨ December of Giveaways is HERE! ✨🎉 The holiday magic is upon us and we're ecstatic to bring you weekly giveaways throughout the month of December! 🎁 Come back every Friday for your chance to unwrap something amazing! ✨ This week, we're giving away a Wacom Movink! 🎨 Here's how to enter: 🎅 Follow @wacom and @wacomedu ❤️ Like this post 🌟 Tag a friend + your favorite creator! This week's giveaway ends 12/27 at 9 am PST. Winner will be tagged in this post and ONLY contacted through official Wacom accounts. Please be extra cautious if contacted via DM – make sure the sender is @wacom or @wacomedu before sharing any personal info. 📩 We’ll only ask for your shipping details if you win! Good luck 🍀 #Wacom #WacomForEducation #WacomGiveaway
630 420
Have you ever tried masking out a person using a mouse? 🫢 @ruthiesmagicalcamera did and it really sucked. 🤷🏻‍♀️ Ruthie likes to have full control over every single detail on her photo composites, and editing with a Wacom pen allows her to get really deep in the details, with razor sharp precision, as if she were painting over her photos 💃✍️📸🌾 Check her out trying out the new #WacomMovink! PS. The Wacom Movink is now on sale! #photoediting #photoretouch #madewithwacom #creativeprofessionals #creativesonthego #digitalphotography
421 9
Jake aka @killerrabbitmedia prefers working on a Wacom Intuos because it's easy to carry and super durable. He also loves pixel art and Asperite because it blends artistry with technical skill. There's a long tutorial video on our YouTube explaining how Jake achieved this look. Go check it out! #madewithwacom #wqcomintuos #intuos #wacomtablet #pixelart #artistsoninstagram
434 6
Enjoy this stylized illustration created by @bonehaus inspired by his recent trip to Amsterdam. ⁣ ⁣ He goes full circle, collecting inspiration and reference, sketching in #AdobePhotoshop, illustrating in #AdobeIllustrator, and then right back to #photoshop for finalizing color and texture 🔄✌️⁣ ⁣ Once in Illustrator, Kirk outlines and traces the major shapes of his sketch, then removes the lines and focuses instead on shapes and shadows. ⁣ ⁣ "I start building in more shadows and more details to help separate any of the shapes that are struggling without that outline. I like my art without a ton of outline, so I prefer the challenge of using some shadows and highlights and stuff to separate them.”⁣ - @bonehaus⁣ Head to the #WacomBlog to read the full interview! ⁣ #MadeWithWacom #WacomCintiqPro #DigitalIllustration #adobeillustrator #Photoshop
371 1
El óleo perfecto para tus ideas es tan delgado como un espejo. 🪞🌾 Descubre la magia de Wacom Movink, nuestro primer lienzo digital OLED. Video creado por la maravillosa @martinab.illustrations 🌹 #WacomMovink #creativeprofessionals #creativesonthego #tabletadigital #artedigital
503 5
📝 Managing license requests and agreements is an essential part of protecting your work as a professional artist. And in this tutorial we show you how to do it easily. Wacom Yuify allows you to easily view, approve, or reject requests, ensuring your creative rights are secured. Streamlining the process means more control over your art and less hassle. 🔒 Ready to simplify your license management? Register for free at yuify.com *Yuify Licensing is only available in selected regions and may require additional agreements for specific cases not covered by the License Builder. #WacomYuify #Yuify #CreativeRights #DigitalRightsManagement
85 2
This week's giveaway is closed now. ✌️✌️✌️ Congratulations @dumartrigali, you're the lucky winner. Thanks to everyone who participated. Stay tuned for this week's giveaway coming up soon! 🎉✨ December of Giveaways is HERE! ✨🎉 The holiday magic is upon us and we're ecstatic to bring you weekly giveaways throughout the month of December! 🎁 Come back every Friday for your chance to unwrap something amazing! ✨ This week, we're giving away a Wacom Cintiq 16! 🎨 Here's how to enter: 🎅 Follow @wacom and @wacomedu ❤️ Like this post 🌟 Tag a friend + your favorite creator! This week's giveaway ends 12/20 at 9 am PST. Winner will be tagged in this post and ONLY contacted through official Wacom accounts. Please be extra cautious if contacted via DM – make sure the sender is @wacom or @wacomedu before sharing any personal info. 📩 We’ll only ask for your shipping details if you win! Good luck 🍀 #Wacom #WacomForEducation #WacomGiveaway
933 585
Therapeutic break! Let's draw some Winnie stickers with @konistudio on a #WacomOne 13. 🧣❄️🌲 #Wacomworkspace #madewithwacom #artistsoninstagram #artistlife
716 14
How to draw fire without burning yourself 🧯🔥 @lplucas thank you for this important service. Stay cozy and stay safe out there friends ✌️ #madewithwacom #drawingtips #digitalartist #digitalart #wacomtips
152179 108
How do you keep inspired during ordinary days? @buttersketch shares a glimpse into her creative process, full of graphic novels, picture books, music, journaling and art materials. "“I really love bribing myself with new materials,” she confesses with a smile. “I think it helps my brain bypass the anxiety of starting, because now I’m focused on just playing.” - @buttersketch✌️ #Wacomworkspace #WacomMovink #creativeprofessional #artistlife #artistsoninstagram #creativeinspiration
238 2
As an artist, protecting your work can feel impossible. Watermarks distort your art, and even then, they can be removed. Many have felt the frustration of seeing creations copied without credit - and that’s why Wacom Yuify exists ✨ —it adds an invisible mark to your work, keeping it safe and traceable without compromising its beauty. 🔒 Ready to protect your art? Visit Yuify.com for more info. Now available for @escapemotions #WacomYuify #Yuify #CreativeRights #DigitalRightsManagement
154 2