Transforme uma foto em uma ilustração com apenas um filtro do Photoshop

Transforme uma foto em uma ilustração com apenas um filtro do Photoshop, com o PiXimperfect

25 de abril de 2023

Talvez você já esteja usando o Adobe Photoshop há algum tempo ou talvez esteja apenas começando. Há muitas maneiras de fazer todo tipo de edição no software, bem como todos os tipos de dicas, truques e truques para fazer as coisas de forma mais simples e fácil.

Você já quis tirar uma foto sua, de um amigo ou ente querido e transformá-la em uma ilustração interessante, perfeita para um avatar de perfil de mídia social ou uma foto de rosto criativa? Neste tutorial, Unmesh Dinda, da PixImPerfect, usará apenas uma ferramenta — chamada Cutout — e, principalmente, ajustará apenas um controle deslizante, para transformar uma foto sua em uma ilustração em estilo vetorial. Assista ao vídeo abaixo para ver o tutorial do Adobe Photoshop ou continue lendo para ver um resumo de como obter o efeito.


Encontrado na Galeria de filtros, oCutout funciona como uma versão avançada do filtro Posterize com três controles deslizantes: Número de níveis, Edge Simplicity e Edge Fidelity. Eles determinam a quantidade de detalhes e a suavidade de suas bordas.

Etapa 1: Objetos inteligentes

Depois de abrir a imagem de origem, a primeira coisa que Dinda faz é duplicar a camada da imagem e, em seguida, acessar o menu Filter (Filtro) e selecionar "Convert for Smart Filters" (Converter para filtros inteligentes), transformando a nova camada em um Smart Object (Objeto inteligente). Para aqueles que não estão familiarizados com o Adobe Photoshop, isso converte a camada em um "arquivo dentro de um arquivo": para editá-la, abra-a em uma nova janela, salve-a e feche-a quando terminar, como se fosse um projeto diferente. Isso permite criar composições mais complexas que incluem várias imagens menores, mantendo todas elas editáveis. Qualquer filtro colocado em um objeto inteligente é naturalmente aplicado como um filtro inteligente, o que significa que ele também pode ser ajustado a qualquer momento.
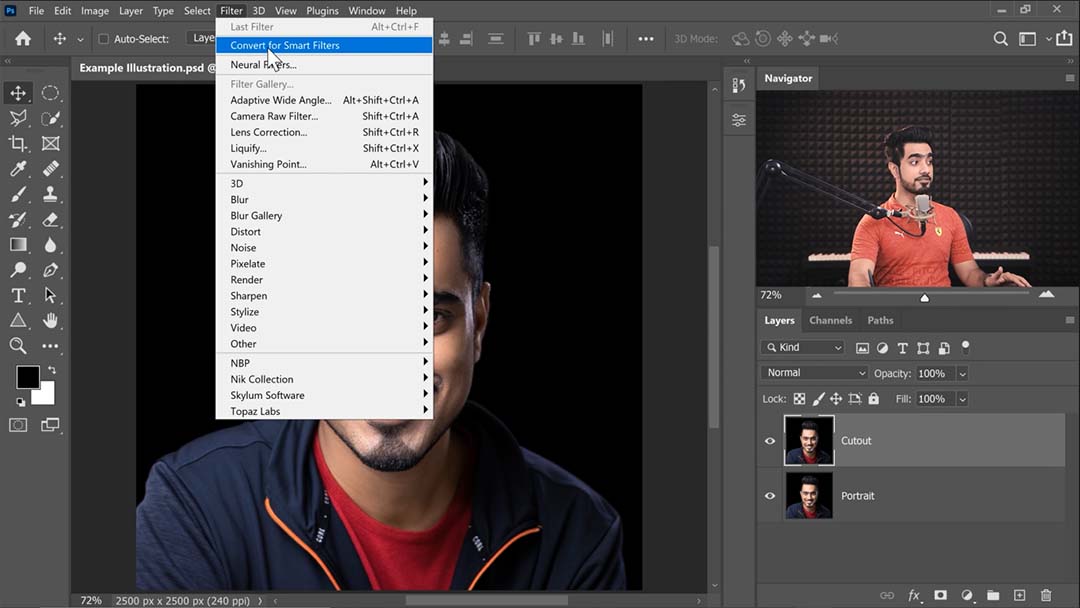
Captura de tela PiximPerfect Pixill Tut1

Etapa 2: Aplicar o filtro Cutout

Dica principal: Se a opção Galeria de filtros estiver esmaecida, é porque sua imagem está em 16 ou 32 bits, mas a Galeria de filtros só pode ser aplicada a imagens em 8 bits. Você pode converter sua imagem em 8 bits acessando o Modo Imagem > na barra de menu e selecionando 8 bits.

Ao abrir a Galeria de filtros, você encontrará Recorte na primeira guia, Artístico. Um guia para seus controles deslizantes:

  • Número de níveis é o equivalente direto mais próximo de Posterize; ele corta sua imagem em seções de cores planas.
  • Edge Simplicity é exatamente o que parece. Dinda o descreve como “o jogo principal”, tornando-o sua principal ferramenta para controlar a ilustração de saída.
  • O Edge Fidelity, o terceiro controle deslizante, é principalmente um complemento ao Edge Simplicity, controlando exatamente a quantidade de detalhes finos da imagem que o filtro tenta preservar e, ao mesmo tempo, reduzir o número de cores. No entanto, isso torna as linhas do recorte mais complexas e irregulares, então Dinda recomenda mantê-las no mínimo para uma aparência de desenho animado.
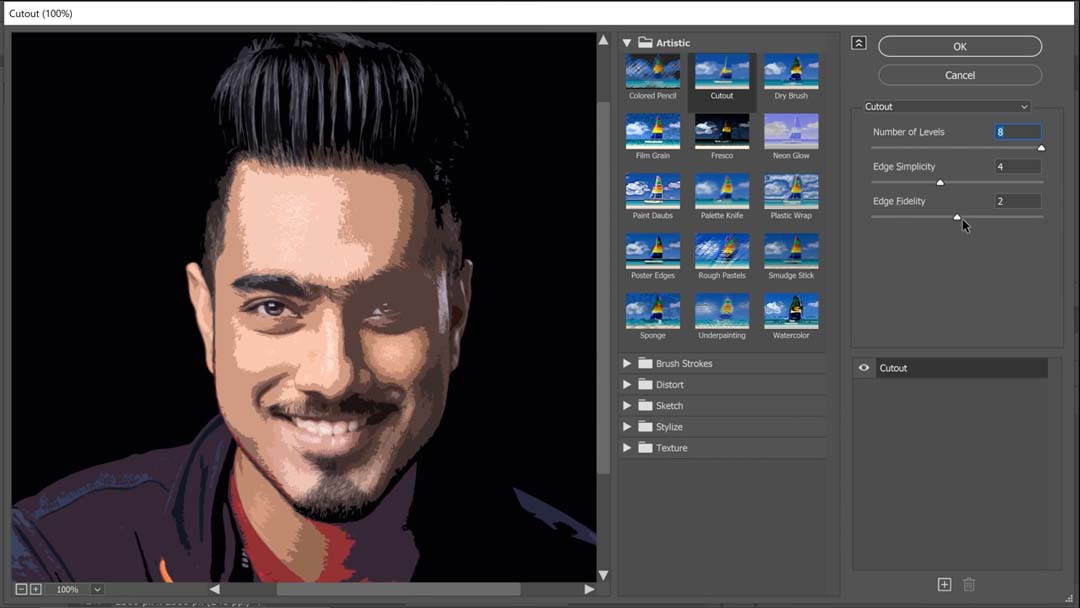
Captura de tela PiximPerfect Pixill Tut2

Etapa 3: Colocar recortes em camadas

Dinda continua fazendo várias duplicatas da imagem com filtros de recorte aplicados em diferentes intensidades, desde uma primeira versão altamente abstrata, que ele enfatiza que você deve manter o mínimo possível enquanto ainda captura a semelhança, até uma segunda e terceira variantes mais detalhadas.

Em seguida, ele cria uma máscara de camada nas últimas, limpa-as para que nenhuma camada apareça e, com sua Wacom Intuos Pro mesa digitalizadora, pinta cuidadosamente as máscaras para que as imagens mais detalhadas apareçam apenas nas partes do rosto que ele deseja que fiquem mais definidas.

Etapa 4: correções e destaques da pintura

Por fim, ele cria uma nova camada Normal e usa um pincel duro redondo de tamanho de pressão para pintar os destaques em branco e levar a ilustração ao próximo nível.
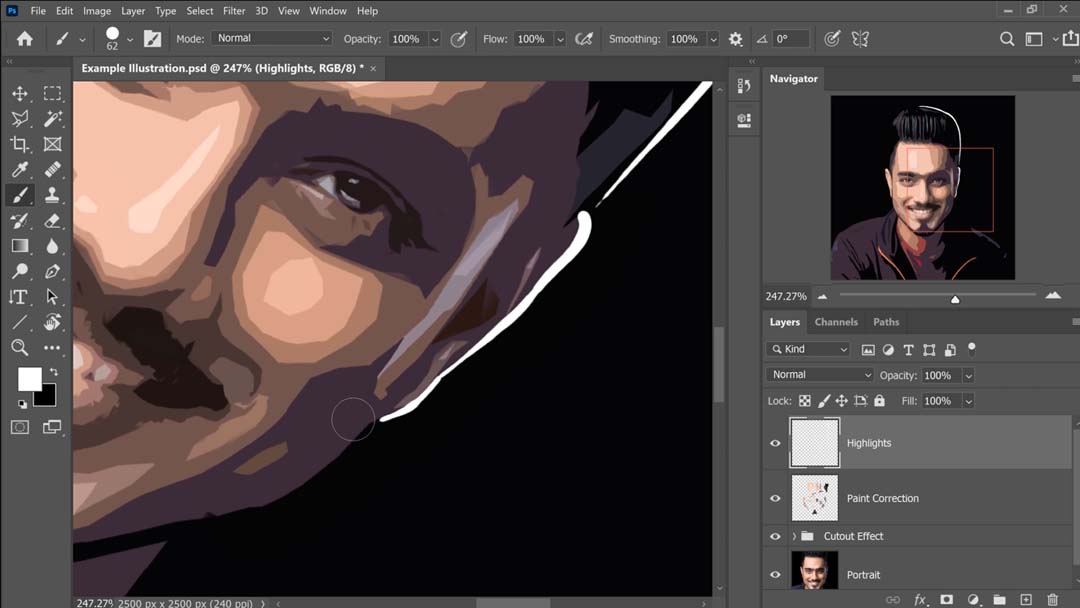
Captura de tela PiximPerfect Pixill Tut3

O resultado final é uma composição de várias versões da mesma imagem com diferentes configurações de filtro de recorte aplicadas e uma camada extra para adicionar destaques pintados à mão, mas a coerência é perfeita:

Captura de tela PiximPerfect Pixill UT4

Ele também usa essa técnica extensivamente em um tutorial relacionado, Transform Portraits to GTA Characters in Photoshop, que demonstra um processo muito semelhante, mas com mais detalhes e etapas extras. Portanto, verifique isso se quiser se aprofundar mais.

Dica extra: se você tem um pouco de experiência em pintura digital e deseja que suas formas sejam mais nítidas, você também pode usar um conta-gotas de uma cor e usar um pincel redondo rígido para preencher as bordas irregulares das linhas.


CS Jones avatar

Sobre o autor

Cameron "C.S." Jones é um escritor e ilustrador de West-Philly que contribui com a Wacom há três anos. Você pode ver mais de seu trabalho, incluindo a maioria de suas contribuições para este blog, em thecsjones.com, ou segui-lo no Instagram ou no Twitter.

Publicações relacionadas:

Making the most of your Wacom with Pablo Muñoz Gómez — Tip 10: How to Back Up Your Custom Wacom Settings

Making the most of your Wacom with Pablo Muñoz Gómez — Tip 10: How to Back Up Your Custom Wacom Settings

Making the most of your Wacom with Pablo Muñoz Gómez, Tip 9: Other Wacom devices and features

Making the most of your Wacom with Pablo Muñoz Gómez, Tip 9: Other Wacom devices and features

Making the most of your Wacom with Pablo Muñoz Gómez, Tip 8: Essential Wacom Tools for Teaching

Making the most of your Wacom with Pablo Muñoz Gómez, Tip 8: Essential Wacom Tools for Teaching

How to draw a stylized illustration in Adobe Illustrator, with Kirk Wallace aka Bone Haus

How to draw a stylized illustration in Adobe Illustrator, with Kirk Wallace aka Bone Haus

Conecte-se com a Wacom nas mídias sociais

What are your favorite Intuos Pro features? For @adam_theillustrator it's pan scroll, the three finger zoom shortcut, and the toggle display for dual monitors option ✍️✨ #intuospro #wacomtips #wacomtablet #digitalartist #digitalart #adobeillustrator
405 13
This week's giveaway is closed now. ✌️✌️✌️ Congratulations @naviecomet, you're the lucky winner. Thanks to everyone who participated. Stay tuned for this week's giveaway coming up soon! 🎉✨ December of Giveaways is HERE! ✨🎉 The holiday magic is upon us and we're ecstatic to bring you weekly giveaways throughout the month of December! 🎁 Come back every Friday for your chance to unwrap something amazing! ✨ This week, we're giving away a Wacom Movink! 🎨 Here's how to enter: 🎅 Follow @wacom and @wacomedu ❤️ Like this post 🌟 Tag a friend + your favorite creator! This week's giveaway ends 12/27 at 9 am PST. Winner will be tagged in this post and ONLY contacted through official Wacom accounts. Please be extra cautious if contacted via DM – make sure the sender is @wacom or @wacomedu before sharing any personal info. 📩 We’ll only ask for your shipping details if you win! Good luck 🍀 #Wacom #WacomForEducation #WacomGiveaway
629 420
Have you ever tried masking out a person using a mouse? 🫢 @ruthiesmagicalcamera did and it really sucked. 🤷🏻‍♀️ Ruthie likes to have full control over every single detail on her photo composites, and editing with a Wacom pen allows her to get really deep in the details, with razor sharp precision, as if she were painting over her photos 💃✍️📸🌾 Check her out trying out the new #WacomMovink! PS. The Wacom Movink is now on sale! #photoediting #photoretouch #madewithwacom #creativeprofessionals #creativesonthego #digitalphotography
420 9
Jake aka @killerrabbitmedia prefers working on a Wacom Intuos because it's easy to carry and super durable. He also loves pixel art and Asperite because it blends artistry with technical skill. There's a long tutorial video on our YouTube explaining how Jake achieved this look. Go check it out! #madewithwacom #wqcomintuos #intuos #wacomtablet #pixelart #artistsoninstagram
434 6
Enjoy this stylized illustration created by @bonehaus inspired by his recent trip to Amsterdam. ⁣ ⁣ He goes full circle, collecting inspiration and reference, sketching in #AdobePhotoshop, illustrating in #AdobeIllustrator, and then right back to #photoshop for finalizing color and texture 🔄✌️⁣ ⁣ Once in Illustrator, Kirk outlines and traces the major shapes of his sketch, then removes the lines and focuses instead on shapes and shadows. ⁣ ⁣ "I start building in more shadows and more details to help separate any of the shapes that are struggling without that outline. I like my art without a ton of outline, so I prefer the challenge of using some shadows and highlights and stuff to separate them.”⁣ - @bonehaus⁣ Head to the #WacomBlog to read the full interview! ⁣ #MadeWithWacom #WacomCintiqPro #DigitalIllustration #adobeillustrator #Photoshop
369 1
El óleo perfecto para tus ideas es tan delgado como un espejo. 🪞🌾 Descubre la magia de Wacom Movink, nuestro primer lienzo digital OLED. Video creado por la maravillosa @martinab.illustrations 🌹 #WacomMovink #creativeprofessionals #creativesonthego #tabletadigital #artedigital
502 5
📝 Managing license requests and agreements is an essential part of protecting your work as a professional artist. And in this tutorial we show you how to do it easily. Wacom Yuify allows you to easily view, approve, or reject requests, ensuring your creative rights are secured. Streamlining the process means more control over your art and less hassle. 🔒 Ready to simplify your license management? Register for free at yuify.com *Yuify Licensing is only available in selected regions and may require additional agreements for specific cases not covered by the License Builder. #WacomYuify #Yuify #CreativeRights #DigitalRightsManagement
84 2
This week's giveaway is closed now. ✌️✌️✌️ Congratulations @dumartrigali, you're the lucky winner. Thanks to everyone who participated. Stay tuned for this week's giveaway coming up soon! 🎉✨ December of Giveaways is HERE! ✨🎉 The holiday magic is upon us and we're ecstatic to bring you weekly giveaways throughout the month of December! 🎁 Come back every Friday for your chance to unwrap something amazing! ✨ This week, we're giving away a Wacom Cintiq 16! 🎨 Here's how to enter: 🎅 Follow @wacom and @wacomedu ❤️ Like this post 🌟 Tag a friend + your favorite creator! This week's giveaway ends 12/20 at 9 am PST. Winner will be tagged in this post and ONLY contacted through official Wacom accounts. Please be extra cautious if contacted via DM – make sure the sender is @wacom or @wacomedu before sharing any personal info. 📩 We’ll only ask for your shipping details if you win! Good luck 🍀 #Wacom #WacomForEducation #WacomGiveaway
932 585
Therapeutic break! Let's draw some Winnie stickers with @konistudio on a #WacomOne 13. 🧣❄️🌲 #Wacomworkspace #madewithwacom #artistsoninstagram #artistlife
716 13
How to draw fire without burning yourself 🧯🔥 @lplucas thank you for this important service. Stay cozy and stay safe out there friends ✌️ #madewithwacom #drawingtips #digitalartist #digitalart #wacomtips
152048 108
How do you keep inspired during ordinary days? @buttersketch shares a glimpse into her creative process, full of graphic novels, picture books, music, journaling and art materials. "“I really love bribing myself with new materials,” she confesses with a smile. “I think it helps my brain bypass the anxiety of starting, because now I’m focused on just playing.” - @buttersketch✌️ #Wacomworkspace #WacomMovink #creativeprofessional #artistlife #artistsoninstagram #creativeinspiration
238 2
As an artist, protecting your work can feel impossible. Watermarks distort your art, and even then, they can be removed. Many have felt the frustration of seeing creations copied without credit - and that’s why Wacom Yuify exists ✨ —it adds an invisible mark to your work, keeping it safe and traceable without compromising its beauty. 🔒 Ready to protect your art? Visit Yuify.com for more info. Now available for @escapemotions #WacomYuify #Yuify #CreativeRights #DigitalRightsManagement
154 2