

Teachers love PowerPoint. But did you know you can use your Wacom pen tablet with them? It’s a great resource to use in the classroom or for remote learning.
Use your pen tablet to create slides before lessons or transform your demonstrations whilst teaching. It’s perfect for online live and recorded classes. Simply plug in your tablet and get started.
Here’s how to make it work in your lessons.
Increase slide size
It can feel cramped handwriting on a slide, so you’ll want to maximise the space you have. Your pen tablet lets you go right to the edge of each slide. Shrink the width of the preview bar on the left hand of your screen or close it down completely.


To make even more space, minimise the top ribbon by pressing the small ^ arrow. You can still click on any of the headers to find all the menus. You’ll see the ^ arrow is replaced by a pin icon. Press it when you want to lock the ribbon back at the top of your screen.
You have control over what icons you can see when the top ribbon is closed. Go to ‘More Commands’ to create a customised quick access toolbar.
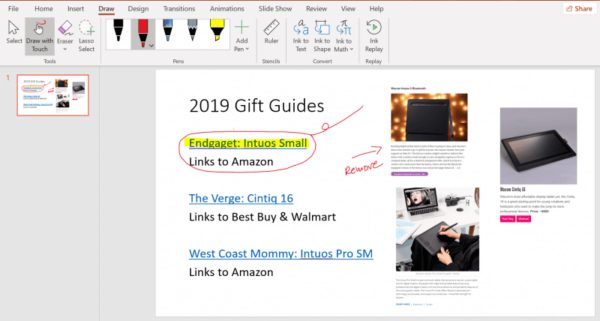
PowerPoint pen tools
To find the drawing tools on PowerPoint, plug in your pen tablet first. Look at the ribbon across the top of your screen and select the drawing option.
You’ll find lots of choices including:
- Pens
- Colour selection
- Pen thickness
- Erasure
- Select tool
- Ink to shapes
- Ink to text
- Ink to math
- Lasso select
During your lessons, capture individual student contributions or key themes using different coloured pens. It’s a straightforward way to keep and organise great ideas. Save your annotations to refer to in future classes.
Drawing and writing
It takes a little time to get used to writing with a pen tablet. If you’ve not used one before, plan time to get familiar with using it. There are plenty of handy tutorials available or check out our YouTube channel to get you started.

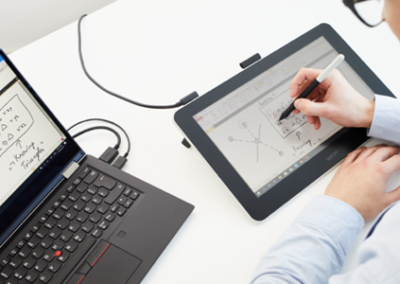
Screen tablets like the Wacom One are easy to write on because you can work straight on the built-in screen. If you’re using a non-screen model like the Wacom Intuos, it won’t take long for you to perfect your usual handwriting.
Annotating images
Have you ever found the perfect picture online, but struggled to use it with your students? Wacom makes it simple by letting you write directly over inserted images.
Use your pen tablet to:
- Highlight key words in text extracts
- Circle specific areas of a diagram
- Add extra information to graphs and tables
- Handwrite notes to add explanations
Using your pen tablet stops static images just becoming background decoration. It’s perfect for dual coding and reducing cognitive overload caused by too much writing on the screen.
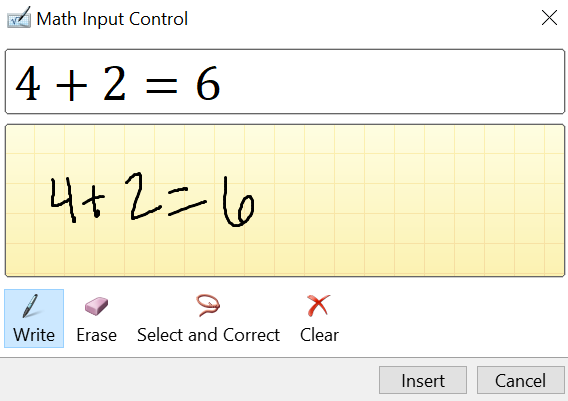
Maths lessons
Typing formulae is always a challenge. Using your pen tablet, write mathematical symbols and expressions directly onto a PowerPoint slide. To turn them into type, use the lasso icon and click ‘Ink to Math.’
The pen tools are great for drawing diagrams and graphs. You can click ‘Ink to Shape’ to convert your rough 2d shape sketches into accurate drawings.
Using your pen tablet in live lessons
Did you realize you can also write directly on your slide show whilst presenting? It’s great for keeping students engaged.
When you’re in presentation mode, the pen tools will appear at the bottom left of your screen along with the buttons to click the next and previous slides. Click on the pen button and the menu of tools appears. You’ll easily draw, highlight, and erase whilst teaching.
To stop drawing, choose the mouse arrow. Alternatively, use the laser pointer to draw attention to specific areas of the slide.
When you exit presenter mode, you can keep or discard your annotations. This means never losing the precious notes you’ve made during a lesson. Your annotations are a helpful support when you send PowerPoints home for revision or for anyone who missed your lesson.
Recording live lessons
If you’re setting remote work for learners to access in their own time, you’ll often want to share PowerPoints. The problem comes when students try to understand them. Good slide shows have small amounts of text and images on each slide, but this is an issue when students use them on their own.
Instead, video record lessons using a free program like Loom, Zoom or Microsoft Stream. Use the screen share option to show your presentation using your pen tablet to annotate and add notes as you go.
Now your students will benefit from hearing your explanation and seeing the useful notes you’re making on the slides. Upload the finished video to your favourite platform or send it home as an email attachment.
Which Wacom pen tablet should you choose?
Now you know how easy it is to use a pen tablet with PowerPoint, you just have to decide which type would suit you best, a traditional pen tablet or one with a built-in screen.

Two teacher favorites are the Wacom Intuos pen tablet and the Wacom One. Find out which would be the best fit for you. Both offer the support you need to teach effectively with PowerPoint and all your other favorite programs, including Microsoft Word and PDFs.
In summary
Wacom pen tablets are the perfect support for Microsoft PowerPoint presentations. Use them to create engaging and effective slides you can refer to for years.
In live lessons, whether at home or in the classroom, annotate and draw whilst you’re teaching. It’s ideal for showing students the process rather than static slides. Once you’ve tried using your pen tablet with PowerPoint, you won’t teach any other way.


