Escape Motions has completely outdone themselves with the newest version of their award-winning digital painting software, Rebelle 6. Want to give digital painting with Rebelle a try, but aren’t sure where to get started? Aaron Rutten has you covered!
Seattle-based artist and educator Aaron Rutten has exhibited and sold artwork globally, and shares his illustration techniques on his popular YouTube channel, which features hundreds of video tutorials that teach nearly every aspect of digital painting with Corel Painter, Corel Painter Essentials, Adobe Fresco, Rebelle, and more.
Check out these sample lessons he’s provided to help you get started on your Rebelle journey! He’ll help you understand Rebelle’s interface and tools, leaving you more confident in your digital painting abilities. This Rebelle 6 tutorial is suitable for all skill levels, too — whether you’re a beginner just getting started or are an experienced digital painter trying Rebelle out.
First launch and creating a new canvas in Rebelle 6
Opening a new creative application can be daunting and overwhelming, but with Aaron’s helpful guidance, you can get over the hurdle of what to do first and get oriented as to which tools and settings will be most helpful in getting started. The below video covers the initial software setup.
Here’s a quick outline of the first decisions you should make to begin creating a new painting in Rebelle.
- Choose your preferred language and tablet type in the Rebelle preferences. If you’re using a Wacom tablet, choose Win tab.
- Consider the canvas size, resolution, orientation, and color profile when creating a new canvas.
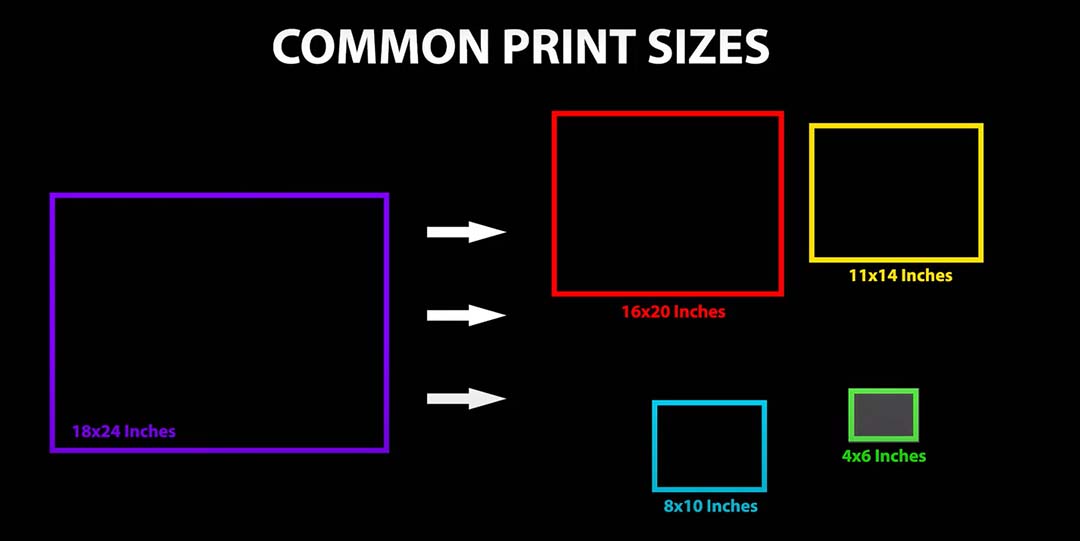
- Choose a common print size that matches standard print and frame sizes, such as 4×6, 8×10, 11×14, or 18×24.
- Set the resolution to 300 DPI for printing — though a lower resolution may be necessary for larger canvases.
- Choose a color profile, such as Adobe RGB, for the composition.
- Use the recent painting option to open a recent painting or create a new canvas.
- Disable the new artwork window if you don’t want it to appear every time you launch Rebelle.
Now that you’re set up, here’s an introduction to Rebelle’s user interface.
Setting up your Rebelle interface
In this video, Aaron compares Rebelle’s user interface to that of a desk. You can have your tools on either side, just as you can for traditional media. You can grab your paper and rotate the angle of your canvas, but because you are working digitally, you also have the freedom to customize the interface to suit your workflow. You can zoom in or out, pan or scroll, and if your tablet supports multi-touch, the navigation will feel even more intuitive. You can also arrange and resize panels, choose a scaling size for the interface, and back up the layout.
The basic navigation in the user interface involves using the Navigator to fit the canvas to the screen, hovering over buttons to see tooltips, and selecting a brush tool and color from the toolbox and color picker, respectively.
With a Wacom pen tablet or display, you can control the thickness of your lines by adjusting the amount of pressure you apply. Additionally, if you have a Wacom ExpressKey remote, or if you’re using a tablet like a Wacom Intuos Pro that has built-in ExpressKeys, you can use them to make your workflow much more efficient. With ExpressKeys, you can quickly access the tools and commands you need without having to navigate through menus or use your keyboard. It also provides a more intuitive and ergonomic way to work, as you can use it like a physical tool to control your software. This can help to reduce wrist and arm fatigue, making it more comfortable to work for extended periods of time.
This lesson touched on just the basics of navigating the user interface in Rebelle, but even with just this fundamental knowledge, you should be able to make your way around the interface and start creating amazing art!
 About the artist
Aaron Rutten is a Seattle-based visual artist who specializes in combining traditional art techniques with modern digital art tools. While he works with both traditional and digital media, he prefers to be on the leading edge of a constantly-evolving profession by embracing the latest art tools and technology.
He is currently putting most of his focus into his popular YouTube channel, where he teaches people how to make digital art. He also sells art courses on Gumroad.
If you’ve found these two sample lessons to be helpful, consider subscribing to Aaron’s complete Rebelle 6 Pro online training course! This comprehensive video course is suitable for all skill levels, and takes you through all the essential tools and features of Rebelle 6 Pro while also teaching you fundamental digital painting and illustration skills.

 About the artist