If you’ve ever dreamed of having a crash course in digital painting, here’s a video you don’t want to miss. Proko instructor Jon Neimeister, teaches you the fundamental skills, digital techniques, and a concrete process for creating compelling illustrations from initial concept to final execution.
You’ll learn about some of the pros and cons of choosing digital over traditional, get an overview of the software and hardware that you’ll need, and learn some basics on hotkeys, tools, and document settings.
By the end of this course, you should have a solid grasp of all the tools and fundamentals required for digital painting, which you can practice and improve upon throughout your entire artistic journey.
Pros and cons of digital painting
If you’re new to painting in general, or you’re a traditional artist thinking of branching out into digital, the first thing to note is that digital painting is not a shortcut and requires just as much skill as traditional painting. Some things are easier in digital painting, like making large changes to a piece halfway through the process, but some things are harder like creating organic textures and interesting brushwork.
At the end of the day, the quality of your paintings depends entirely on your creativity and fundamental skills, not what medium you choose to work with. You should also consider your career goals when deciding whether to focus more on traditional painting or digital painting. If you want to work in entertainment, like films and video games, digital painting is the standard and most clients will require you to work digitally. Entertainment pipelines require lots of flexibility, and most assets are repurposed in different ways which require the character to be separated from the background to be used somewhere else. Even if you’re primarily a traditional artist, it’s immensely helpful to have a digital workflow for putting finishing touches on your pieces and applying challenging feedback in a timely manner.
The great thing about digital art is that it has a very low barrier to entry: you don’t need a top-of-the-line computer or a huge studio space, and you don’t have to re-purchase materials when you run out. Oil paints can be expensive.

All you need to start drawing digitally is a decent computer, some digital painting software like Photoshop or Clip Studio Paint, and a pressure-sensitive drawing tablet or display like the ones I personally use from Wacom. I recommend Wacom tablets myself as I’ve been using them exclusively since I started painting digitally in 2004. Wacom tablets are also the industry standard in practically all studios and workplaces.
My personal favorite is the Wacom Cintiq, as it allows you to draw directly on the screen which I find to be much more natural and intuitive, especially if you’re used to drawing traditionally.
In this course, I’ll be using the Wacom Cintiq Pro 32, but there’s a whole variety of Wacom Cintiq sizes including the Wacom One which is more affordable if you’re just starting out with digital painting.
Some artists prefer screenless tablets like the Wacom Intuos, and they work just as well. It all comes down to your personal preference and your budget. Bear in mind that this is a tool you’ll use for many years, so it’s worth investing in a long-term solution.
Health tips for digital painters
As a digital painter, it’s very important to have an ergonomic workspace, especially if you’re working on a Cintiq. Be sure to have your chair and desk set up in such a way that you can sit comfortably upright with your feet on the floor or a footrest, and be sure you can draw on your tablet with your arms at a comfortable 90-degree angle without hunching forwards. Additionally, be sure to stand up and stretch at least once every hour or so. Throughout your day, try to do overhead stretches to flex your back.
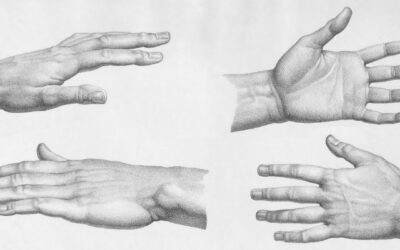
You can also stretch out your hands with this super easy exercise:

Start by extending one of your arms, grab your fingertips with your opposite hand, and pull your fingers back toward you. Just until you feel a nice stretch. Hold this for about 10 or 15 seconds, and then flip your hand the other direction, grab the back of your hand and again pull towards you just enough to feel a stretch. Repeat this with your other hand. Keeping your muscles relaxed and your joints in motion is immensely important to your health and wellbeing as an artist.
Many artists have had their careers interrupted or hindered significantly due to back and wrist pain, so for a long and healthy career, it’s just as important to take care of your body as it is to develop your painting skills.
Also try to keep your painting workday to an 8-hour maximum, as working for 10 or 12 hours a day can cause serious strain on your body and result in repetitive stress injuries.
Software and hardware tools
Now that we’ve discussed digital painting as a medium, it’s time to dive in and get a feel for the tools we’ll be using throughout the course. I’ll be using Photoshop, but virtually all digital painting software has these tools, though some are named slightly differently.
The Brush Tool
This is our primary workhorse and it will constitute 90% of our digital painting workflow. While there are other techniques that can be used to create digital art, this course will be approaching digital painting from a very traditional, hand-painted perspective, so the Brush Tool is our best friend.
The Eraser Tool
The Eraser Tool, as you might guess, allows you to erase anything on your current layer. You can use any of your Brush Tool brushes with the Eraser Tool, allowing you to erase out a variety of textures and edges.
The Eyedropper Tool
This allows us to select colors directly from our canvas and references which can then be painted with the Brush Tool. This is a great time-saver and is very useful for blending. Also, you can toggle the Eyedropper by pressing [Alt/Option] while using the Brush Tool, which allows you to switch seamlessly between the two while painting. I recommend binding this shortcut to your tablet pen.
The Smudge Tool
The Smudge Tool allows you to “smear” the pixels on your canvas as though they were soft charcoal or oil paint, which is immensely useful for blending and edge control. You can also use any of your Brush Tool brushes with the Smudge Tool, but I prefer to have a set of brushes specifically designed to work with the Smudge Tool to get the results I want.
The Zoom Tool, The Hand Tool, and the Rotate Tool
Working digitally generally requires high-resolution images, so you’ll often find yourself zooming in to work on certain parts of your painting. For this you can use the Zoom Tool [Z] to zoom, the Hand Tool [H] to pan, and the Rotate Tool [R] to rotate your canvas. Additionally, you can hold [Spacebar] at any time to use the Hand Tool to pan, and you can use [Ctrl/Cmnd + =] to zoom in and [Ctrl/Cmnd + -] to zoom out. I recommend binding all these shortcuts to your tablet buttons.
The Move Tool and Transform Tools
In addition to moving your view of the canvas, you’ll also often want to move and adjust the contents of your painting. For this we have the Move Tool [V] which moves the contents of a layer and the Free Transform tool [Ctrl/Cmnd + T] which allows you to scale, distort, and warp your layer. You can hold Shift to switch between free transform and locked ratio transform and hold Ctrl/Cmnd to skew any point freely. You can also right-click the transform box for a variety of other options, including Perspective and warp transform.
Selection Tools
The Marquee Tool [M] allows us to create square and circle selections; hold [Shift] to create a perfect circle or square. You can also set a specific aspect ratio for your selection in the options bar. The Lasso Tool [L] allows us to create organic shaped selections; either freehand using the Lasso Tool, point-by-point using the Polygonal Lasso Tool, or intelligently using the Magnetic Lasso Tool. To switch between the different modes of these tools, click and hold on the tool in the toolbar until other options appear, or hold [Shift] while pressing the tool’s hotkey repeatedly.
You can also use the Move Tool and Free Transform Tool on your selections, to only affect that specific part of the layer.
There are a lot more tools available to us for digital painting, and we will explore those in future lessons. For now these tools are more than enough to get us started and create fantastic digital artwork! A big part of being a professional artist is being able to work quickly and efficiently, and one of the advantages digital painting offers us is keyboard shortcuts. These allow you to switch between tools and perform various functions without having to dig through application menus.
Becoming familiar with your software’s hotkeys, and re-assigning the ones you use the most to convenient places, like your tablet buttons, can save you a ton of time over the course of a painting.
Most shortcuts in Photoshop are listed next to their relevant tool or function, and you can set up your own shortcuts by going to Edit -> Keyboard Shortcuts. If you ever find yourself performing a function frequently and it takes you more than a second to do it, consider making it a shortcut.
You can also assign any of your Wacom tablet buttons to perform a keyboard shortcut in your Wacom tablet properties Wacom tablets have a fantastic feature called Radial Menus. In your Wacom tablet properties, you can create a radial menu with shortcuts assigned to your most frequently-used functions, and even nest multiple radial menus within each other. You can see my radial menu here, which I use to switch between the tools and functions I use the most with just a single button on my tablet.
Some artists prefer using their keyboard to using tablet buttons, so try both and do whatever feels natural to you. Learning keyboard shortcuts and creating a custom setup that works for you can take a while, but it’s well worth it for the increase in speed and efficiency it provides. I’ve fine-tuned my shortcuts to the point that I can paint entirely without a keyboard, which speeds up my workflow significantly.

One other key feature of Wacom tablets is that you can set a custom pressure curve: that is, how hard you have to press your pen onto the tablet to reach a full opacity brush stroke. For digital painting, I highly recommend using a softer pressure curve, as it’s more like the pressure you use when painting traditionally. It will also put less strain on your wrist and prevent your tablet surface from getting scratched.
Now that we’ve familiarized ourselves with our tools, we need a canvas to actually paint on!
Understanding the basics of digital images is important to working as a digital artist, and many clients will have requirements and restrictions in regards to canvas dimensions. Press [Ctrl + N] to create a new image document, in here you will see a few parameters with the most important being width, height, and resolution.Using the dropdown boxes to the right, you can change the measurement type Photoshop uses to create your canvas. It’s wise to use the type that best fits the final application of the painting.
Most clients will give you pixel dimension requirements for your canvas, so using Pixels makes sense, but for print they may ask for Inches or centimeters, in which case switching to one of those is more appropriate. When making a new image, changing the resolution does not change the actual dimensions of your canvas, it only affects how those dimensions are translated. When changing the resolution of an existing image, the pixel data will scale with the resolution change. As far as the resolution setting of the canvas, it’s not super important. Most clients will want you to work at 300 dpi, but what really matters is the pixel dimensions. So just be sure you create a canvas large enough to paint your details comfortably without overly taxing your computer, as larger canvases require more CPU power.
I personally recommend doing final paintings no smaller than 4000px on the longest side, and my preferred resolution for a 16×9 image is 8000×4500. To improve your computer’s performance with high resolution images, Photoshop allows you to use your video card in addition to your CPU. Go to Edit -> Preferences -> Performance to enable this feature.

It also comes with some nice side benefits such as a smoother display at uneven zoom levels. Lastly, your color space should be RGB 8bit. You can go higher than 8bit, but there’s currently no practical reason to do so. It is worth noting that if you’re working for print, your final image will probably have to be CMYK. But it’s better to create your painting in RGB first then convert your final piece to CMYK before sending it to be printed.
That completes our overview of the basics we’ll need to begin painting; although these technical details aren’t the most exciting part, becoming comfortable and familiar with your tools is essential to an efficient workflow. The more mental energy you spend struggling to use your software, the less mental energy you have available for making good creative decisions. It may seem overwhelming at first, but with time and practice everything we talked about here will become second nature.
About Jon Neimeister

Jon Neimeister is a digital painter, illustrator and concept artist in the games industry for over a decade, working on IPs like SMITE, League of Legends, Hearthstone, and many others. Jon’s specialty is high-level marketing and splash style illustration. Check out his ArtStation here.
About Proko

Proko’s drawing lessons are approachable enough for beginners and detailed enough for advanced artists. Proko’s philosophy is to teach timeless concepts in an entertaining way. When you are having fun, you learn better and Proko takes pride in producing high-quality videos that you will enjoy watching and re-watching. For more, check out their website or YouTube.