Viv Le Affinity Tips Blog Post Feature image

How to get the most out of Affinity Designer with your Wacom tablet, with Vivienne Le

October 3, 2024

In this video, Iโ€™ll be sharing some tips for making the most out of Affinity Designer using the Wacom One tablet. First, Iโ€™ll go over why I prefer the drawing tablet, instead of something like the iPad. Then, Iโ€™ll walk you through my workflow using two features special to Affinity Designer.

The first is the Persona System, which lets you switch between vector and raster elements in the same document. The second is the Symbols Tool, which allows you to create reusable elements that sync in real-time for efficient style updating.

Setup

When Iโ€™m traveling and have to do my design projects, the Wacom One connected to my laptop is a great setup. I have the size M (for Medium) so itโ€™s really portable, while still feeling like a substantial surface to draw on. The tablet fits in my laptop sleeve with my 13-inch MacBook Pro. The Bluetooth connection is super easy, but I prefer using the USB-C cable for an instant link.

Why Should Designers Use a Drawing Tablet?

For my particular use case, I am 70% of the time designing for print — some kind of poster, publication, or product. This usually means a design combining 2D illustration with text. I also already remember all of my keyboard shortcuts on my Mac, so it is a lot faster and easier for me than touching through a bunch of menus. Affinity Designer is unique because itโ€™s the only program where I can switch between vector elements and raster art on the same document. This streamlined workflow is possible with Affinityโ€™s Persona System.

Viv Le Affinity Tips Image 1

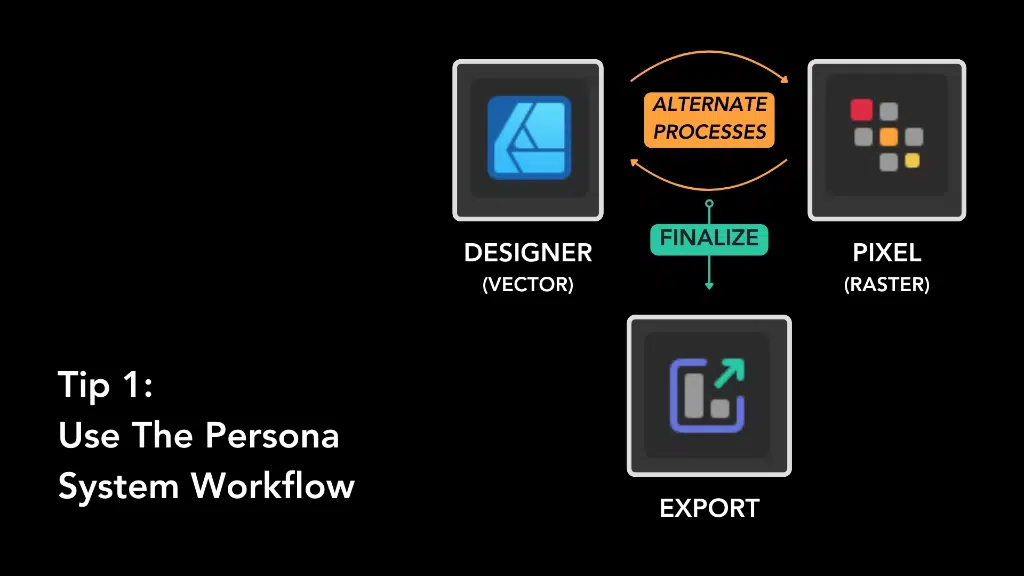
Tip 1: The Persona System – Designer, Pixel, and Export

As you can see here, there are three Personas. The Designer Persona is where you’ll spend most of your time if you’re focused on vector design, similar to how you would work in Adobe Illustrator. The tasks best suited for this persona are:

  • Creating anything with vector graphics
  • Vector-based text (This is crucial for printing sharp and clear text)
  • Using symbols and reusable elements

The Pixel Persona allows you to work with raster images directly within Affinity Designer, something that Illustrator typically requires Photoshop for. The tasks best suited for this persona are:

  • Pixel brushes; this is ideal for adding fine details or textures, or retouching
  • Working with raster images
  • Non-Destructive raster effects (blur, noise, grain, etc.)

The Export Persona helps you export in whatever file types you require for your project.

Switching Between Personas in a Design Workflow

The real power of Affinity Designer lies in the seamless integration between these two personas, allowing you to switch back and forth as needed:

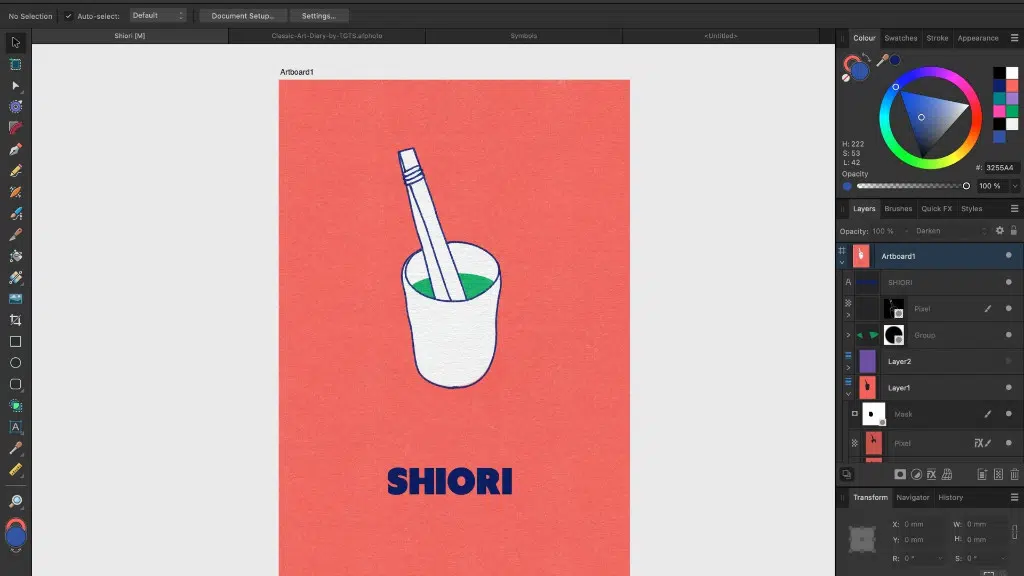
First, I start in Designer Persona. For this example, I used a personal photo of a meal I had in Berlin. I use the Vector Brush Tool to draw the spoon and teacup using the Wacom One tablet, which makes it super easy to create vector graphics from my sketches or photos.

Then, I switch to the Pixel Persona. I use a brush that mimics a risograph print, because I like the warmth that analog textures can add to digital designs. A useful shortcut to know is the keyboard brackets โ€œ [ โ€and โ€œ ] โ€ change the brush size in both personas. I can also use the masking tool to erase vector curves in the Pixel persona without actually deleting them.

This is one of the ways Affinity Designer facilitates Non-Destructive Editing, which is crucial if you ever change your mind. Now I switch back to the Designer Persona to add type for the name of the restaurant. This file is essentially print ready and can go to the Export Persona.
Viv Le Final Designer Screenshot

In short, you can use Designer Persona to use vector tools and text, then switch to Pixel Persona to add texture and fine detail. Alternate between the two before going to Export Persona to prepare it for the file type you need.

This approach allows you to combine the precision of vector graphics with the richness of raster effects, all within a single document. The ability to switch processes without exporting to another program streamlines your workflow, saving time and effort while maintaining creative control.
Viv Le Affinity Tip 2

Tip 2: Creating Symbols for Recurring Elements

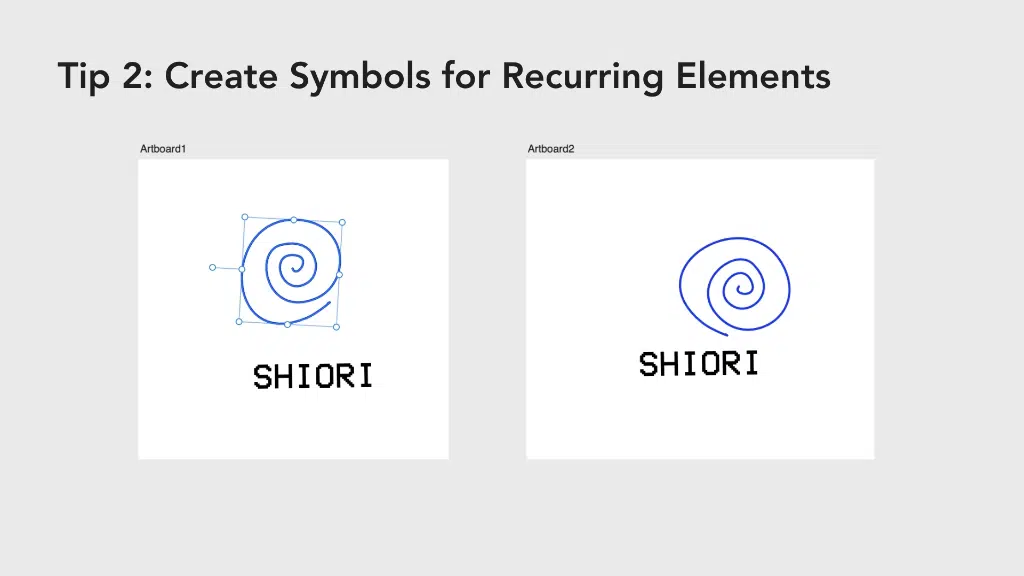
Symbols can be used for any kind of recurring element that is used in a lot of different materials. The most common is probably a logo and wordmark. Here I drew a super simple logo for the restaurant and added the wordmark below. Now you can access the Symbols panel through the top menu โ€œWindows.”

Then select each item and click Create. Now you can drag them out of the Symbols panel to duplicate that element. You can change fill color, transform the text, rotate it, etc., and every instance of the symbol will sync with your changes across artboards.

Conclusion

So whether youโ€™re an experienced artist exploring alternatives to Adobe, or a beginner learning the ropes, I hope these tips will help you use the Affinity software more efficiently so you spend more time being creative. I can highly recommend the Wacom One tablet if youโ€™re an artist with an illustration background looking to take your artwork to the next level using graphic design tools.

Affinity Designer and the Wacom One tablet are less expensive, more streamlined, and will make a lot of people satisfied for 80% of their use cases, without overwhelming you with expert features. I hope you learned something new!

Related posts:

What will be the top branding trends for 2025?

What will be the top branding trends for 2025?

Making the most of your Wacom, with Pablo Munoz Gomez – Tip 6: Creating Advanced Radial Menus

Making the most of your Wacom, with Pablo Munoz Gomez – Tip 6: Creating Advanced Radial Menus

Making the most of your Wacom, with Pablo Munoz Gomez – Tip 5: How to use ‘Precision Mode’

Making the most of your Wacom, with Pablo Munoz Gomez – Tip 5: How to use ‘Precision Mode’

Comparing Affinity vs. Adobe for designing a bookmark, with Vivienne Le

Comparing Affinity vs. Adobe for designing a bookmark, with Vivienne Le

Finance with Klarma

Shop now pay later with Klarma

Only on the US eStore

Shop now>

Connect with Wacom on social media

Black Friday Deals are here ๐Ÿ–ค๐ŸŽ๐Ÿ›’โฃ
Head to our Amazon store to discover our exclusive #BlackFriday deals. โฃ
Whether you're a beginner artist or a pro, we have something for you!โฃ
Head to the link in our bio or our stories to save! โฃ
Also check out Wacom accounts in your region to find what Black Friday exclusives we have in your area. โฃ
#christmasgifts #holiday #deals #shopping #amazon #wacomsale
77 0
Hey ๐Ÿ‘‹ Artists of Europe!

Weโ€™ve got some exciting news for you! ๐ŸŽ‰ Wacom Europe now has its very own INSTAGRAM ACCOUNT โ€” created just for YOU!

Follow @wacomeurope and get ready for:
โœจ Creative tips & tricks
๐ŸŽจ Get inspired by incredible artists
๐Ÿ“… Stay updated on local events
๐Ÿ’ก Enjoy exclusive promotions

Letโ€™s celebrate creativity together and join the Wacom community ๐Ÿš€

Follow us here ๐Ÿ‘‰ @wacomeurope 

#CreativeCommunity #WacomArtists #WacomCommunity
160 19
When the brain won't quit playing tricks ๐Ÿง ๐Ÿ‘ฏโ€โ™‚๏ธ๐Ÿ–Œ๏ธ
Switching to digital can be hard but not impossible, right @lplucas? 
What are some of the things you struggle with as you transition from analog to digital? Tell us in the comments ๐Ÿ‘‡๐Ÿผ
#madewithwacom #digitalartist #digitalart #artistsoninstagram #artistlife #wacomtablet #wacomtips
1612 15
Have you ever considered becoming a jewelry designer?ย 

As part of #CareerDevelopmentMonth, we're excited to share a handful of diverse careers among Wacom users. โœ๏ธโฃ
โฃ
Meet Quincy Vadan (@champagne_corpse), an independent jewelry designer and the artist-owner of Vadan Jewelry. Quincy shares his entire process for creating a three-piece capsule collection. His setup, including the Wacom #CintiqPro, makes it possible for him to remain completely independent and to take charge of the vast majority of his creative process.โฃ
โฃ
Head to the link in bio to watch the full video!โฃ
โฃ
#Wacom #MadeWithWacom #WacomForEducation #Jewelry #JewelryDesigner #SilverJewelry #ConnectedInk #ConnectedInk2024
147 21
Register for an amazing FREE webinar TOMORROW at 1pm PST with the amazing @aaronblaiseart! โ„๏ธ๐Ÿปโ€โ„๏ธ๐Ÿค

Learn from one of our favorite animation mentors as he walks us through the process of creating amazing animal characters like the main character of his animated short, Snowbear.ย 

Sign up through the link in our bio โ˜๐Ÿผ
#wacomwebinar #wacomconnectedink #digitalart #artwebinar
567 10
Want to learn how to create licenses for your artwork? @zeythehuman walks you through how to easily set up licenses* in Wacom Yuify, ensuring your work is protected. From using templates to customizing your own agreements, it has never been easierย  to manage your creative rights.

Ready to protect your art?๐Ÿ”‘
Register for free at Yuify.com
โ€Œ
*Yuify Licensing is only available in selected regions and may require additional agreements for specific cases not covered by the License Builder.

#WacomYuify #Yuify #CreativeRights #DigitalRightsManagement
111 1
Let's dive in with @alexferreiraa to learn how to improve our poses using the #WacomMovink and the 2D workflow to push them to the next level. Check out the full video through the link in our bio or head to @animationflow.academy YouTube channel.ย 
#animationflow #madewithwacom #characteranimation
310 4
Looking for a gift that will thrill a 7-year-old, a dad, or a co-worker? ๐ŸŽโฃ
Get them a #WacomIntuos!โฃ
โฃ
Perfect for sketching, animation, comics, photo retouching, and note-taking, it's a gift that will keep on giving. โฃ
โฃ
Now on sale on the Wacom US estore ๐Ÿท๏ธโฃ
#WacomSale
187 1
When author and @verabee had a fast deadline approaching, she was away from home and away from her usual work setup ๐Ÿ˜ฑ

Enter Wacom Movink, a truly portable and powerful pen display she could use anywhere.

Watch the full video on our YouTube to hear her full #WacomMovink review, and to see her spot illustration process. And make sure to look out for Return to Sender, publishing in 2025!
#movink #creativeprofessionals #madewithwacom
#creativesonthego #digitalart
157 0
@zeythehuman reminds us that sharing your art with the world is essential, but so is protecting it. Yuify helps artists safeguard their work and identity, so you can showcase your creativity without worry.

๐Ÿ”’ Want to know how to protect your art? Visit Yuify.com for more info. Now available for @clipstudioofficial 

#WacomYuify #Yuify #CreativeRights #DigitalRightsManagement
131 6