In this video illustrator, comic artist, and writer Obi Arisukwu, aka Obi Aris, takes you behind the scenes of his entire creation process, from start to finish. Want to see how Obi tackles concepting, thumbnailing, inking, coloring, and everything in between? He breaks it all down, highlighting the five key stages of his process: Prep, Sketch, Ink, Color Rendering, and Post Processing.
For this project, Obi puts his new Wacom Cintiq Pro 22 to the test by creating a stunning portrait of one of his favorite artists, Nikkolas Smith. Watch as he brings this piece to life with expert technique and a little bit of geeky flair. Read on for a summary of the video as well.
Step 0: Concept & Tools
I decided to use my boy Nikkolas Smith as my muse. He's a great artist and painter, and let's be honest, as artists, no one ever draws us, right? We want to be on the canvas sometimes, so why not give my boy some shine?
When I began my digital art journey, I started by using Wacom products. What makes this video so special, though, is that they blessed your boy with one of their brand-new Wacom Cintiq Pro 22 pen displays. 4K resolution, anti-glare screen, 21.5-inch LCD display – it's a sexy beast, it really is.

Step 1: Prep
Preparation is probably the most important step in the entire process. Why? Because the more thoroughly you prep, the more efficient you become. The more efficient you become, the quicker you can get through finalizing your artwork.
I begin my preparation by drawing thumbnail sketches. This gives me an idea of which route I want to go with, which sketch may be the most effective, or which one speaks to me the most. Once I pick the thumbnail sketch that speaks to me, I start gathering reference images – whether it's from Google, Pinterest, or me taking pictures myself.
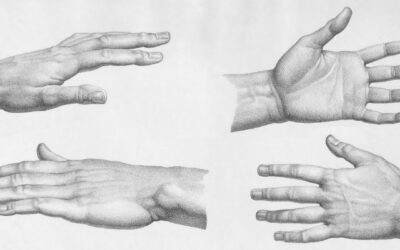
Look, I even took a picture in a turtleneck. I know I look good, but that's not the point. I really wanted to get that texture and see the way those lines flowed in the sweater so I could incorporate those details into the artwork.

Then, I warm up, mainly by doing quick poses – one-minute sketches, about 10 of them – to kind of warm up my wrist and get them going. Now, as you can see, this initial sketch isn't the one that I went with. I decided to go in a whole different direction.
This direction was combining Nick with one of the greatest artists that ever walked this earth. And no, not Michelangelo – Bob Ross. They're both painters; it just makes sense. So, I went back to the drawing board and started tinkering with thumbnail sketches again, gathering my references. I ended up choosing the Bob Ross pose that I felt was more iconic when it comes to photographs of him. Then, I went back to drawing my one-minute poses to warm up my wrist. After that, I moved on to stage two: sketching.
Step 2: Sketching
The software program I use for my digital art is Clip Studio Paint. I love it. I think it's one of the best software programs for artists. It has many tools and features that really help with digital art.

My initial sketch is very, very rough. It's just so I can get the framing, the skeleton, whatever you want to call it. I'm making adjustments along the way and continue making adjustments throughout the process. After the very rough sketch, I do a rough sketch, but this one is a little more detailed. I'm able to place more of the volume, the way the shirt folds, the face, the hair, and all those things. Then, I move on to the main sketch. I like my underlining sketches to be in color while my main sketch is in black. This keeps the sketches from looking muddy, and I can tell the difference between the main and the roughs.
Step 3: Inking
Next is inking. I'm very limited in the brushes I use. I only use like three – just give me my G-pen, move out of my way, and let me get to work! That simple. Just look at the way this pen glides across this Cintiq Pro surface – so smooth.
When it comes to inking, don't worry about perfection. Perfection will kill you, figuratively. Those "mistakes" that only you can see, that no one else can tell? They don't mean anything. Once I started getting out of my head and realizing, "Hey, just go for it," I didn't care if the line matched the sketch. I didn't care if it didn't look like the work of the artists I admire. I'm not erasing. I'm just going to go for it. Well, I still erase, but not as much. The more I started doing that, the faster I got. And I realized these mistakes are actually beautiful.

And of course, you gotta do the horizontal flip. It lets you see the mirror image of what you're working on and figure out what looks weird and what looks off. These eyes? They look wonky as heck. But thanks to the horizontal flip, I can see the error, and I'm going to fix it. I promise you I will.
Step 4: Coloring and rendering
Stage four is coloring and rendering. The beginning of this process is laying down the flat colors. I went with a blue background. When you're drawing people, you want that focal point to be the face, and Nick's skin tone is primarily in the orange family. This allows the skin tone, the face, and everything to pop out on that blue background.
When I'm coloring, I use different methods and techniques to get all the colors together. When the flats are done, I move to shading. One process I use for shading is mapping out where the shadows will go. Honestly, this isn't the best idea – I should have just filled everything in and then cut out the negative shapes. It's a lot easier that way.

The technique I'm using for rendering the shadows is called cel shading. Instead of using one color and setting that layer on multiply for the entire subject, cel shading is when you take each color individually and adjust its value so that it has its own shade and color. I also do the same for the highlights.
Step 5: Post
We've reached the end of the process – stage five: post. Just like with post-production in movies, where you see what needs to be fixed, cleaned up, added, or removed, I do the same with my artwork. I step away, do some push-ups, save a cat from a tree, then come back with fresh eyes. I make adjustments, balance colors, adjust brightness and saturation, and make sure my dang signature can be seen.
And when it's all said and done, we have the final product: Nicholas Smith as Bob Ross – a.k.a. Nick Ross.

That's my process. Keep creating. Peace!

About the artist
Obi Arisukwu, aka Obi Aris, is an illustrator, comic artist, and writer, as well as a "geek, and cartoon lover," out of Houston, TX now based in Los Angeles.
Follow his work at his website or on Instagram, X (Twitter), or Facebook.