Baby Blues comic strip and its journey to digital

June 7, 2021

I’ll admit, when Wacom came out with display tablets, I couldn’t see ever switching to digital art for drawing Baby Blues, the syndicated comic strip I co-created with Jerry Scott. I was a pencil & paper guy—I liked the feel of pencil on paper.

Over the nearly twenty-five years I’d been drawing the strip, I’d changed materials a few times: Prismacolor to Faber-Castell Polychromos to a combo of Pitt Artist Pens and Polychromos, to lead holders and thick leads to Palomino Blackwings. I love pencil. I love the texture and nuance of the line. What I didn’t love was turning that into something digital as our method of delivery changed from frantic drop-offs at FedEx to modems and then the internet.

Through experimentation, my best reproduction method for newspaper was to spray the strip with hairspray (less toxic than fixative to stop pencil smears), make a photocopy (I had an 11×17 Minolta), then scan on my same size HP scanner, followed by a bunch of time cleaning up the scans and straightening the strips so I could apply the final touches of resizing and adding the Photoshop halftone screens that replaced the old Zip-a-tone dot films we used to use. Whew!

I had been using Wacom Intuos tablets for years to do Photoshop and Illustrator work, but never considered drawing the strip on the computer. All that changed at a breakfast in December 2014 in Columbus, Ohio with some cartoonist friends. Hilary Price, creator of Rhymes with Orange, had brought her Wacom Cintiq Companion, the first mobile Wacom computer display. She passed it around for all of us to try. We were a group of diehard paper lovers. Once I had my hands on it, I received an epiphany. I could see shedding myself of the copy machine and all of its paper waste, no more touching up scans—two big steps taken out of my workflow completely! And storage! I would never have to worry about where to put the stacks of strips. We had twenty-five year’s worth of originals. Was it necessary to have more than that?

Once I received my Cintiq Companion, I set out trying to replicate my pencil style in Photoshop, creating new brushes and tweaking them. Each iteration, I would send a drawing to Jerry to see if he could tell the difference between a Baby Blues drawing in real pencil and one done in Photoshop. Eventually, he couldn’t tell, and I was off to the digital races.

The copier? Gone, which opened up studio floor space. Next, the big expensive scanner. I was free.

What I didn’t count on was that Windows and I would never get along. I’d always been a Mac user. My first digital illustration was on an original Mac in 1984. I’d done a lot of freelance work with Fractal Design’s Painter and Adobe’s Photoshop and Illustrator.

After a year or so of using the Cintiq Companion as a standalone computer/display tablet, I couldn’t take the spontaneous disappearance of functions like Bluetooth, the inopportune times it decided to update itself, even though I’d set it not to. Windows glitches caused hours of down time and frustration. I bought a MacBook Pro and got the connector kit to work with the Companion. We were happy, for a while. We went for long periods without incident. The display was good, but not super sharp, and the screen was showing signs of wear in places where I drew frequently.

Then I heard about Wacom’s latest computer pen display, the MobileStudio Pro, and saw one in person. It was magnificent. The display is gorgeous, larger than the Companion’s and more suited to a comic strip. It’s sharp and the colors beautifully bright. The screen is a dream to draw on.

Digital desktop

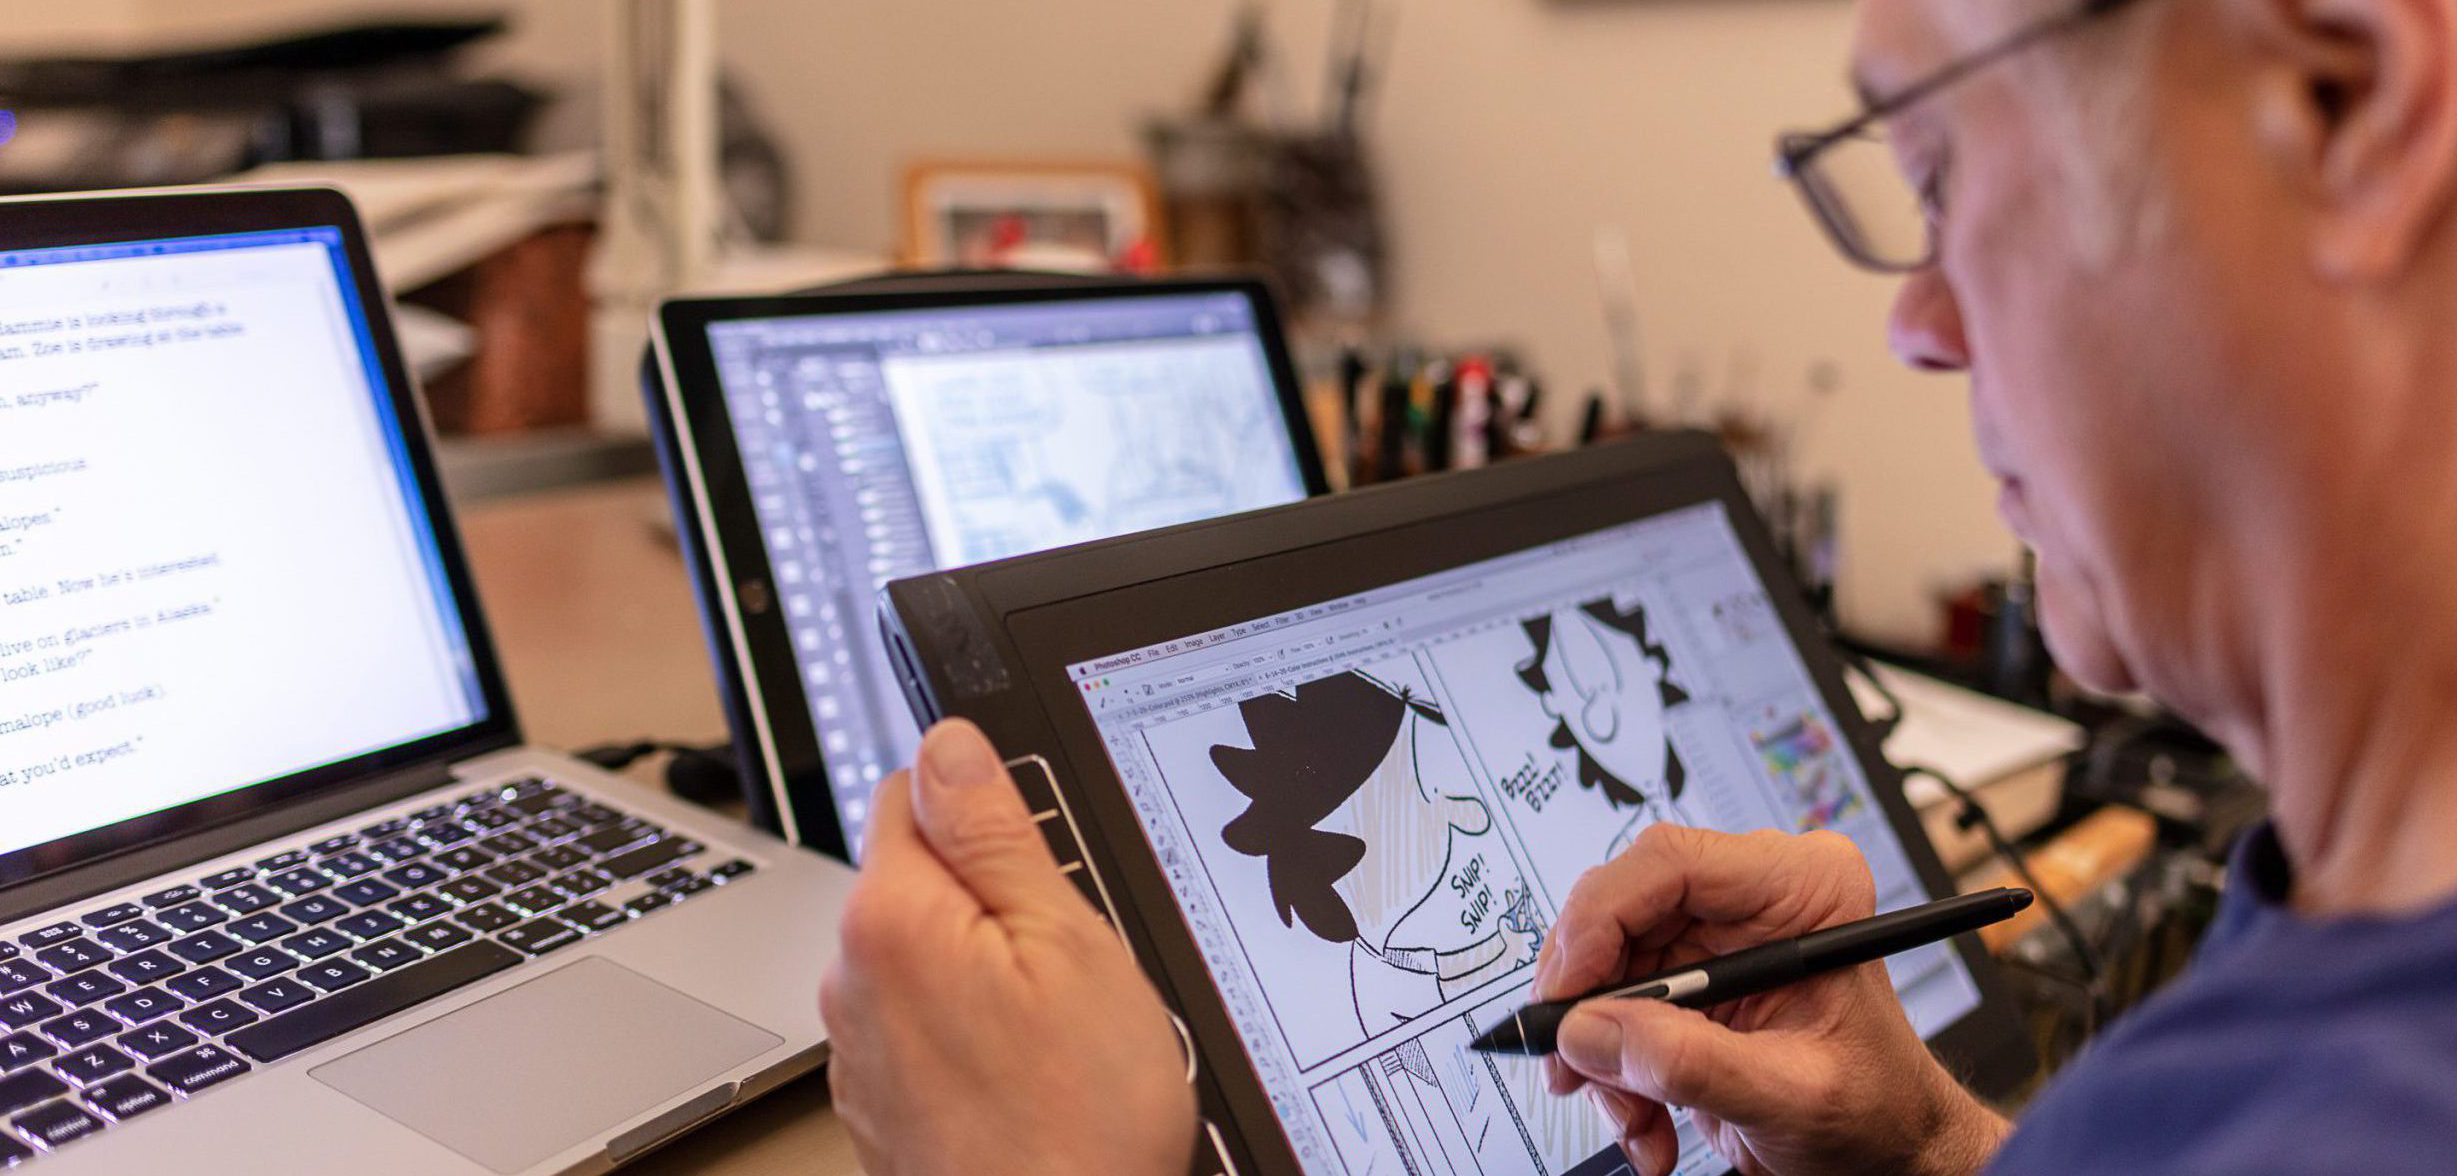
My home set up with the MobileStudio Pro

I still use a similar workflow that I used with the Companion. I draw the roughs in Clip Studio Paint, using a pen tool in a color similar to the non-photo blue pencil that I’d used for decades. I email the roughs to Jerry for last minute edits and suggestions. After that, I switch to a customized set of five pencil tools that I’ve tweaked (based on the Pastel tool). Using the custom pencils, I draw the strip.

I have templates, complete with lettering guidelines and different panel configurations in non-photo blue on different layers.

The process of drawing the finished daily strip:

Step 1: Letter dialogue with a dedicated pencil tool, sometimes switching to drawing pencil tools for lettering that is larger or with more character. I letter all of the strips, one after the other, so I can stay in the lettering zone, and not interrupt it with drawing.

Step 2: I draw each strip straight through, starting with the dialogue balloons, then all characters on one layer.

Step 3: Then, depending on the difficulty of drawing backgrounds or objects, I may draw those on a separate layer.

Step 4: Shading. On a separate layer, I’ll draw the shading, using a different pencil tool made just for that. It has a softer line. I use that for single line shading and crosshatching.

Step 5: Then borders. CSP allows your tool to follow guidelines with your pen tool line, so my border lines have a pencil look. I have a pre-made hand lettered copyright/web site lines that I copy and paste into the gutters of panels.

Step 6: Sign the strip.

Sunday Wacom MSP closeup

Up close with Sunday’s comic strip

Once all the strips are done and saved as Photoshop files, I go into Photoshop and convert them to the correct final size, Bitmap, using Actions I’ve saved for these steps. I copy the B&W versions of the strips and then convert back to Grayscale to add gray tones, then I convert to halftone dots at the end.

This leaves me with two versions of each strip, one with halftone dots, one without. The non-halftone dotted strips are for the syndicate’s colorist to use for coloring, because I don’t like color being applied over black halftone dots. It gives us a cleaner look in the paper and online.

The Sunday strip is done essentially the same way, with the exception that I have my own colorist, Deborah McGarry, who colors the Sunday strip based on my custom palette for Baby Blues. After she works her magic, I do any tweaking of color, add any special effects I might want, and convert the files in Photoshop for delivery to the syndicate.


Then I start all over again.

Related posts:

How to draw a stylized illustration in Adobe Illustrator, with Kirk Wallace aka Bone Haus

How to draw a stylized illustration in Adobe Illustrator, with Kirk Wallace aka Bone Haus

How To Draw Polar Bears, with Legendary Animator Aaron Blaise

How To Draw Polar Bears, with Legendary Animator Aaron Blaise

The best storyboarding classes on Skillshare

The best storyboarding classes on Skillshare

Explore Creativity Without Boundaries: Wacom Announces General Availability of Wacom Bridge with AWS  

Explore Creativity Without Boundaries: Wacom Announces General Availability of Wacom Bridge with AWS  

Connect with Wacom on social media

🎉✨ December of Giveaways is HERE! ✨🎉

The holiday magic is upon us and we're ecstatic to bring you weekly giveaways throughout the month of December! 🎁 Come back every Friday for your chance to unwrap something amazing! ✨

This week, we're giving away a Wacom Movink! 🎨 

Here's how to enter:

🎅 Follow @wacom and @wacomedu

❤️ Like this post

🌟 Tag a friend + your favorite creator!

This week's giveaway ends 12/27 at 9 am PST. Winner will be tagged in this post and ONLY contacted through official Wacom accounts. Please be extra cautious if contacted via DM – make sure the sender is @wacom or @wacomedu before sharing any personal info. 📩 We’ll only ask for your shipping details if you win!

Good luck 🍀 #Wacom #WacomForEducation #WacomGiveaway
353 225
Have you ever tried masking out a person using a mouse? 🫢 @ruthiesmagicalcamera did and it really sucked. 🤷🏻‍♀️
Ruthie likes to have full control over every single detail on her photo composites, and editing with a Wacom pen allows her to get really deep in the details, with razor sharp precision, as if she were painting over her photos 💃✍️📸🌾
Check her out trying out the new #WacomMovink! 

PS. The Wacom Movink is now on sale! 

#photoediting #photoretouch #madewithwacom #creativeprofessionals #creativesonthego #digitalphotography
284 7
Jake aka @killerrabbitmedia prefers working on a Wacom Intuos because it's easy to carry and super durable. He also loves pixel art and Asperite because it blends artistry with technical skill. There's a long tutorial video on our YouTube explaining how Jake achieved this look. Go check it out! 
#madewithwacom #wqcomintuos #intuos #wacomtablet #pixelart #artistsoninstagram
359 6
Enjoy this stylized illustration created by @bonehaus inspired by his recent trip to Amsterdam. ⁣
⁣
He goes full circle, collecting inspiration and reference, sketching in #AdobePhotoshop, illustrating in #AdobeIllustrator, and then right back to #photoshop for finalizing color and texture 🔄✌️⁣
⁣
Once in Illustrator, Kirk outlines and traces the major shapes of his sketch, then removes the lines and focuses instead on shapes and shadows. ⁣
⁣
"I start building in more shadows and more details to help separate any of the shapes that are struggling without that outline. I like my art without a ton of outline, so I prefer the challenge of using some shadows and highlights and stuff to separate them.”⁣
- @bonehaus⁣

Head to the #WacomBlog to read the full interview! 
⁣
#MadeWithWacom #WacomCintiqPro #DigitalIllustration #adobeillustrator #Photoshop
324 1
El óleo perfecto para tus ideas es tan delgado como un espejo. 🪞🌾
Descubre la magia de Wacom Movink, nuestro primer lienzo digital OLED. 
Video creado por la maravillosa @martinab.illustrations 🌹
#WacomMovink #creativeprofessionals #creativesonthego #tabletadigital #artedigital
455 4
#WacomSale⁣
The festive season is upon us, and adventure calls! 🏁✈️🌎⁣
Unleash your creativity anywhere with a #WacomMovink.⁣
Shop now through the link in our bio!⁣
120 2
📝 Managing license requests and agreements is an essential part of protecting your work as a professional artist.

And in this tutorial we show you how to do it easily.

Wacom Yuify allows you to easily view, approve, or reject requests, ensuring your creative rights are secured. Streamlining the process means more control over your art and less hassle.

🔒 Ready to simplify your license management? Register for free at yuify.com

*Yuify Licensing is only available in selected regions and may require additional agreements for specific cases not covered by the License Builder.

#WacomYuify #Yuify #CreativeRights #DigitalRightsManagement
77 2
This week's giveaway is closed now. ✌️✌️✌️
Congratulations @dumartrigali, you're the lucky winner. 
Thanks to everyone who participated.

Stay tuned for this week's giveaway coming up soon! 

🎉✨ December of Giveaways is HERE! ✨🎉

The holiday magic is upon us and we're ecstatic to bring you weekly giveaways throughout the month of December! 🎁 Come back every Friday for your chance to unwrap something amazing! ✨

This week, we're giving away a Wacom Cintiq 16! 🎨 

Here's how to enter:

🎅 Follow @wacom and @wacomedu

❤️ Like this post

🌟 Tag a friend + your favorite creator!

This week's giveaway ends 12/20 at 9 am PST. Winner will be tagged in this post and ONLY contacted through official Wacom accounts. Please be extra cautious if contacted via DM – make sure the sender is @wacom or @wacomedu before sharing any personal info. 📩 We’ll only ask for your shipping details if you win!

Good luck 🍀 #Wacom #WacomForEducation #WacomGiveaway
917 580
Therapeutic break! 
Let's draw some Winnie stickers with @konistudio on a #WacomOne 13. 🧣❄️🌲
#Wacomworkspace #madewithwacom #artistsoninstagram #artistlife
683 13
How to draw fire without burning yourself 🧯🔥
@lplucas thank you for this important service. 
Stay cozy and stay safe out there friends ✌️
#madewithwacom #drawingtips #digitalartist #digitalart #wacomtips
140899 104
How do you keep inspired during ordinary days? 
@buttersketch shares a glimpse into her creative process, full of graphic novels, picture books, music, journaling and art materials. 

"“I really love bribing myself with new materials,” she confesses with a smile. “I think it helps my brain bypass the anxiety of starting, because now I’m focused on just playing.”
- @buttersketch✌️
#Wacomworkspace #WacomMovink #creativeprofessional #artistlife #artistsoninstagram #creativeinspiration
231 2
As an artist, protecting your work can feel impossible. Watermarks distort your art, and even then, they can be removed.

Many have felt the frustration of seeing creations copied without credit - and that’s why Wacom Yuify exists ✨ —it adds an invisible mark to your work, keeping it safe and traceable without compromising its beauty.

🔒 Ready to protect your art? Visit Yuify.com for more info. Now available for @escapemotions 

#WacomYuify #Yuify #CreativeRights #DigitalRightsManagement
150 2