Tristan in Harvest Header

4 Ways Boris FX Optics can bring your cosplay photos to life

August 23, 2022

A lot of creatives are heading back to conventions like Comic-Con this summer, so there’s no better time than now to mention that the Wacom Intuos comes with a full-year free trial of Boris FX Optics.

Boris is best known for a suite of video effects programs that helped make films like Infinity War, Avatar, Interstellar, and similar blockbusters. Boris FX Optics adapts their tools to still photography, letting you make fire, fog, lightning, explosions, and a host of other effects you’d normally need stock images for, in either a standalone program or as a Photoshop plugin.

From the time I first heard about it, I was struck by how particularly useful it sounded for cosplay photography: if making fire with a click of a button sounds like magic, that’s because spell-crafting is one of Boris’ specialties – along with the rest of the lighting, background replacement, and color grading it takes to give a cosplay shoot next-level production values.
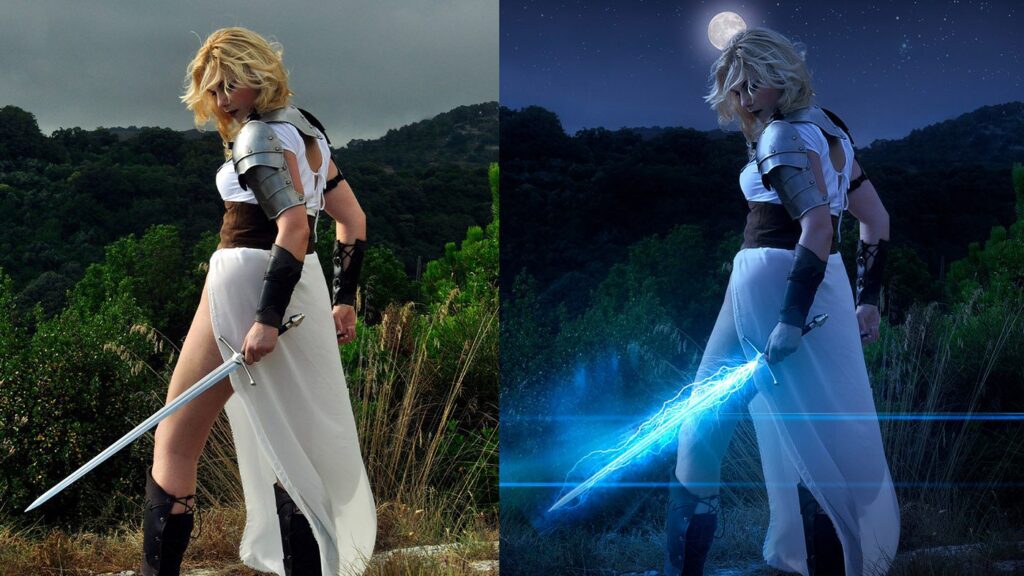
fantasy sword image edited with boris fx optics

Imagine a program made entirely of Photoshop’s adjustment layers: Create one, click an effect to add it, tweak its settings, repeat until you have a composite effect, then save and export. That’s all there is to using Optics, really. It’s as user-friendly as effects programs get, perfect for those new to photo manipulation.

But that simple framework unfolds to reveal massive complexity: its 160 tools come with a combined 1,700 presets, and most have long menus that let you tune every property. 

Unfortunately, it’s been years since I’ve shot photos at a con, but I had to pull out some of my old cosplay photos to try it myself. Here are just a few examples, grouped by what cosplay photographers can use them for:

1. Change backgrounds in a flash

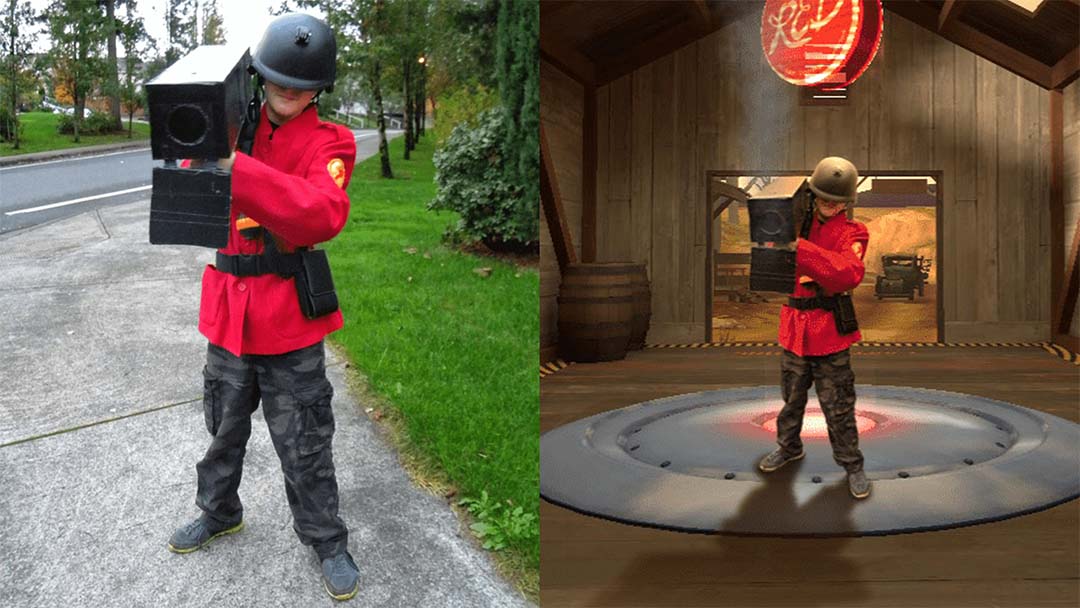
Although Boris FX Optics is known for visual effects, the Photoshop plugin also comes with a smart masking tool that can cut subjects out of backgrounds in a sliver of the time it takes manually.

If you can get shots with decent color separation between your subject and background, you can take them straight from the con to wherever you want — without having to worry about masking out each spike of hair.
Tristan Cosplay Boris FX
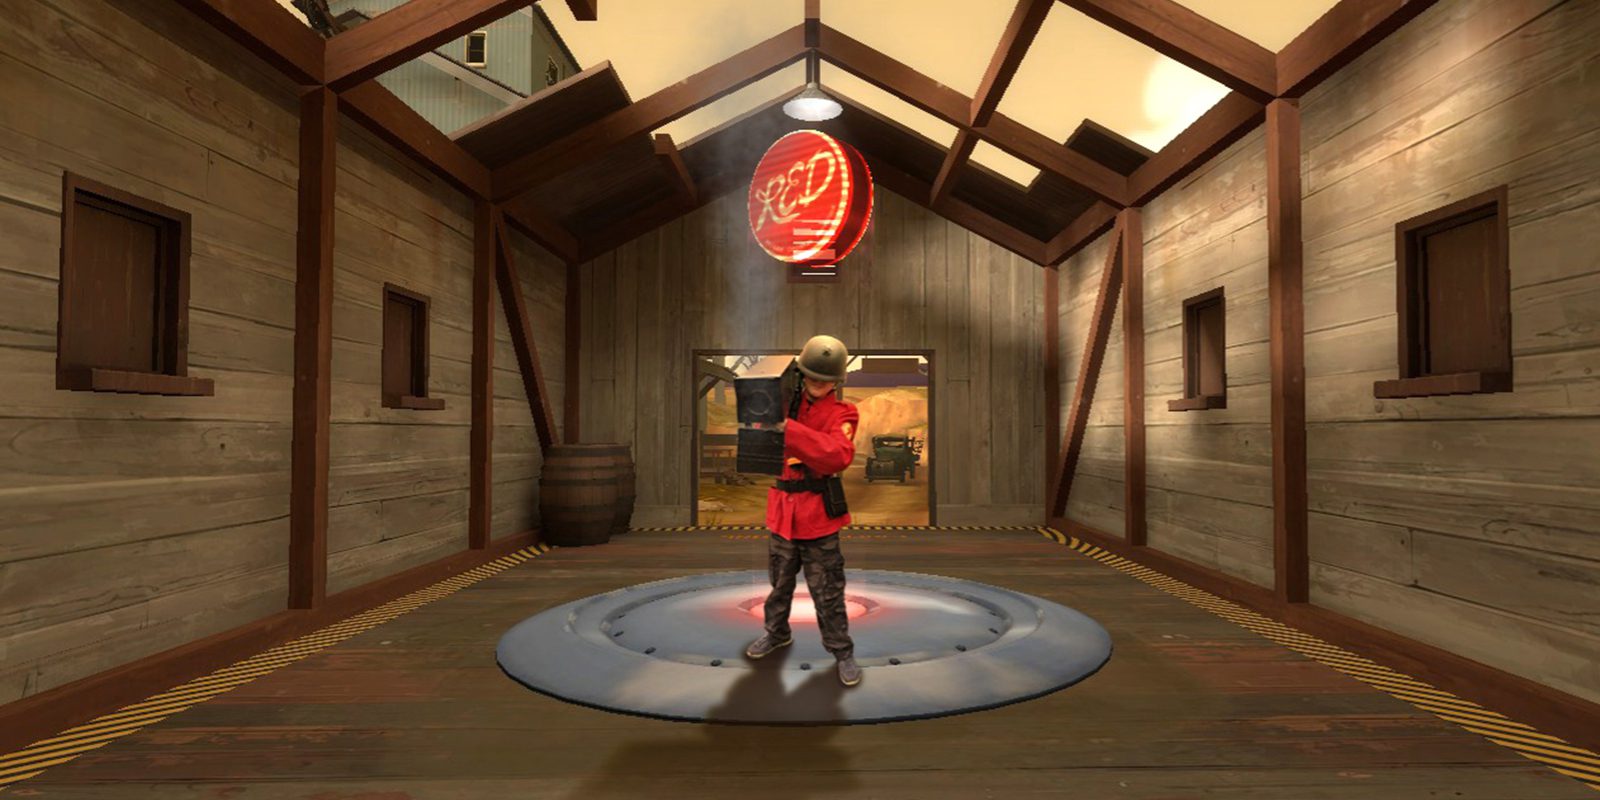
Wacom manager Pamela Park’s son’s Dragon Con 2018 cosplay. Screenshot from Team Fortress 2, compositing and drop shadow in Photoshop, everything else done in Boris FX Optics.

2. Correct colors with a click

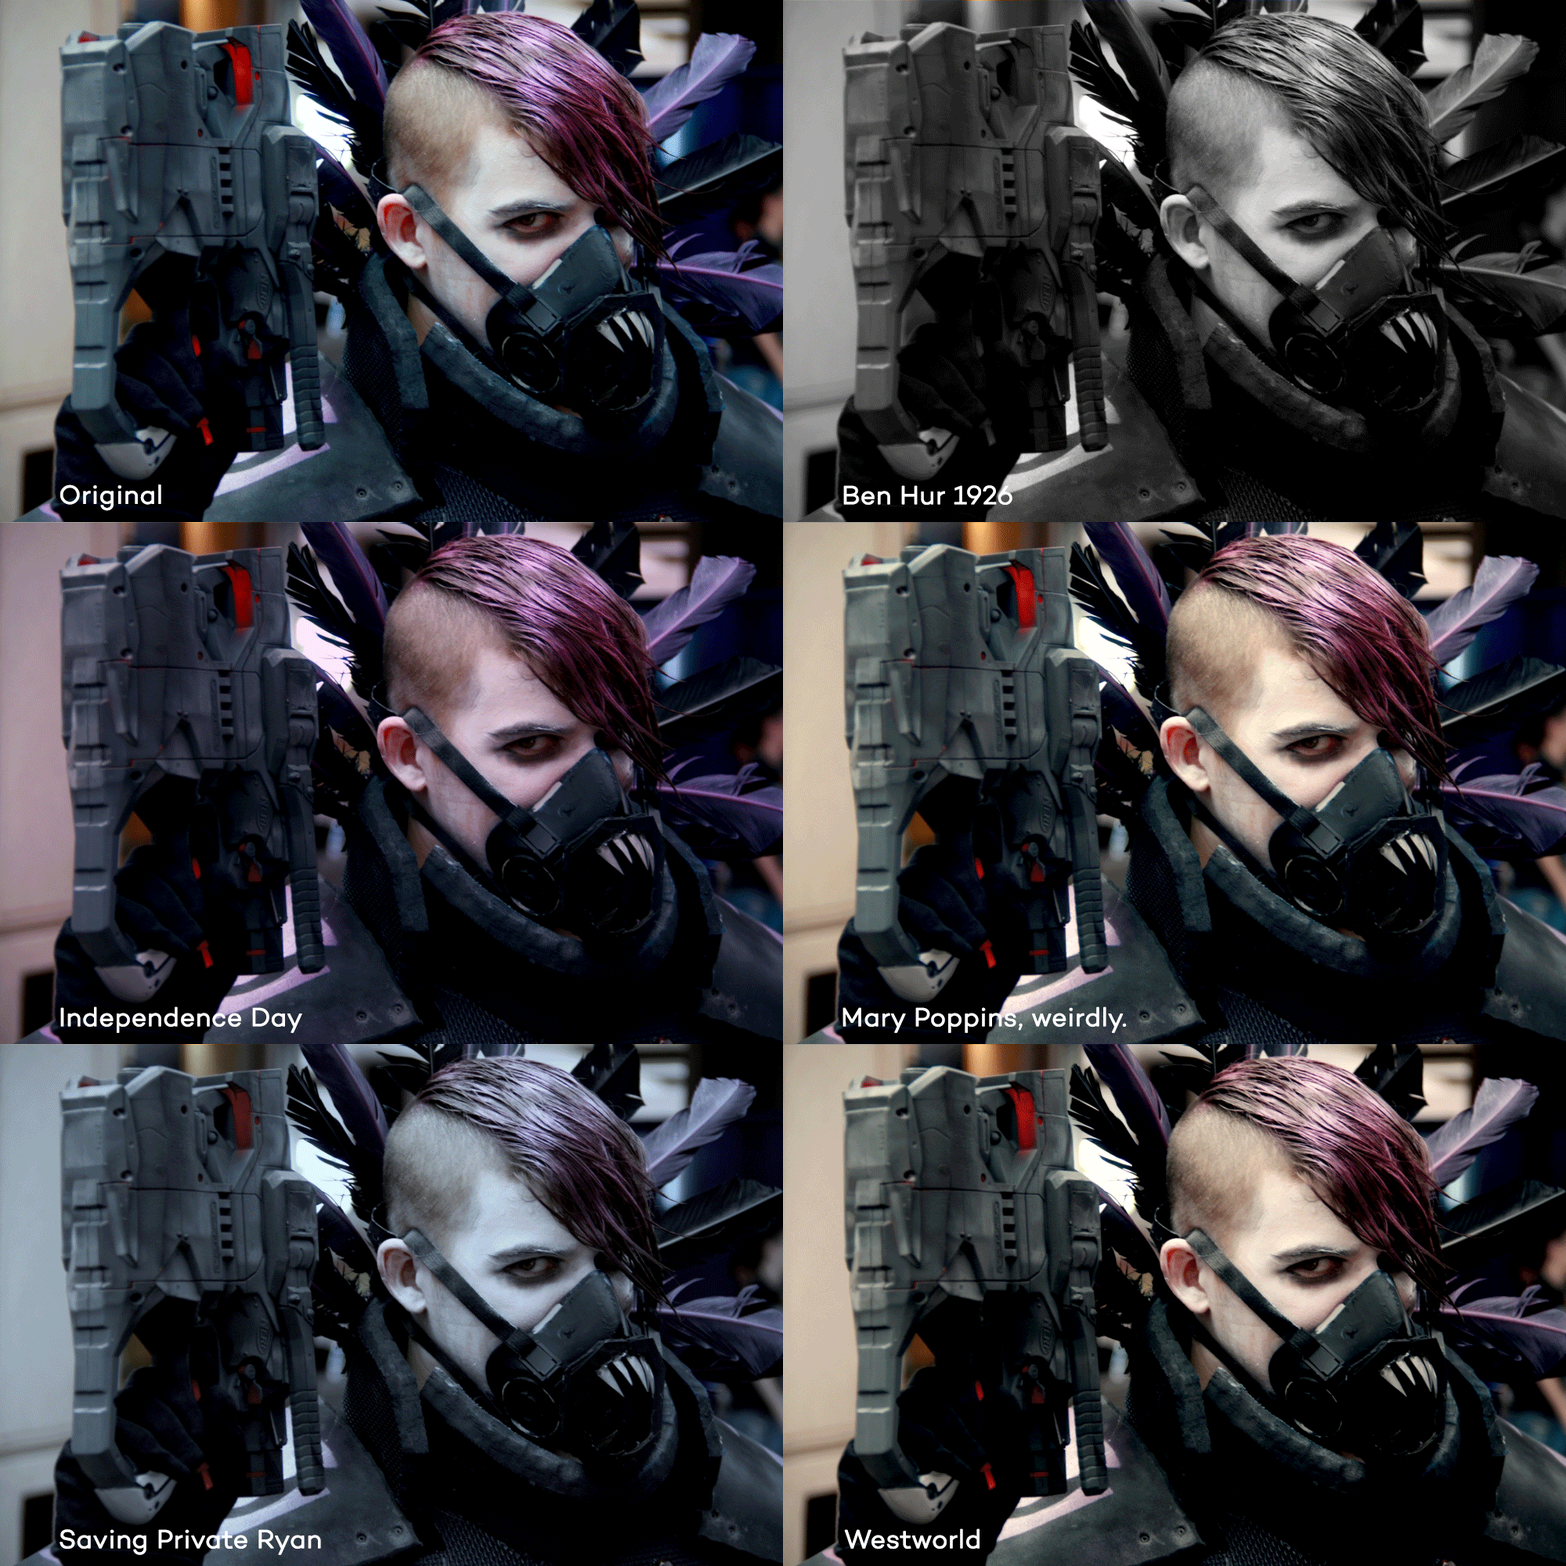
Color palettes are integral to a franchise’s look, and Boris FX Optics has done a great job emulating a lot of famous ones — some were created with Boris software, after all.

The ColorFilm Lab, and Grads/Tints tabs come with more grading presets than you can imagine, including a series based on actual movies: “Back to the Future” and “Stranger Things” will wash your image out in blue, “The Matrix” will tinge it green, and “The Walking Dead,” will apply a yellow tint.  A personal favorite is “Children of Men,” which will desaturate it to an apocalyptic gray.
Warhammer Boris FX Optics Demo

3. Work magic

Optics 2022’s new killer feature is the Particle Illusion Library, a collection of over 70 effects ported over from Boris’s video programs. Entire animations are replicated, so you can advance through them frame-by-frame and select which stage of them you think fits best.

The glow effects automatically light the rest of your photo, or you can use smart masking to constrain them to the parts you want lit.  And of special note to cosplayers: it has a whole subsection of anime effects!

Boris FX Optics Witch

4. Match the show’s style

Finally, after you’ve placed the character in their setting, matched them to the show’s color profile, and given them canonically-accurate powers, time to apply the final production tricks to push it over the top.

The Lighting tab contains smart lighting effects as well as sun ray generators, glints, sparkles, and dozens of lens flares in more sizes and colors than you’d think possible. These are lowkey some of the program’s most impressive tools: they genuinely map the light to the contours of your image, not just add a light-colored overlay to it like other programs’ filters, with very professional results.

Scattered across the panels, you’ll find miscellaneous other effects for various post-prod duties, like PI HUD-GUI, a selection of sci-fi interface graphics, and S_TVDamage and DigitalDamage, the rare genuinely good glitch effects. And Beauty Studio in the Diffusion tab has your quick skin-healing needs covered.

Conclusion

With Optics, Boris FX has done a lot to make their toolset available to laypeople without studio budgets.

The one-year trial that comes with every Wacom Intuos tablet is enough to build a substantial cosplay photography portfolio on its own, but at just $10 a month (or $150 for a perpetual license) afterward, it won’t be too expensive to keep enhancing your photos for good. 

And for all it can do, it’s surprisingly lightweight. The download was huge, but once installed, it ran comfortably with other programs open on a relatively low-spec laptop, lagging only on complex particle effects. So if you have one of those, you can easily take it to the next con you attend and edit the day’s photos from your hotel room that night — which I can attest is the best way to get the jump on uploading them to social media before the event’s over.

For a more dynamic demonstration of these tools, you can watch Boris’s official tutorial on enhancing cosplay photos at the video below.

Related posts:

Comparing Affinity vs. Adobe for designing a bookmark, with Vivienne Le

Comparing Affinity vs. Adobe for designing a bookmark, with Vivienne Le

How to get the most out of Affinity Designer with your Wacom tablet, with Vivienne Le

How to get the most out of Affinity Designer with your Wacom tablet, with Vivienne Le

The Best Free Tutorials To Get Started in Photo Manipulation With Adobe Photoshop

The Best Free Tutorials To Get Started in Photo Manipulation With Adobe Photoshop

Flex your creativity – Flex your Movink! Editing photos on the go with Amyboyy

Flex your creativity – Flex your Movink! Editing photos on the go with Amyboyy

Connect with Wacom on social media

Brushstrokes, along with subject matter, color and types of media, often identify the author of a piece without a signature or overt documentation. 🖌️ The same concept applies to digital art. With Yuify, you can embed your authorship in your work, while allowing for hassle-free licensing and easy collaboration. ⁣
⁣
Join the Wacom team for a look at Yuify, including the steps for registering artwork with your unique proof of creation, retrieving and identifying the creators of pieces of art and creating and honoring licenses that you have chosen.⁣
⁣
Register via the link in bio. ☝️⁣
⁣
#Wacom #WacomYuify #Yuify #creativerights
94 0
Register for an amazing FREE webinar TOMORROW at 1pm PST with the amazing @aaronblaiseart! ❄️🐻‍❄️🤍

Learn from one of our favorite animation mentors as he walks us through the process of creating amazing animal characters like the main character of his animated short, Snowbear. 

Sign up through the link in our bio ☝🏼
#wacomwebinar #wacomconnectedink #digitalart #artwebinar
518 10
Want to learn how to create licenses for your artwork? @zeythehuman walks you through how to easily set up licenses* in Wacom Yuify, ensuring your work is protected. From using templates to customizing your own agreements, it has never been easier  to manage your creative rights.

Ready to protect your art?🔑
Register for free at Yuify.com
‌
*Yuify Licensing is only available in selected regions and may require additional agreements for specific cases not covered by the License Builder.

#WacomYuify #Yuify #CreativeRights #DigitalRightsManagement
107 1
Let's dive in with @alexferreiraa to learn how to improve our poses using the #WacomMovink and the 2D workflow to push them to the next level. Check out the full video through the link in our bio or head to @animationflow.academy YouTube channel. 
#animationflow #madewithwacom #characteranimation
285 4
Looking for a gift that will thrill a 7-year-old, a dad, or a co-worker? 🎁⁣
Get them a #WacomIntuos!⁣
⁣
Perfect for sketching, animation, comics, photo retouching, and note-taking, it's a gift that will keep on giving. ⁣
⁣
Now on sale on the Wacom US estore 🏷️⁣
#WacomSale
165 1
When author and @verabee had a fast deadline approaching, she was away from home and away from her usual work setup 😱

Enter Wacom Movink, a truly portable and powerful pen display she could use anywhere.

Watch the full video on our YouTube to hear her full #WacomMovink review, and to see her spot illustration process. And make sure to look out for Return to Sender, publishing in 2025!
#movink #creativeprofessionals #madewithwacom
#creativesonthego #digitalart
154 0
@zeythehuman reminds us that sharing your art with the world is essential, but so is protecting it. Yuify helps artists safeguard their work and identity, so you can showcase your creativity without worry.

🔒 Want to know how to protect your art? Visit Yuify.com for more info. Now available for @clipstudioofficial 

#WacomYuify #Yuify #CreativeRights #DigitalRightsManagement
130 6
Let's create a little magic this season...❄️🪄💜⁣
Art by the one and only @aaronblaiseart⁣
#animation #madewithwacom #aaronblaise #snowbear
1418 6
✍🏻 The flagship pen for the ultimate feel

Wacom Pro Pen 3 is not a generic design meant for everyone. Instead, it is the ultimate companion for professional creatives and promises the best pen experience. Wacom is committed to its claim “to deliver the best pen experience” and leaves no stone unturned to keep this promise.

Engineered for adaptability and precision, the Wacom Pro Pen 3 offers unparalleled customization options, making it an essential tool for professionals in digital art, design, and beyond. 🚀

Discover how the Pro Pen 3 is redefining creative possibilities. Link in bio.

#PrideOfWacom #WacomProPen3 #digitalink
243 15
👻 You cannot either run or hide from these digital nightmares 🏃🏻😅

Add yours in the comments below ⬇️

#HappyHalloween #WacomMovink
495 10
🎥 Tutorial: How to Create an Export on Wacom Yuify

Ready to take your creative projects to the next level? Join artist Zeynep Alpay @zeythehuman as she shows you the simple steps to export your work on Wacom Yuify! Whether you’re working on detailed illustrations or designs, knowing how to export seamlessly is essential. 💼✨

Take control of your digital rights with these easy-to-follow tips and make the most of #WacomYuify!

Register for free in Yuify.com

#Yuify #DigitalRightsManagement #CreativeRights #MadeWithWacom
87 1