School of Motion is reimagining art school with world-class training that is available on your schedule from anywhere on Earth. They offer a wide variety of courses that can take your creative goals to the next level. Check out their website to see all of their offerings. The below video originally appeared on School of Motion’s YouTube Channel, and this explanatory article originally appeared on their website.
Adobe Photoshop is a powerful tool for design and animation. Many projects rely on imagery that needs to be removed from a background before use. Whether you’re designing a poster, building storyboards for an animation project, or working on a motion design masterpiece, we’ve got the ultimate guide to get you started.
We’ve prepared the ultimate guide to cutting out images in Photoshop. No, really, this is as comprehensive as we’ve ever made it, and we know you’re going to pick up a trick or two along the way. Of course, there are pros and cons to each of these tips, and they work best when you combine several techniques. This tutorial is meant to add new tools to your belt, so grab a cup of coffee (or your learning beverage of choice) and let’s get after it.
In this tutorial, you’ll learn how to:
- Paint on an Image Mask
- Use the Pen Tool
- Use the Object Selection Tool
- Use the Quick Selection Tool
- Use Smart Selection Tools
Note: this tutorial is based on Adobe Photoshop CC 2022, but this tutorial should be similar enough no matter what version of Photoshop you are using). To download the files and follow along, go to School of Motion’s website.
How to Paint on an Image Mask in Photoshop CC 2022
An Image Mask is a quick, non-destructive way to adjust images in your composition. Instead of cutting the image away from the background, you simply hide the parts of the image you don’t want to use. If you use the eraser, you are actually deleting pixels from your image. If you make too many mistakes, even CTRL/CMD+Z can’t save you anymore. That’s why you should go with masks.
Image masks can be created by clicking on the Image Layer and then clicking the mask icon.
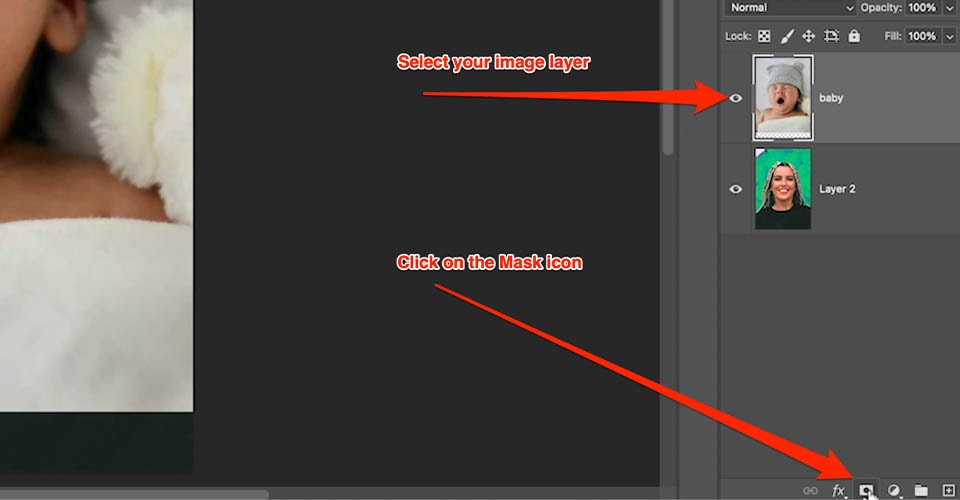
You’ll see a plain white layer open adjacent to your image layer. Now select your Brush (B) and change the color to black. Click on your Mask Layer and draw over the image. Pixels will disappear, just as if you were erasing…but those pixels aren’t gone forever. They’re just masked.
What’s great about a mask is the ability to use shades of gray to mask your image at varying levels of opacity. This makes blending between images even easier. While Image Masks are great for their flexibility and non-destructive nature, they are also a painstaking manual process. If time is of the essence, this might not be the best go-to tool.
How to Use the Pen Tool in Photoshop
The Pen Tool is pretty much the most precise way to cut things out of an image in Photoshop. Before you even get started, however, we recommend adjusting one setting of the tool before you even get started. By default, the pen will drop points down at the tip of the icon.
Instead, let’s make this a bit more accurate. First, you’ll go to the Photoshop Menu > Preferences > Cursors and set your Other Cursors to Precise.
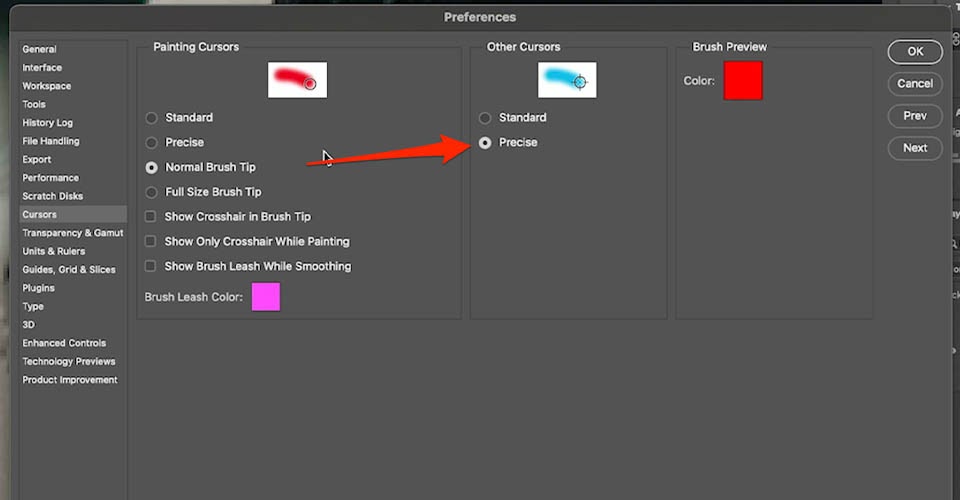
This changes your cursor from the Pen icon into a Crosshair, which allows pixel-perfect selection. Remember, the key to a speedy workflow is preparing your tools for the tasks at hand. Now that you have your Pen Tool set up, it’s time to see what it can do.
Now the trick to using the Pen is simple. Click to place your initial point. When you click your second point, hold and drag to create a Bezier Handle. This allows you to create curves that follow the natural contours of your image. If you’re working with laser-etched lines, fantastic. You can use a straight line. But most of the images we’ll use in our careers aren’t so perfectly shaped.
Once you have the initial shape, press Option/Alt and drag, and you’ll break your Bezier Handle.
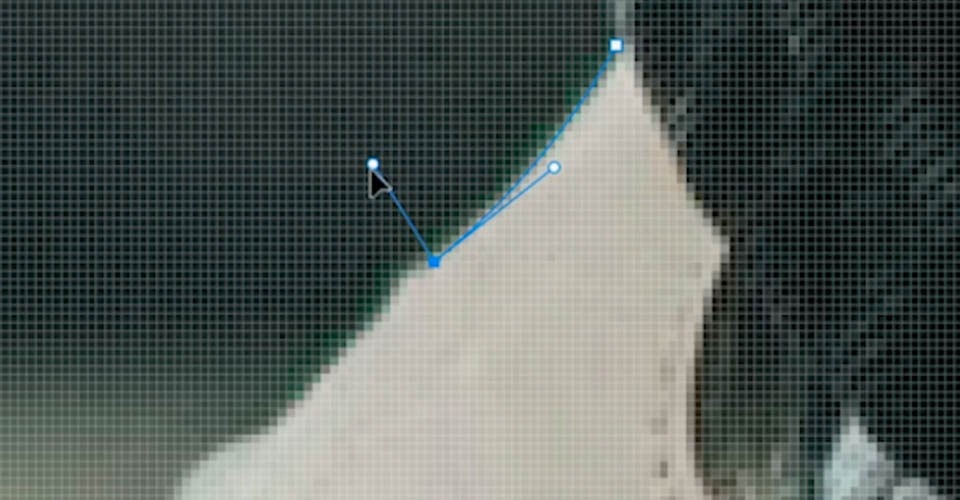
This tells Photoshop the direction you plan to head next, and makes it that much easier to move from point to point.
If you make a mistake placing a point, hold CMD/CTRL and you can pick up and move the point where it needs to go. This is a tedious process, especially if you want to get all the details, but that’s what it takes for a crisp image.
As you move around the image, hold Spacebar to change your cursor into a hand so you can adjust your canvas.

This takes practice, but soon you’ll have an instinct for how the tool will behave. As you can see, I was able to get away with fewer points in some areas, while the busier sections required a whole mess of adjustments.
Create an Image Mask from the Pen Tool
To turn this into a mask, we head on over to the Path tab on the right side. You’ll see we have a Work Path created. If you CMD+Click, there, this will turn the path into a Selection. Now go into your Layers tab and click the Mask Icon, and viola! You’ve created a perfect mask for your image. However, there is an even better way to mask your image.
Create a Vector Mask from the Pen Tool
Instead of an Image Mask, let’s make a Vector Mask.
With your Path created, select your image and head down to the Mask icon. Hold CMD/CTRL and click the Mask button to create a Vector Mask. You’ll notice the mask looks different in your layer.
Now, with the Vector Mask selected, hit the A key to switch to the Direct Selection Tool. This allows you to select points from the path and affect them in a non-destructive way. You also have additional options in the Properties tab that are unique to Vector Masks.
The Pen Tool, as you can see, is extremely accurate. However, utilizing it can be a slow and tedious process. Thankfully, Photoshop provides you with some powerful tools to speed up the process.
How to Use the Object Selection Tool in Photoshop
The Object Selection Tool is a fun, easy-to-use tool that quickly identifies and selects an object. However, it might not be easy to find in your default settings. Sometimes it is tucked away with all the other tools. In any case, let’s bring it to the front and see what it can do.
Head to Edit > Toolbar, and we can insert the Object Selection Tool wherever we want. I think it belongs with the Quick Selection Tool, so that’s where I’m putting it.
When you select the tool, you’ll notice two arrows rotating in your Toolbar. This is Adobe’s Sensei Engine chugging away in the background, trying to figure out where all the objects are in the image. Once the arrows stop moving, you’re ready.
Now, wherever my cursor moves, you’ll see the image highlighted for selection.

How cool is that? Photoshop has already created masks for every object in your image (that it was able to identify). So if I want to change the color on one of these objects, I just click and it selects. I can hold Shift to select multiple objects. If I make a mistake, I can deselect by holding Option/Alt and clicking.
Now let’s create a new layer, then create an Image Mask on that layer. You’ll see that my mask is already set up for the objects I selected. Now select the new image layer, pick a color, and hit Option/Alt+Delete. Now I just need to change the Transfer Mode of this layer and I can create…

The Object Selection Tool is an awesome addition to your Photoshop toolbar. While it does take a second to initialize (depending on your machine), you can see how effective the Sensei Engine can be.
If you want to refine your selections, you can do so with the Select and Mask Tool, which we’ll get to in just a moment.
How to Use the Quick Selection Tool in Photoshop CC 2022
The Quick Selection Tool is a really handy way to quickly grab objects when you don’t need to be pixel perfect. Head on over to your toolbar and select this tool.
When you use the Quick Selection Tool, your cursor will change to a brush icon. Use the brackets ( [ or ] ) to grow or shrink the tool. Then just paint over the object you want to select. If you catch something you don’t want, hold the Option/Alt key and paint over that area.
You may notice that the selection area jumps from time to time. This is Photoshop using your input to guess at which parts of the image you meant to catch. Some fine-tuning will be needed if your object isn’t well lit, or is just a bit too small, but this is an easy way to grab obvious objects in your image.

Smart Selection Tools in Photoshop
There are also some Smart Selection tools in Photoshop that can really help your workflow, so let’s take a quick look at those as well.
Select Sky in Photoshop
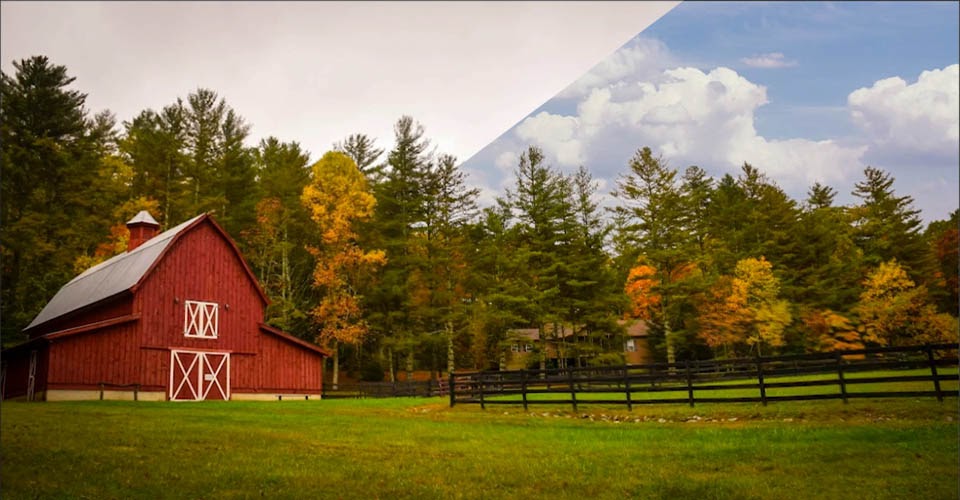
Let’s say you have a great image but need to swap in a more interesting sky. Well, that can be a pretty tedious process, masking out all of the objects in the foreground. Today, however, you can just go to Select > Sky. Seriously.
Photoshop will have a look at your image and — in seconds — come up with a fairly accurate mask. To test it out, we go to our Sky image and apply the newly created mask. In our case, it looks pretty dang good!
Select Focus Area in Photoshop
You now have the ability to select a specific focal range in your image. You do this by using the Focus Area selection in the Select menu. This allows you to select those portions of the image that are within the focus range you’ve chosen.
Photoshop will automatically select the pixels that fall within your focal plane. Once you hit OK, you’ll have a selection around just that portion of your image, which allows you to do some pretty fun things.
With my new selection, I can open an Adjustment Layer and apply a Curve, lightening that portion of the image as though I had a separate key light. With the additional tools in the Properties tab, I can feather the mask to erase harsh edges and create a more natural look.

Continue your Photoshop Journey
Want to learn even more about cutting out images in Photoshop? Watch the rest of the video above for tips on using the Select and Mask Tool, Selecting Color Range, and Using Channels. And if you’re comfortable with Photoshop but don’t feel confident about your design skills, check our Design Bootcamp!

Want to learn more?
While this was not a complete guide to cutting out images in Photoshop, it will certainly get you started. Interested in learning more about image editing as well as animation? For more tips, head to School of Motion’s Youtube Channel, or find complete courses on their website.

