Monika Zagrobelna is a Polish artist with a great passion for creating new things — whether by drawing, digital painting, or photo manipulation. She specializes in creating realistic art, especially of animals, and is a big fan of dragons and feline creatures!
She loves sharing her skills with others, including on her blog and social media accounts. Check her out on X (Twitter), Facebook, LinkedIn, Instagram, or on her website.
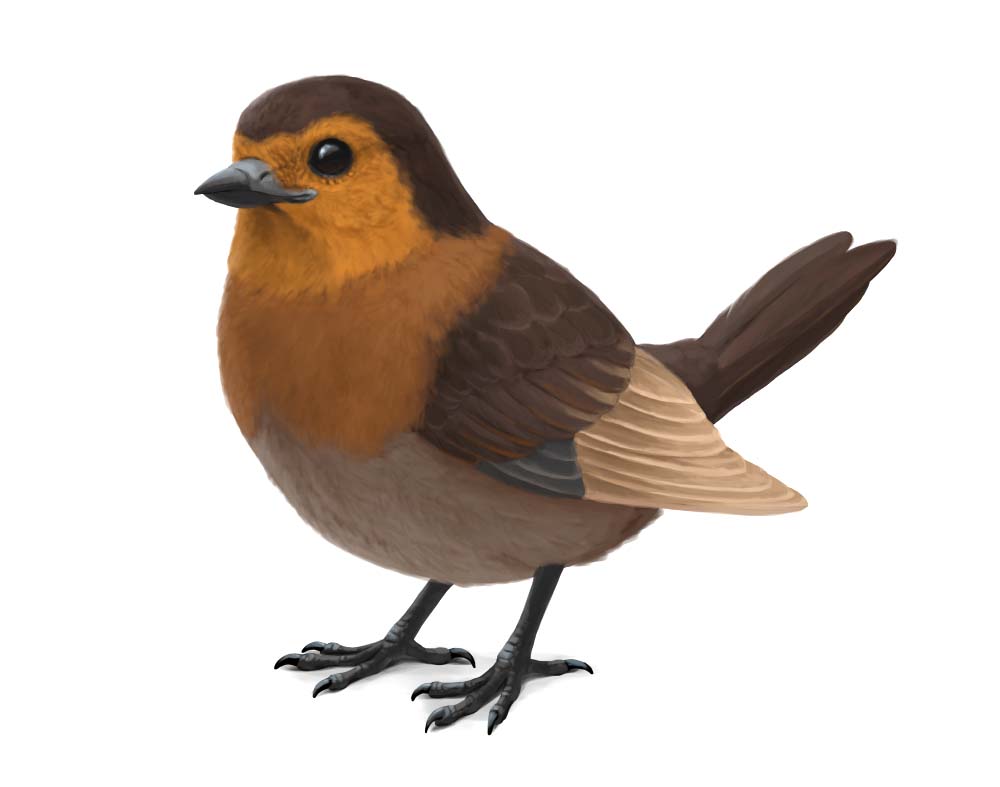
In this extremely detailed tutorial, she walks step-by-step through her process for drawing an incredibly cute little bird!
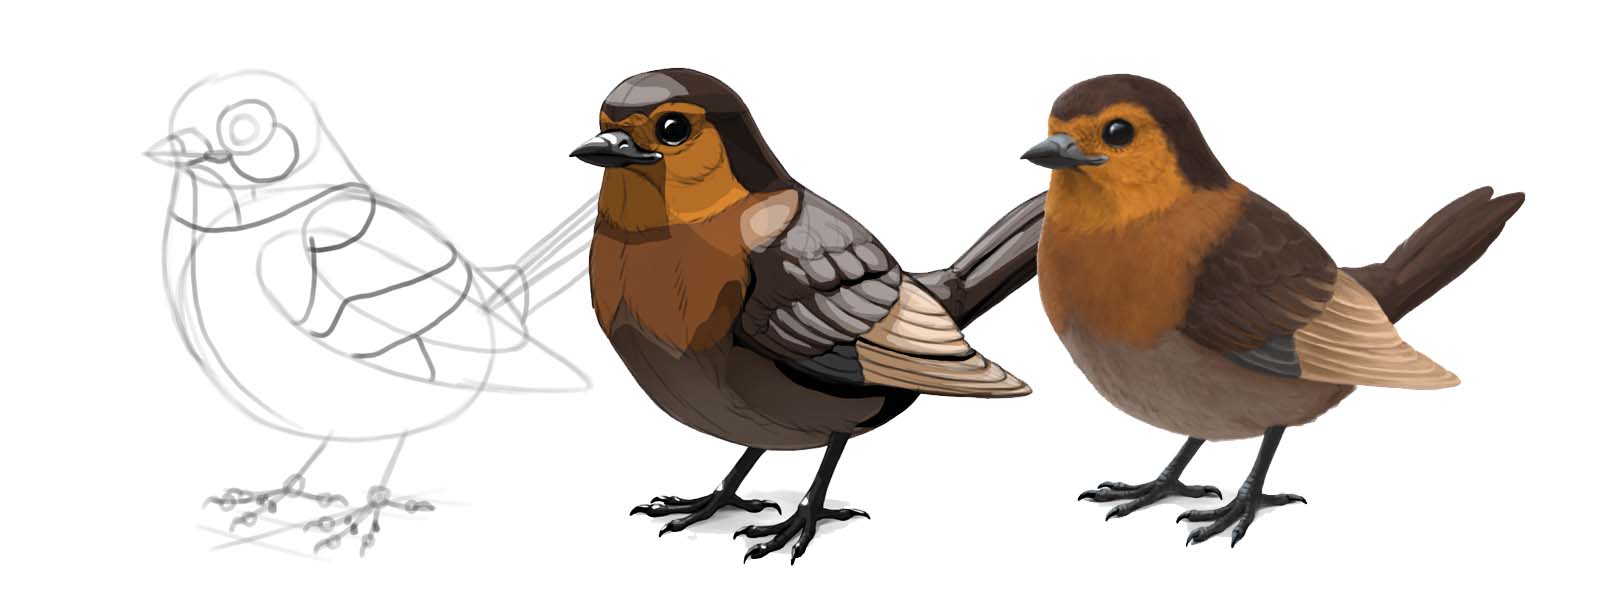
When you think about creating a digital artwork, you may know exactly what the final result is supposed to look like, but not the steps that you need to take to get there. So in this tutorial I’ll show you an example process of creating a digital painting from start to finish! You’ll learn how to draw the sketch, plan the basic colors, add some shading, and render the whole picture — and you can easily modify this process to create your own style.
Setting up your tools
Digital art, as any medium, has its special tools. They differ slightly depending on the program you use, but the basic ones are pretty similar. Here’s a quick overview of the tools I’ll be using in this tutorial, with examples from Sketchbook Pro (light grey) and Photoshop (dark grey).
Image Size
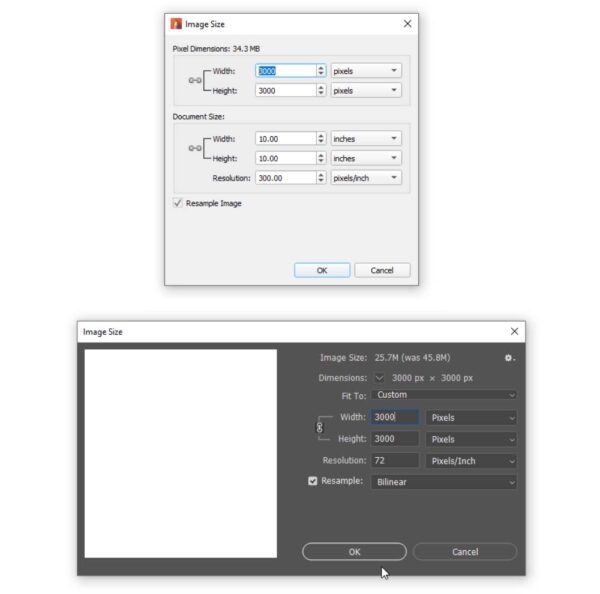
Before you start working on your drawing, you need to make sure the canvas is the right size. If your canvas is too small, the drawing will look blurry; if it’s too big, your brushes may look blurry or too small (and they may lag). 3000 x 3000 px should be enough for most drawings. You can define your canvas dimensions by going to Image > Image size.
Drawing Brush
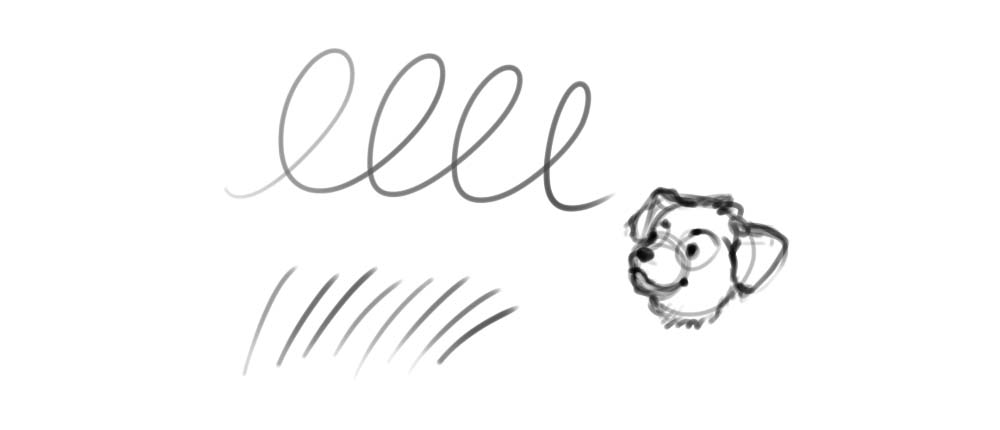
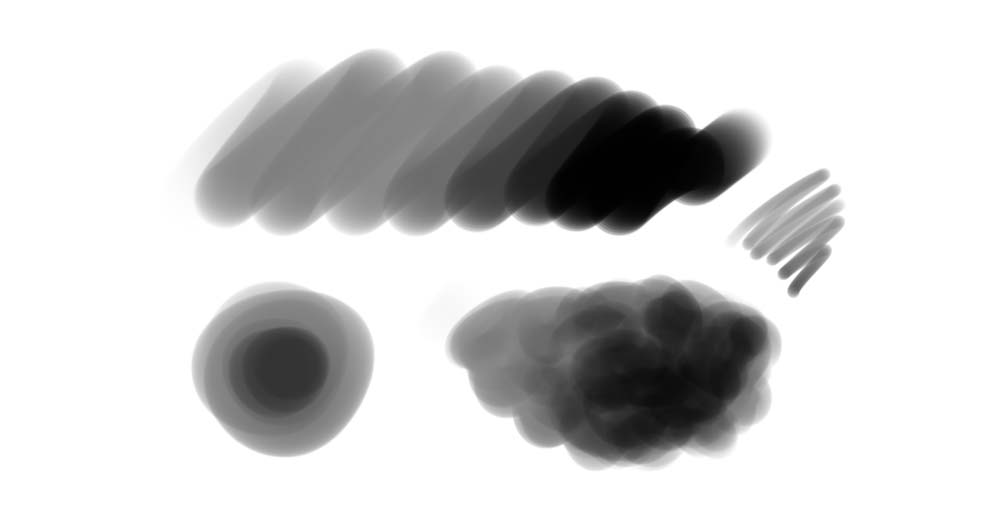
Every drawing program comes with its default brushes, and in this tutorial you’re going to need only two of them. First, find a brush that tapers at the ends according to the pressure of your pen, and becomes more opaque the stronger you press it. This will be your drawing brush — perfect for sketching and creating the line art! You can resize it using the square bracket keys ([ and ]), but keep it pretty thin.
Painting Brush
Second, find a brush that also changes its opacity in reaction to the pressure, but retains a consistent size all over the length of the stroke. This brush can be used for painting. Change its size manually depending on the need.
Editor’s Note: want to learn more about brush settings in Adobe Photoshop?
Check out our comprehensive Photoshop brush series here.
Color Picker
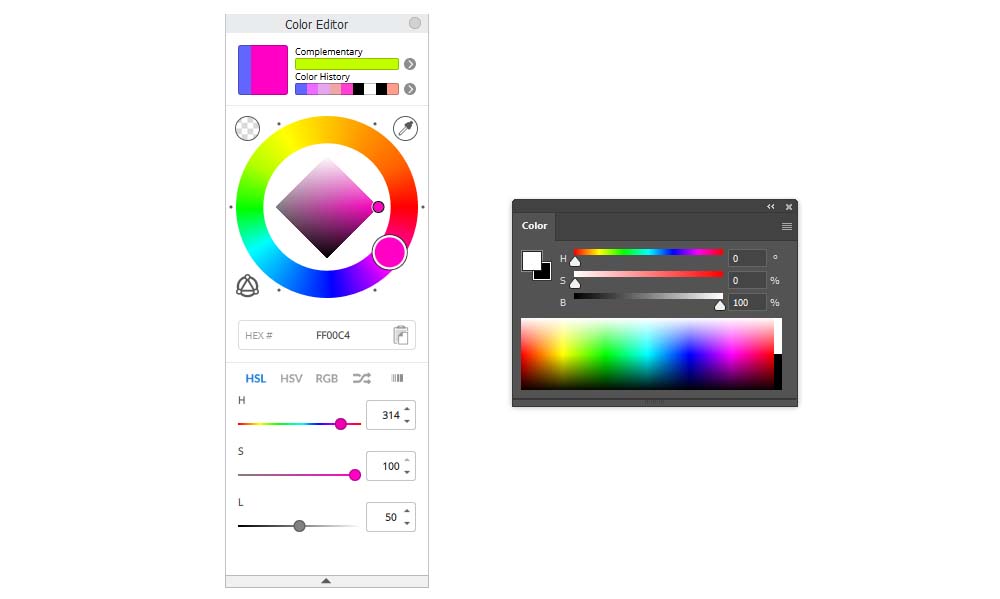
To change the color, you can use the Color Picker. It may have a form of a square, triangle, or simply a rainbow gradient, with sliders that allow you to precisely change the attributes of color.
Eyedropper Tool
You can take a sample of any color present in the canvas by holding the Alt key and clicking in the chosen area.

New Layer
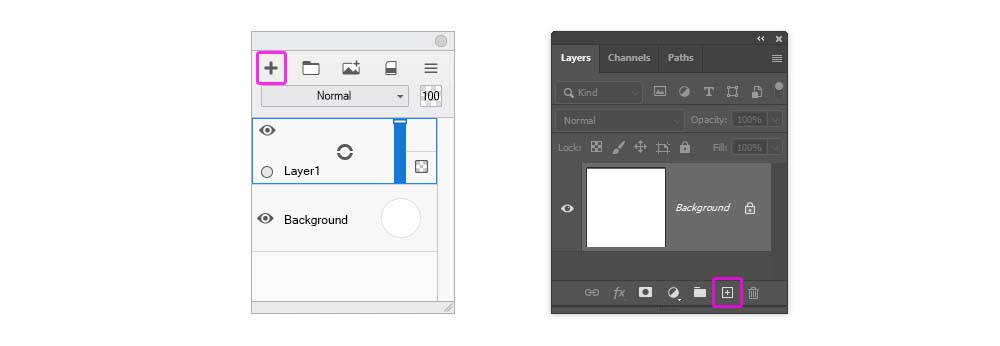
Layers allow you to separate parts of the drawing from each other. To create a New Layer, click the plus icon in the Layers panel.
New Layer
Layers allow you to separate parts of the drawing from each other. To create a New Layer, click the plus icon in the Layers panel.
Layer Opacity
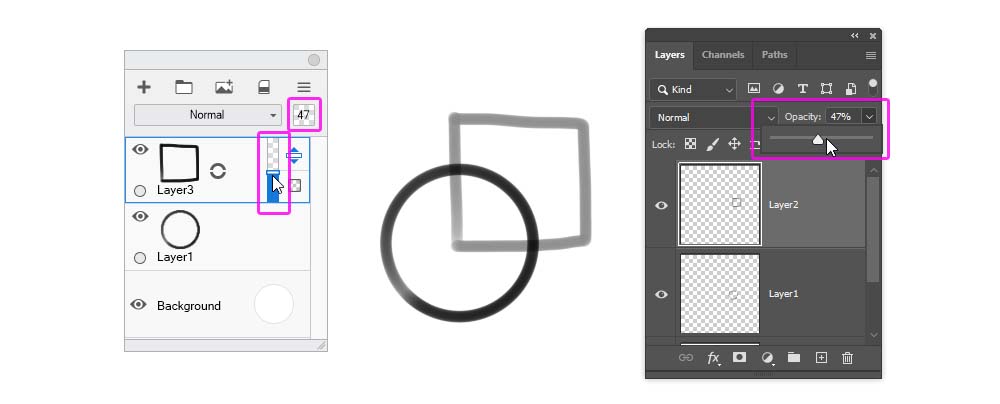
At any moment, you can make the content of a layer less visible in a non-destructive way. Look for a 100% number somewhere in the Layers panel — editing this number will allow you to reduce the Opacity of the layer. In Sketchbook Pro, you can also do it directly by moving the vertical slider next to the layer.
Layer Visibility
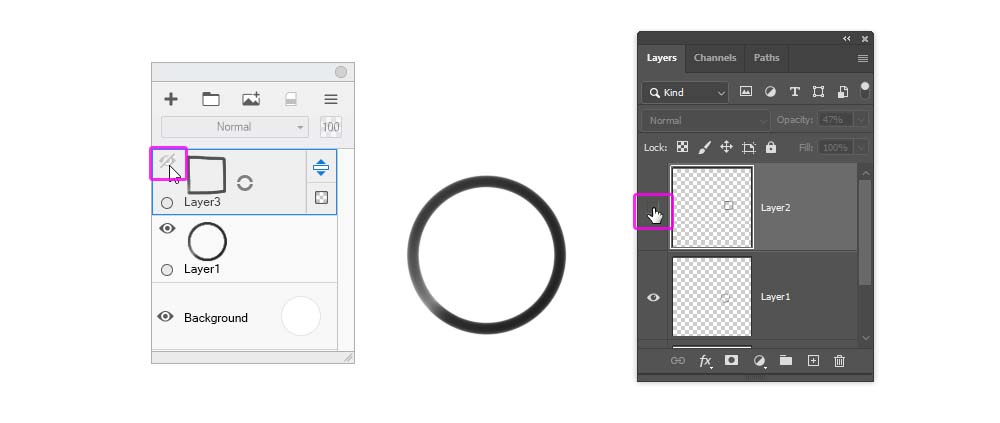
You can also make the layer temporarily invisible. To hide a layer, click the eye icon next to it. Click the same place to bring it back.
Blend Mode
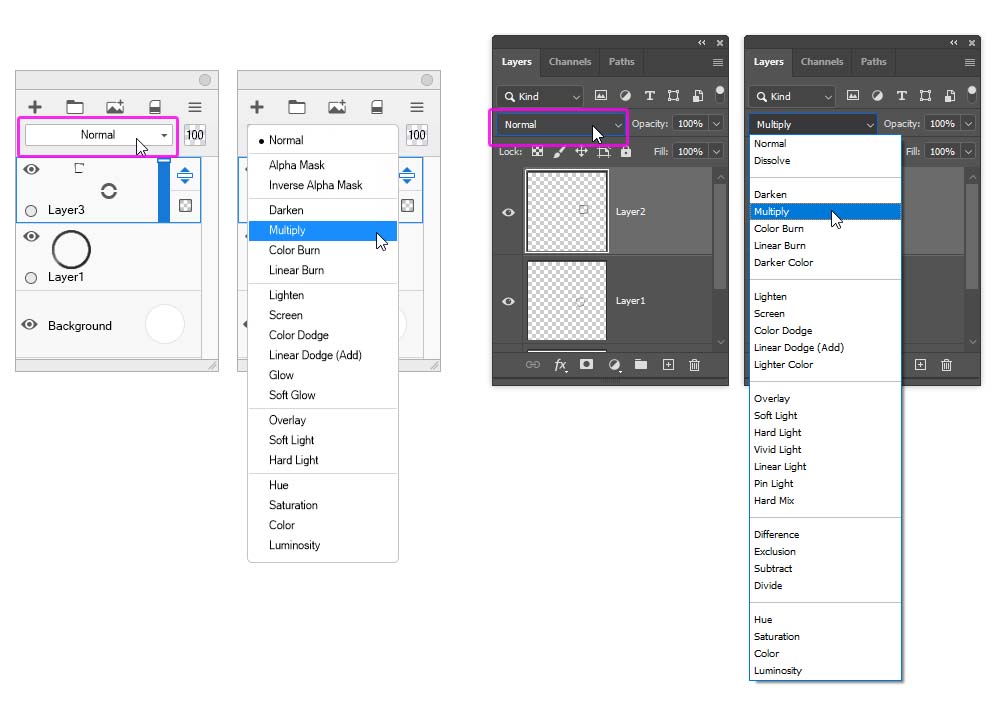
By default, the upper layer covers the lower layer (unless you change its Opacity), the same it would work if you used oil paint. But covering is just one type of layer mixing — and you can select one of many others in the Blend Mode menu. To open it, click the bar labeled “Normal”.
Layer Group
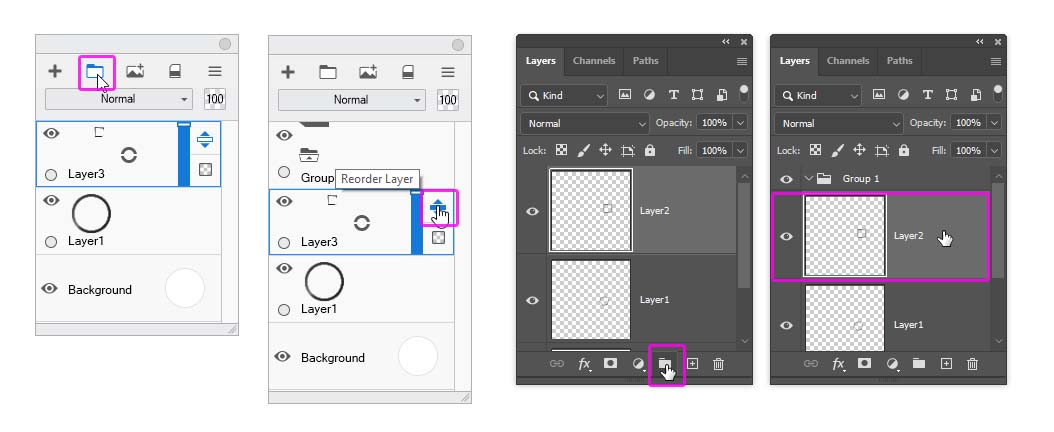
If you have lots of layers, it’s good to divide them into groups. You can create a New Group by clicking the folder icon, and then drag the selected layers into it.
Lasso Tool
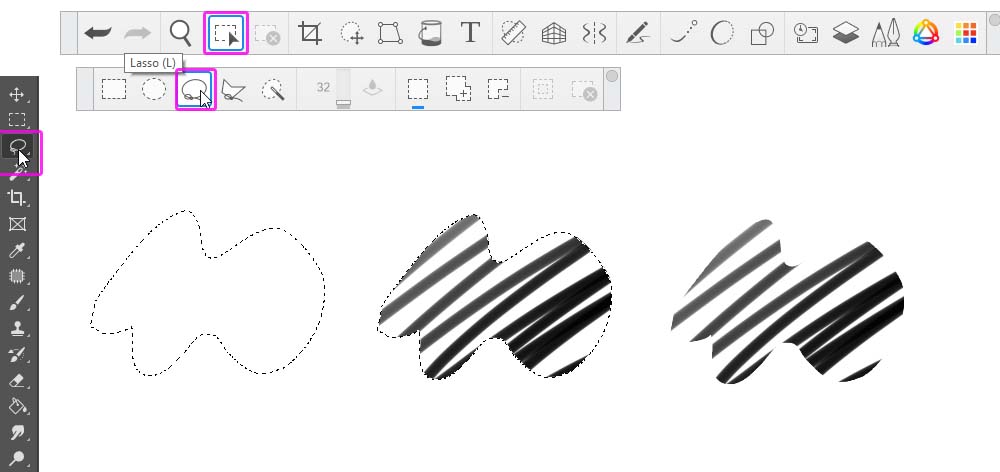
The Lasso Tool is a special type of a selecting tool. You can use it to draw the outline of the selection area, which gives you a precise control over its shape. Then, once you have this selection, you can paint inside it, and never cross its borders! You can add to the selection by holding the Shift key, and subtract from it by using the Alt key. Control-D will remove the selection.
Paint Bucket Tool
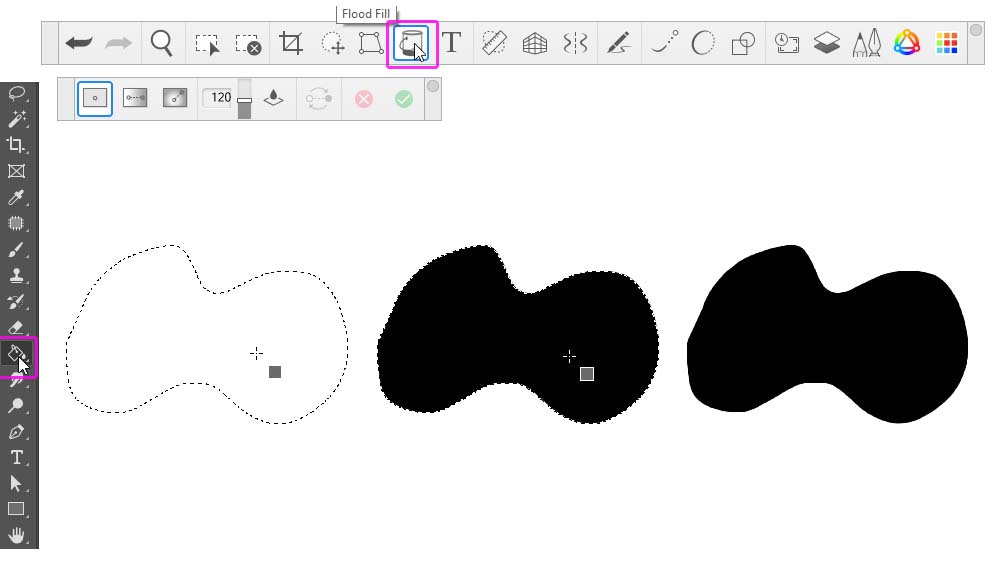
Once you have the selection, you can quickly turn it into a full, hard-edged shape by filling it with the Paint Bucket Tool:
Pixel Transparency Lock/Alpha Lock
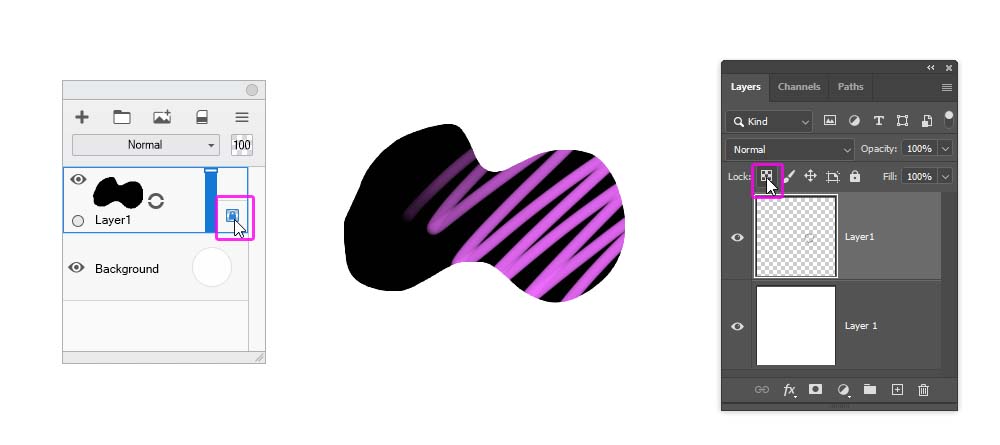
If you put a little lock next to your layer, locking its transparent pixels, you’ll be able to draw over the content of the layer and never cross its edges.
Alpha Mask
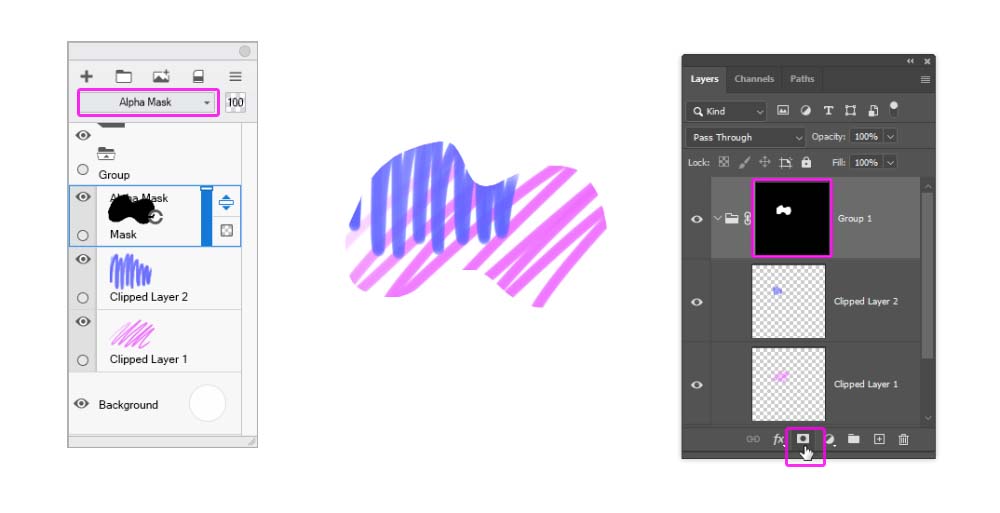
If you want to create multiple layers, all within the same borders, you can use an Alpha Mask for this. Put all your layers inside a group, and change its Blend Mode to Normal. Then add a Mask. In Sketchbook Pro, the Mask is simply a layer on top, with its Blend Mode set to Alpha Mask. In Photoshop, you need to add a Layer Mask to the group, and then draw the masking shape on it. After this, anything you add to the group will be automatically clipped to the shape of the Mask.
1. How to Create the Sketch
You can create your own sketch for this tutorial and modify the steps to make them fit your illustration. But if you want, here’s a quick guide for drawing this bird.
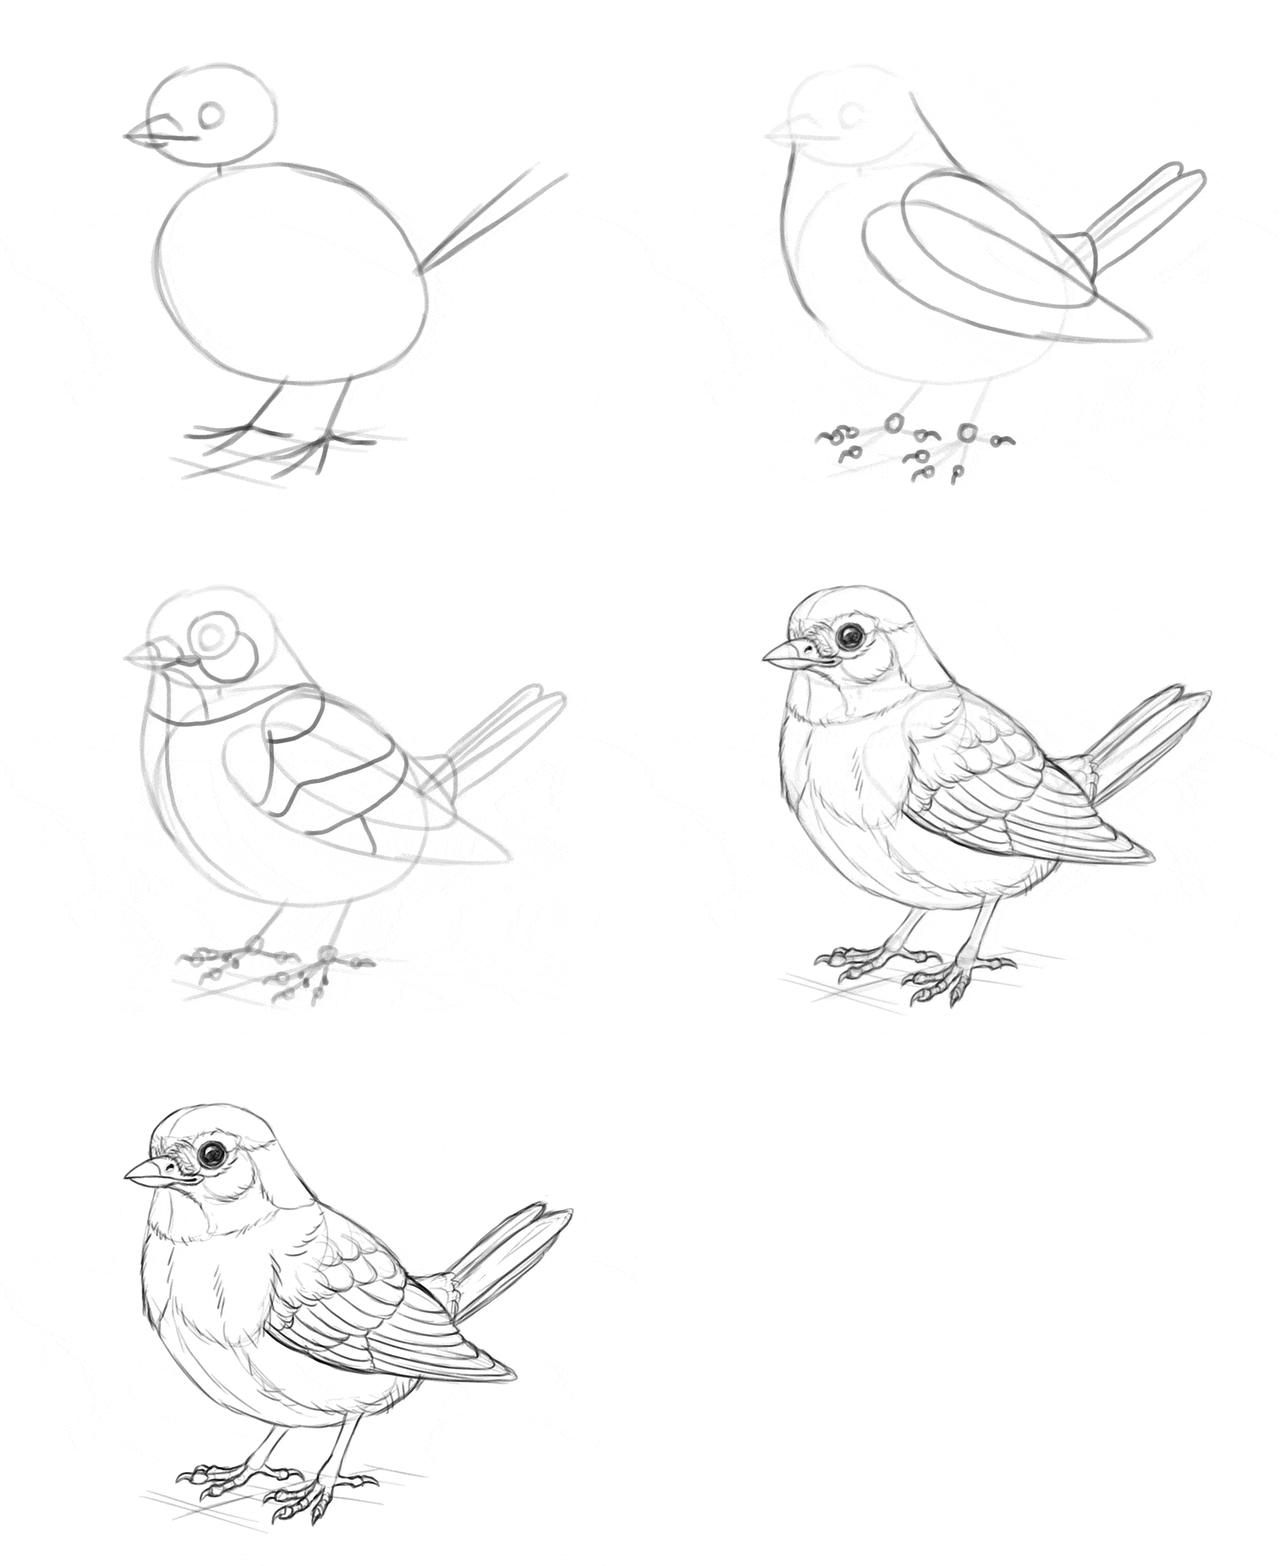
Step 1
Take a drawing brush, make it quite thick, and sketch the basic shapes of the bird—the big, round torso, a small elliptical head, a circular eye, and a few lines for the legs, beak, and tail.
Step 2
Connect the head with the torso to create the shape of the neck. Create the outline of the wings with two simple shapes. Add two simple feathers to the tail, and mark the claws.
Step 3
Divide the body into these separate areas, and add a “joint” to each toe.
Step 4
Lower the Opacity of this sketch and create a New Layer on top. Make your drawing brush smaller and draw the line art based on the guide lines below. It’s good to use a reference at this point—there are many details that are hard to memorize, and a photo will remind you of their existence.
2. How to Draw the Basic Colors
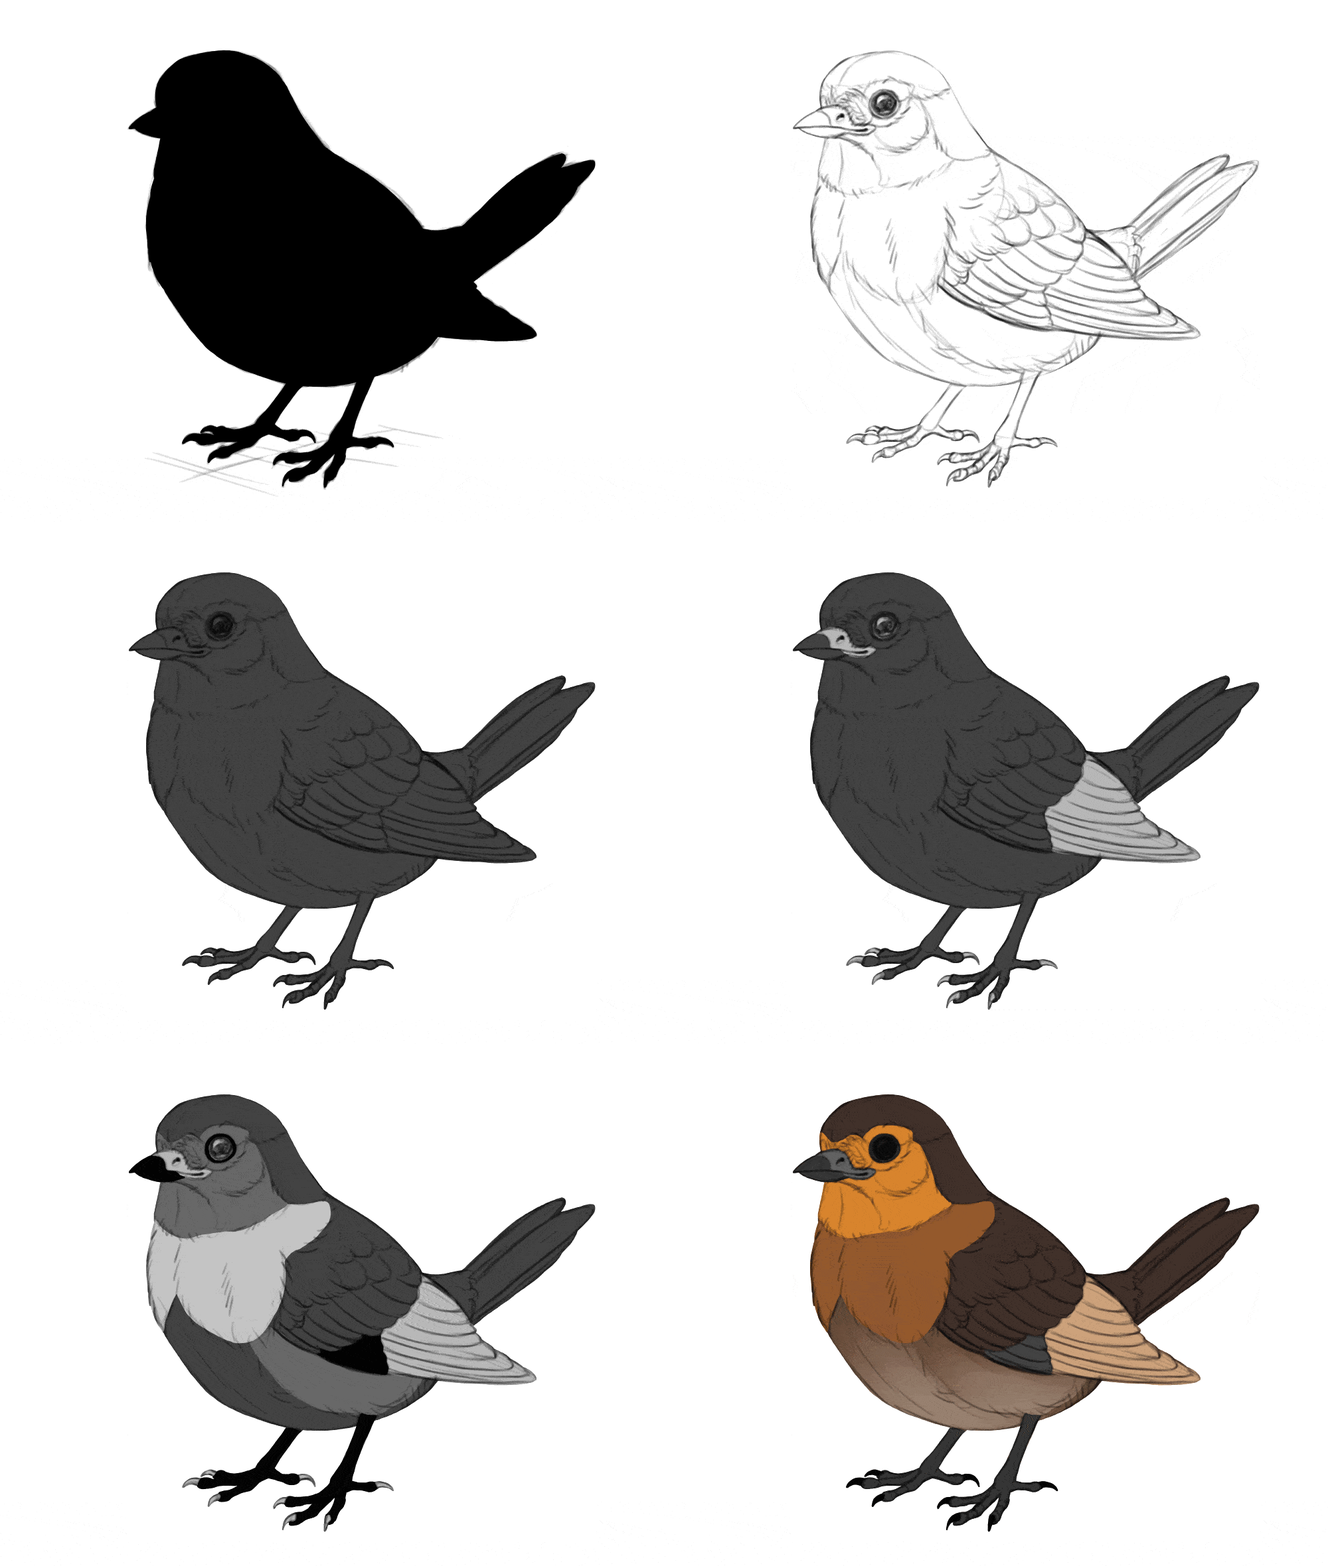
Step 1
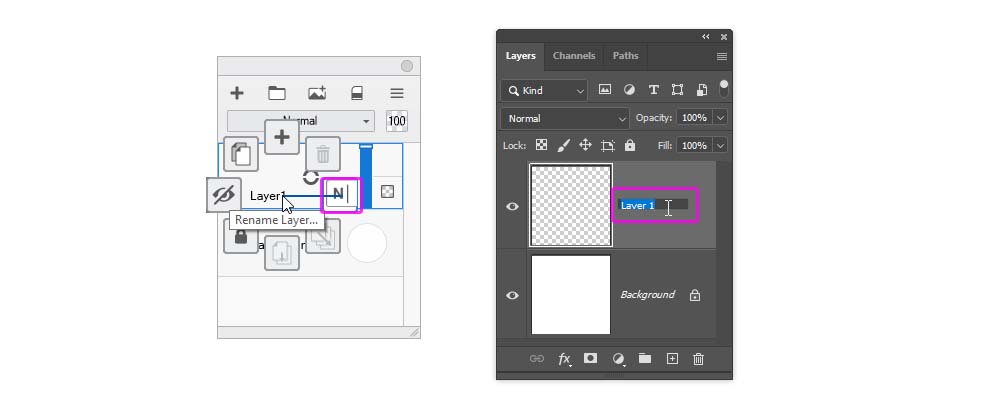
Create a New Layer over the line art and use the Lasso Tool to select the whole silhouette of your subject. Then use the Paint Bucket Tool to fill it with any color. Name this layer Mask.
Step 2
Turn this layer into an Alpha Mask and clip the line art to it. All the other layers from now on should be clipped to Mask, and remain under the line art.
Step 3
Create a New Layer under the line art and fill it with a random shade of grey. This will the background color of the subject.
Step 4
Create a New Layer. Your subject will probably have multiple color areas on its surface—for example, I want the beak to be colored differently than the feathers. We need to mark these color areas now.
Try to imagine the separate color areas, and outline them with the Lasso Tool. Try to be as precise as possible and follow the lines established by the line art. You can select multiple areas with different colors, as long as they’re at a distance from each other. Then fill them with another random shade of grey.
Step 5
After you mark all these separate areas, create a New Layer and mark other ones, using a different shade of grey this time. Feel free to put that new layer under the previous one, to avoid redrawing the same edges. Repeat this step until you cover all the color areas.
Step 6
Now, lock the transparency of each of the color areas. Then paint over them with a painting brush, assigning each area its actual color. You can create color gradients, but avoid adding too much detail.
3. How to Add Shading
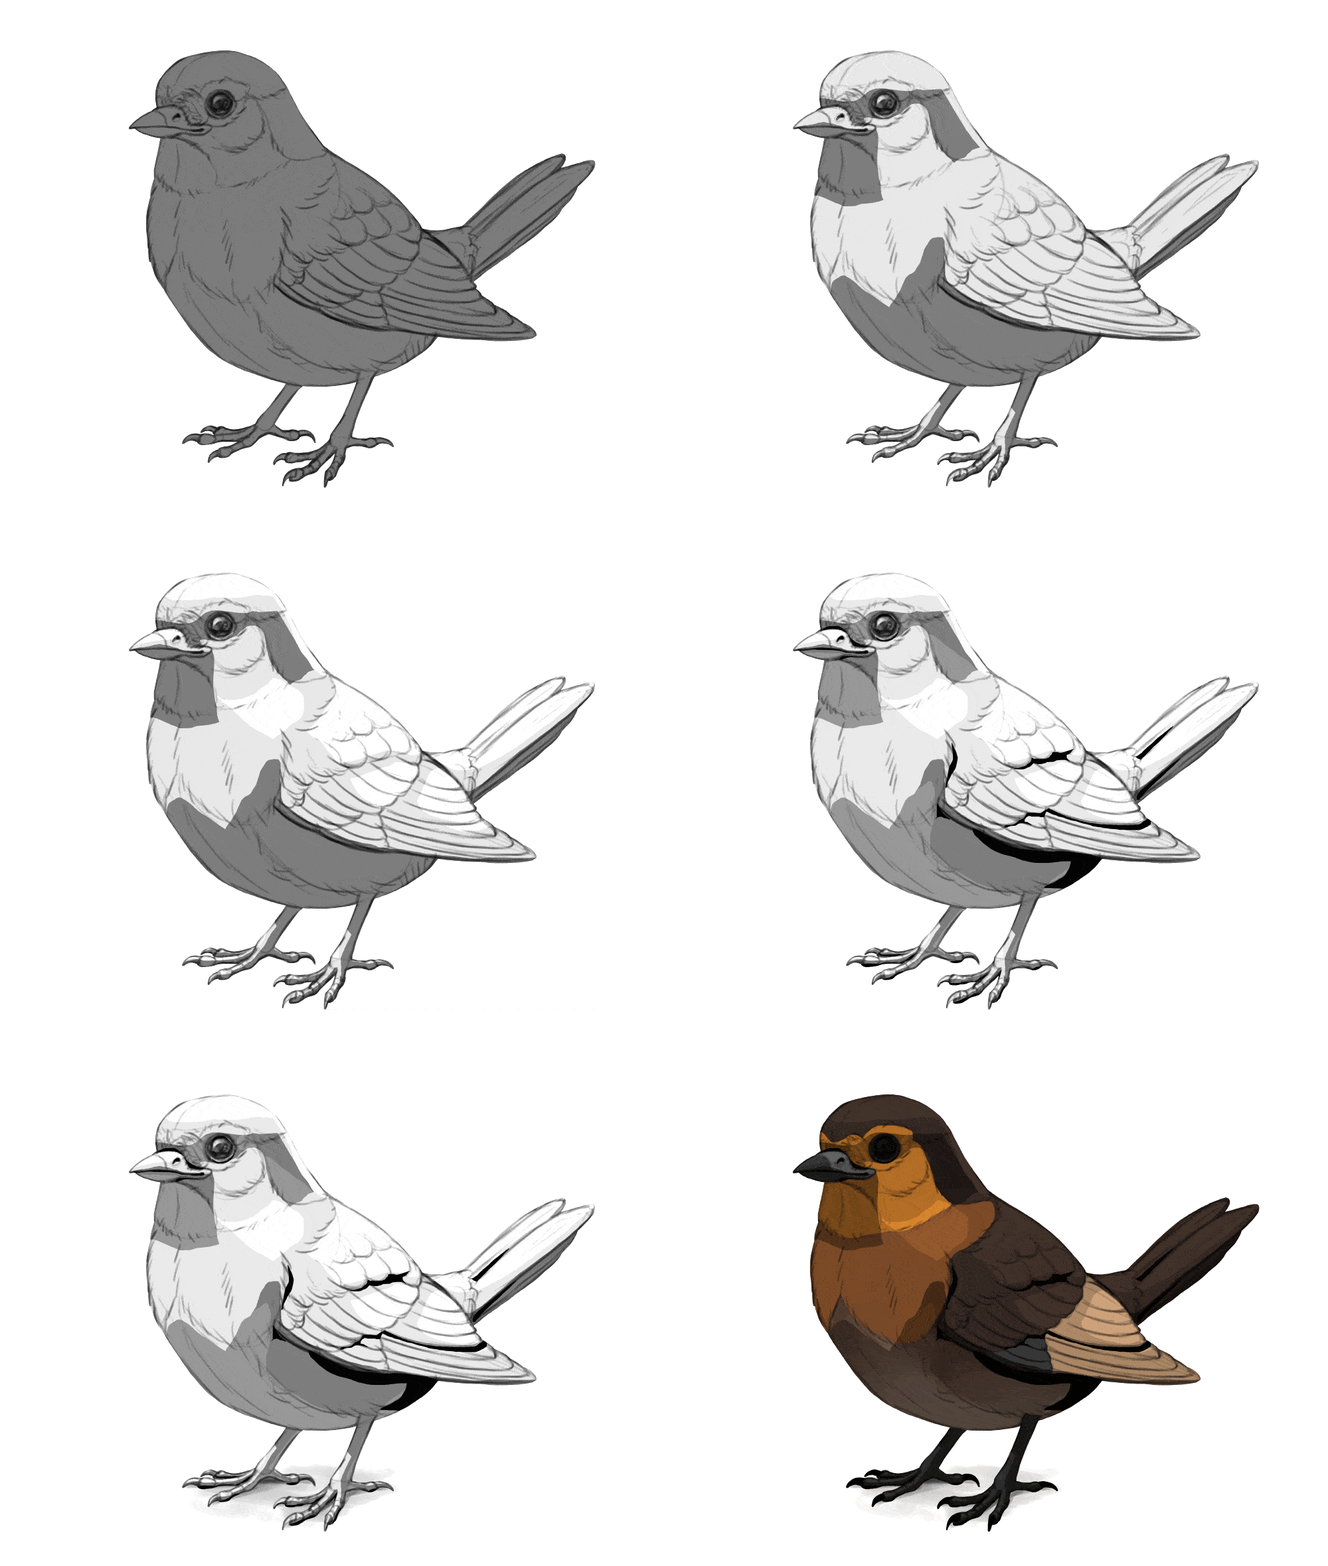
Step 1
Now that we have the basic colors in place, we can sculpt the form of the subject with the magic of light and shadow! Don’t worry about its brightness and color for now—first we need to take care of the sculpting qualities of the shadow. To do this, create a New Group between the line art and the color layers. Call this group Shadow. Inside, create a New Layer and fill it with medium grey. Name it Ambient Light—which is the light coming from around the object, from the sky or the walls.
Step 2
Create a New Layer and use the Lasso Tool to select the areas that seem to be pointing towards the light source—possibly somewhere above. Then fill this selection with a lighter shade of grey. Name this layer Direct Light 2.
Step 3
The illuminated area has different levels of brightness—mostly due to the light falloff effect. In short, the wider the angle between the light ray and the surface, the less light that surface gets. To simulate this effect, create a New Layer and select the areas that seem to be pointed directly at the light source. Fill these areas with white. Name this layer Direct Light 1.
Step 4
Another aspect of light is called the reflected light (or the bounce light). The light hitting the ground (or the subject!) gets reflected, and if it reaches the shadow area, it illuminates it with its own power. Select these areas on a New Layer, and fill them with grey that’s brighter than the ambient light, and darker than the main light. Name this layer Reflected Light.
Step 5
So far, we’ve been adding mostly light—just weaker and stronger types. Time to add some real shadow, in the areas that the light doesn’t reach. Mark them on a New Layer, and fill them with black. Keep these areas small. Name this layer Occlusion Shadow.
Step 6
Finally, let’s add the cast shadow—the shadow visible on the ground. Do to this, create a New Layer on the bottom, outside of the masked layers. Paint a small grey patch under the subject—the closer this shadow is to the subject, the darker you can make it. Name this layer Cast Shadow.
Step 7
Now, time to mix all this shading to the colors. It’s very easy: just change the Blend Mode of the Shadow group to Multiply.
4. How to Add Shine
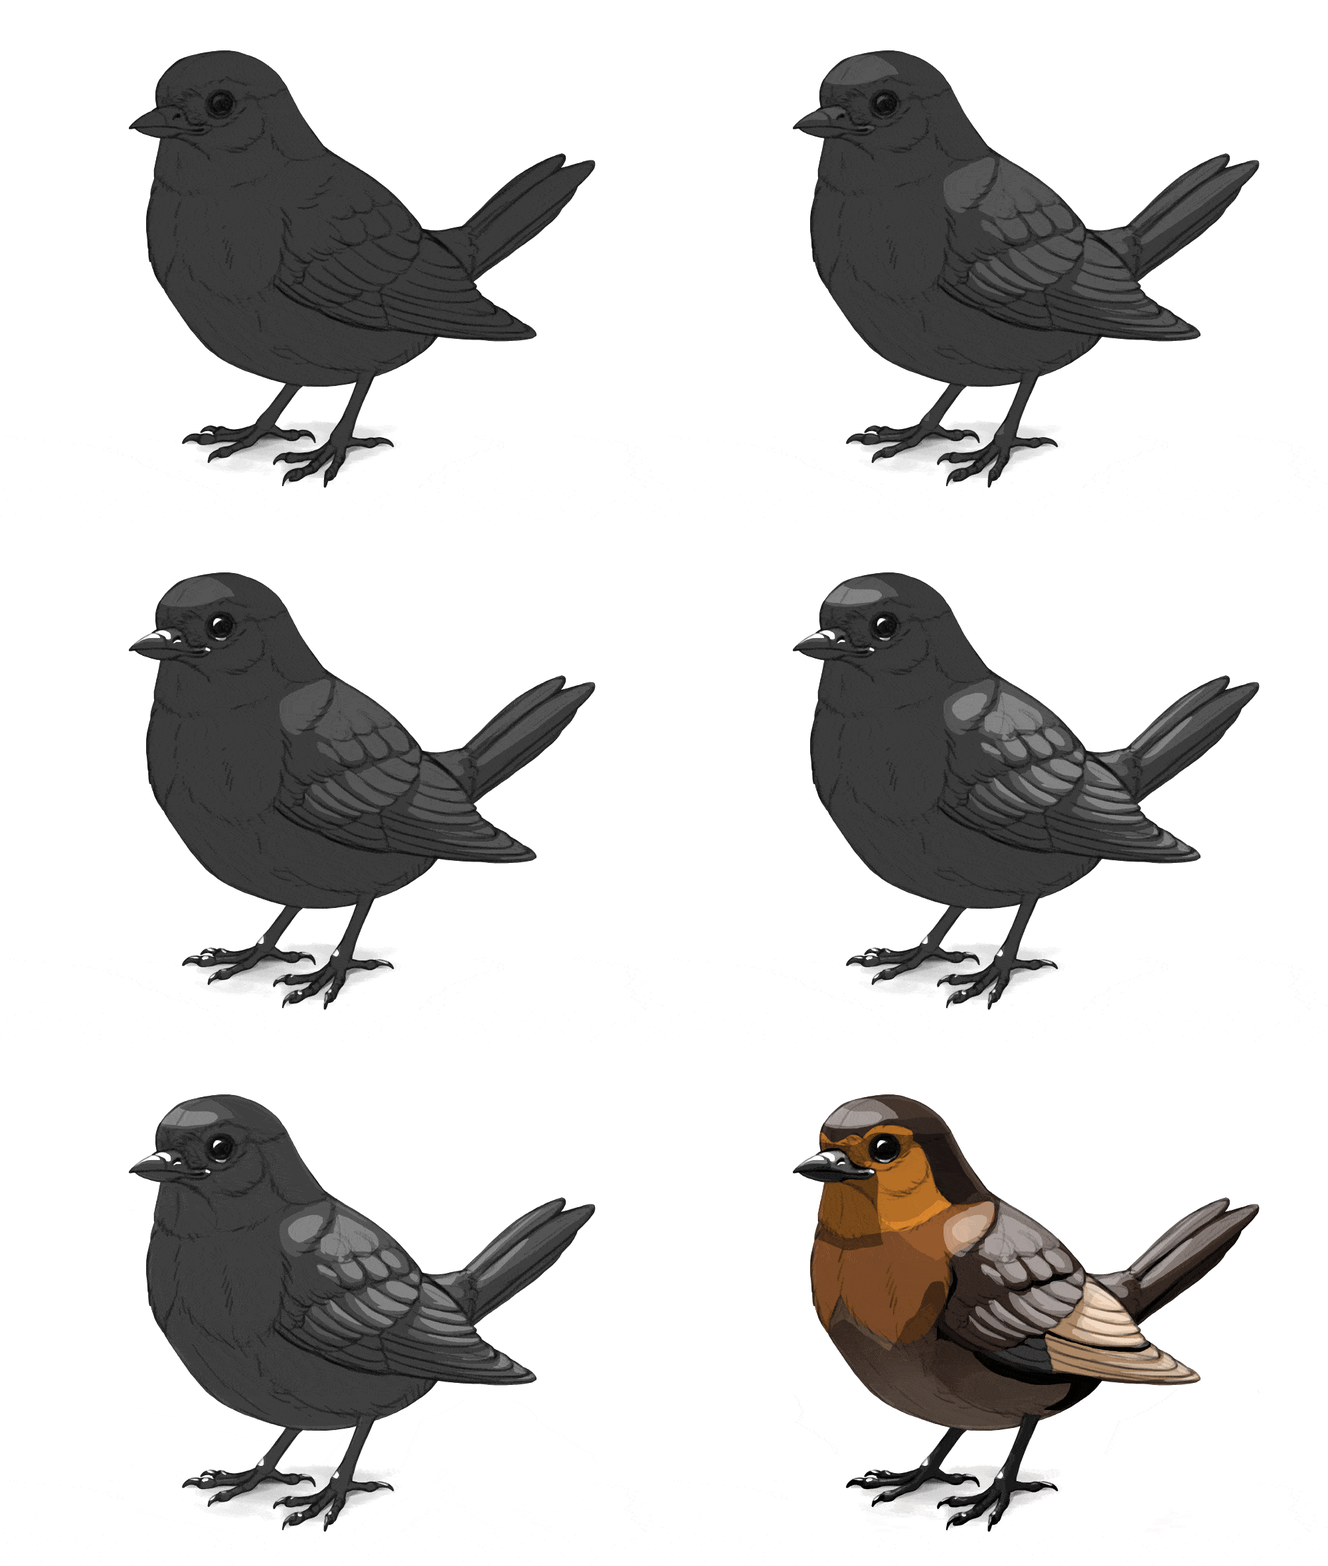
Step 1
Shadow is not the only thing that sculpts the form of the subject. There’s also shine—the direct reflection of the light source appearing only at a special angle between the light source and the viewer. To add this effect, create a New Group above the Shadow group. Name it Shine. Inside, create a New Layer and fill it with dark grey. Name it Background.
Step 2
Create a New Layer and use the Lasso Tool to mark the areas that should be slightly shiny. These areas can be pretty big, but still smaller than the illuminated area. You can use it to reveal the uneven surface of the illuminated area—for example, the separate feathers. Fill them with grey only slightly brighter than the background. Name this layer Dark Shine.
Step 3
Create a New Layer, and mark the most shiny areas. Keep them small—the brighter the shine, the smaller and sharper it must be. This strong shine usually belongs to smooth, hard surfaces—so here I’m adding it to the beak, legs, and claws, but not the feathers. Fill these areas with white. Name this layer Highlights.
Step 4
Now, create a New Layer between the two previous ones. You can use is to add the areas of a medium strength, and medium size, to reveal even more details of the surface. The grey here should be slightly brighter than the first, big shine. Name this layer Mid Shine.
Step 5
In real world, once a surface turns away from the viewer, it seems more shiny. It’s called the Fresnel effect, and you can include it by marking a thin outline right next to the edge of the subject—on a New Layer, of course. You can make it white, and then regulate its strength with the Opacity until it doesn’t look fake. Name this layer Fresnel Effect.
Step 6
Now, remove the dark grey Background and change the Blend Mode of the group to Screen. This will automatically mix the shine with the shadows and colors!
5. How to Adjust the Colors
Step 1
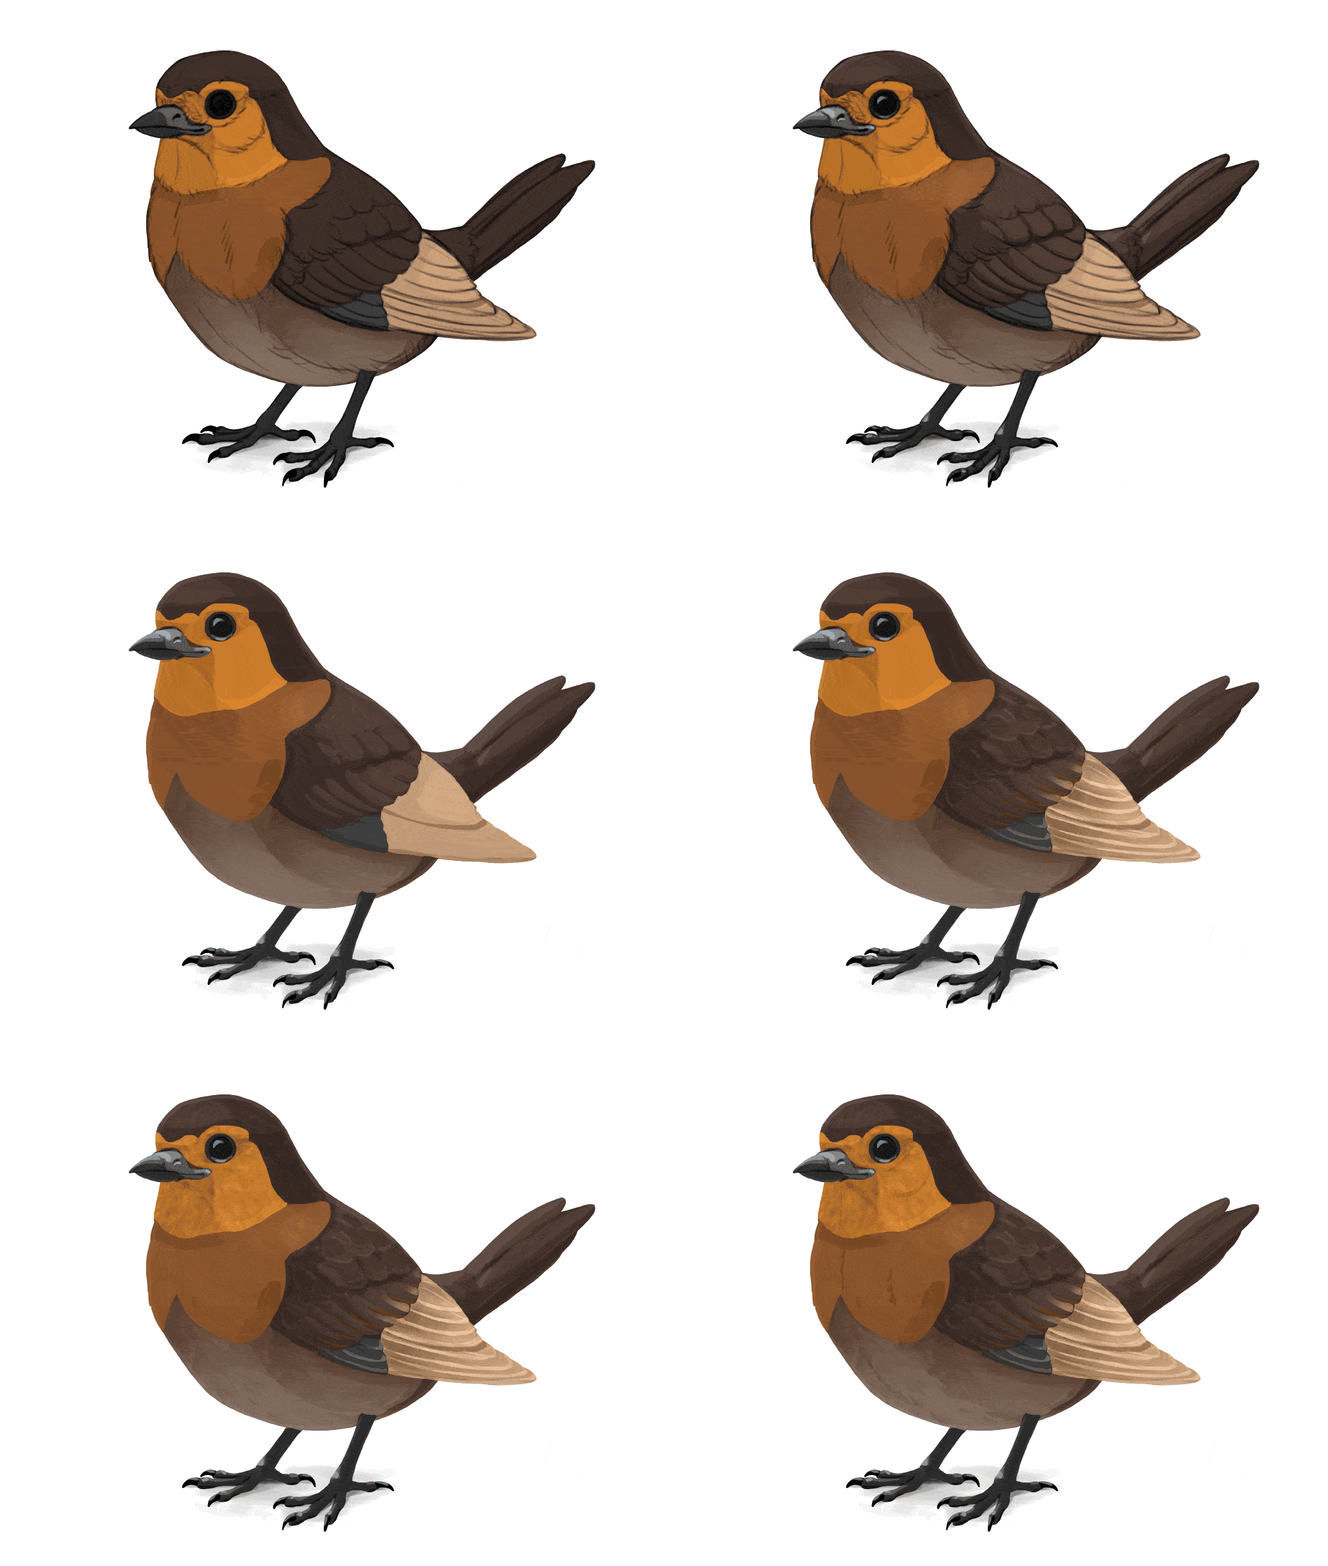
As you can see, my bird looks 3D now, but its materials look all wrong—it seems hard and shiny, like a painted sculpture. It’s because the soft feathers, in reality, would capture some of the light inside them, making them warmer in color and breaking the strength of the shine. This effect is called the subsurface scattering.
To include this effect, we need to adjust the colors and Opacities of the shadow and shine layers. First, hide the Shine group to see the shadows only. Then, lock the transparency of each shadow layer, and paint over it with the painting brush. The relative darkness of each shadow should remain the same—so, the occlusion shadow should stay darker than the ambient light, which should stay darker than the reflected light, which should stay darker than the direct light, and so on.
But other than that, you can change anything you want—make these layers brown instead of grey, brighten them all, make one shadow only slightly darker than the other, or even give each of them different colors. Don’t worry about the theory behind it—your goal is simply to make it look good! Just remember that the fluffier/softer the material is, the more light it captures inside, brightening the shadows.
Step 2
Do the same with the Shine group now. Shine looks the strongest on dark, smooth, and/or hard materials, so in my case, I can leave it pretty visible on the beak, in the eye, and the legs. The shine on the feathers, though, will be broken by their softness and their subsurface scattering, making it weaker and warmer. Keep in mind that this isn’t true for all feather—big black birds, like ravens, have smoother feathers with lots of shine!
Step 3
Now if you hide the line art, the artwork should look pretty good. And still, there may be some details missing—they are there when the line art is on, and disappear when you hide it. This is because we’ve recreated most of these lines with shading and shine, but some of them should com from variation in colors.
So look at your subject now and see where such variation can be added. For example, the feathers are often outlines with a thin, brighter edge, so adding it would help us separate the feathers without adding any extra shading. To do this, you can show the line art and use the Lasso Tool to select the areas right next to the lines. Then you can hide the line art again and paint these new colors on a New Layer, above the other colors and under the Shadow group.
Step 4
Continue doing this to all big feathers, or any separate elements that you have in your drawing.
Step 5
The basic color areas that we’ve established earlier can also be modified to include more details. You can use a drawing brush to draw a subtle texture on them, accentuating the 3D curvature of the area.
Step 6
If you mark all the colors and there are still some details left, you can add an extra shadow layer in the Shadow group, and add them there. Just keep them subtle!
6. How to render the artwork
Your drawing, in some sense, is already finished—just in a stylized way. If you want to make it look more realistic, though, there’s some extra work to be done.
Create a New Layer on top, over the masked layers. Look at all the sharp borders between shadows and colors—paint over these borders to cover them, picking the colors from the area with the Eyedropper Tool. This is also a great opportunity to suggest the texture of the surface by drawing subtle shapes in these transitional areas—for example, small individual feathers, or shadows between scales.
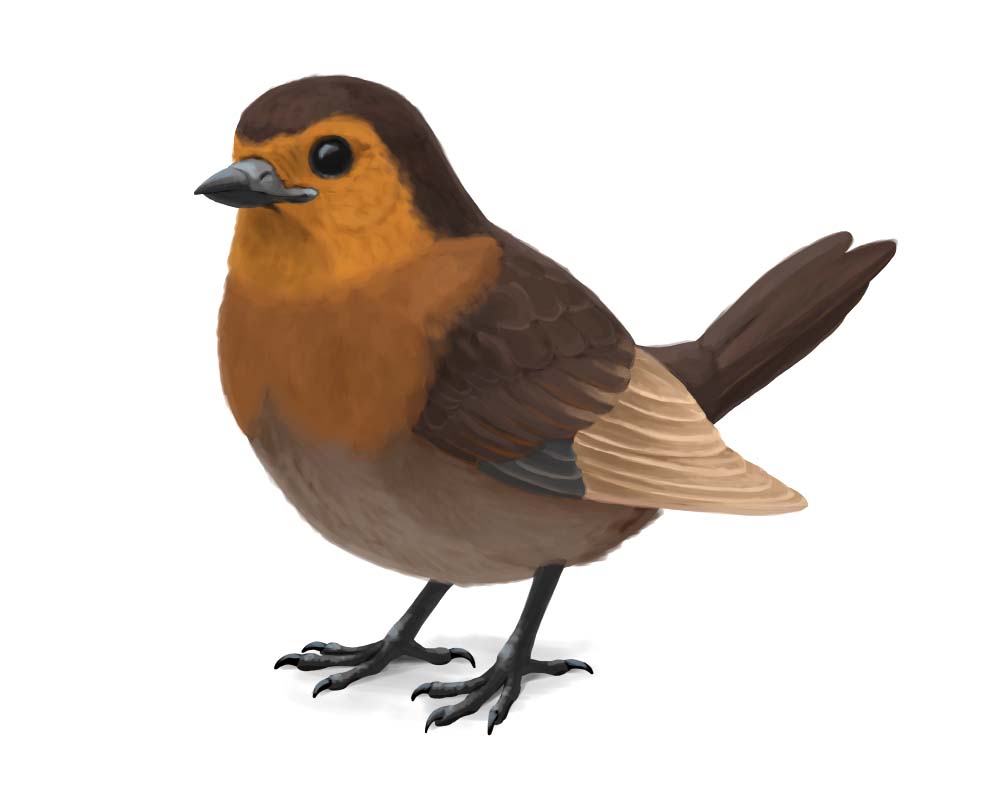
The artwork looks pretty good now, doesn’t it? It’s very much finished, but if you want to push it even further, here’s what you can do. Create one more New Layer on top and paint small details using a smaller painting brush (or even a drawing brush). If you’re not sure what details you’re missing, you can use a reference photo to see what else can be added. You can also move the line art to the top and show it for a moment, to see if there are any details that you’ve missed.
The final product:
