

Maybe you’ve been using Adobe Photoshop and Lightroom for a while, or maybe you’re just getting started. There are many ways to do different things with the software, as well as all kinds of tips, tricks, and hacks to do things simply and easily.
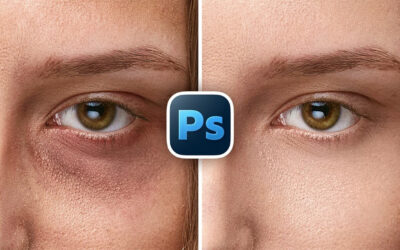
In this tutorial Colin Smith, the creator of PhotoshopCAFE, demonstrates how to edit a photo to get the maximum detail out of the sky and the foreground. Check out the video below for the Adobe Photoshop and Lightroom tutorial, or read on for all of the details.
1. Make adjustments in Lightroom/Camera Raw
If you're not doing it inside of Lightroom or you don't have Lightroom, just go into Adobe Bridge, right click on the image and choose to Duplicate. Select both images and choose Open in Camera Raw. Do the same adjustments as below.
We first begin in Lightroom. Duplicate (Ctr/Cmd+’) the photo, and it will create a copy of the image.
Select the copy and go to the Develop module. What we want to do is bring out the detail here in the original sky. So bring Highlights to -100 and Exposure to -1.55. Yes, the foreground got dark, but it doesn't matter.

Now select the original image. Notice the “blooming:” this means that we are losing edge detail because of the brightness. With the original photo selected, bring Highlights down to -64 so we can see our edges clearly. This also isn’t going to overly affect our foreground. Also lighten Shadows to +40 to bring out detail in the trees.
Now select both images by clicking on the X|Y button in the Library module to view them side-by-side. You can see below that the image on the left is exposed so the shadows are lightened. The image on the right is exposed so highlight areas will reveal the sky.

Now select both photos, Right Click > Edit In > Open as Layers in Photoshop. Now Photoshop will launch with these two images as individual layers.
2. Merge photos together in Photoshop
Now, we don't want to replace the sky. We want to use the real sky. So with the top image selected, choose Select > Sky tool.
There will still be little bits that haven't been selected. So what we want to do is we want to expand this selection a little bit. Go to Select > Similar. This will select the similar areas inside these little gaps that were missed on the first selection. Now deselect the areas that were incorrectly picked. Choose the Rectangular Marquee Tool. Select Subtract. Then drag a selection box over the areas we want removed.

Now hold down the Alt/Option Key and click Layer Mask. What this does is masks everything opposite your current selection. So maybe the background is just a little bit strong. What we're going to do is we're going to select the mask, go to Properties, see the Density -- this slider controls the effect of the mask. So we can adjust the amount of the sky that we want and mix it with the layer underneath to make it look more believable. We set it to 73%. Notice the blue in the top right corner of the sky. If we zoom into the original image, that blue is actually from the original sky, but let’s fix it to be gray.

So to make a selection, let's go back to our top layer, make sure we're selecting the layer and not the mask. Now select the Magic Wand Tool (W). Set Tolerance to 30. Check Anti-alias. Change Sample to 5 by 5 Average. Uncheck Contiguous. Then click on the blue corner to select it. Now select the mask, choose the Brush Tool (B), and make black the foreground color. Then paint over the blue corner of the sky.
Don't turn off the selection just yet! Create a New Layer in between the two layers, and use the Eyedropper Tool (I) to sample a gray color from the image. Notice how the foreground color will change to be this gray you sampled. Now use the Brush Tool (B) and paint the blue corner. Deselect by pressing Ctrl/Cmd+D.

3. Fine-tune color using curves
Let’s create a curve adjustment above the middle layer. The reason we're putting it between our top layer and these layers underneath is because any adjustment we make is going to affect our sky area, and our little corrected patch of gray sky. Play around with the contrast by dragging different parts of the line up and down in the Curves panel. We darkened shadows by dragging the left side of the line down and brightened highlights by dragging a point on the right side up.

To give it more color, say blue, select the Blue channel from the RGB dropdown menu. Dragging the line will increase blue, dragging down will decrease blue (and make the image more yellow). We increased a bit of blue to the shadows like so.
If you feel it's still a little fake, go back to our mask and lower the Density. That’s it! We hope you learned something new here, enjoy!
The final product: