Friends-on-boardwalk-photoshop

How to remove your ex from a photo: Adobe Photoshop tutorial

February 13, 2023

We’ve all been there – you’ve got a great group of friends, but one of them has a partner that doesn’t quite mesh with the rest. Finally, what everyone was quietly hoping for happens: that friend has decided to move on!

Here’s a quick and easy Adobe Photoshop tutorial from Kyle Runciman, Product Marketing Manager at Wacom, on how you can remove that “ex-friend” from a photo. Watch the video below for the tutorial, or read on for a summary. Don’t forget to use your Wacom Intuos tablet to make the selecting and masking a breeze!

Tips and tricks on how to completely remove a person from a group photo.

Note: not every group photo is created equal. Some are going to be way more difficult than this. In this example here, we’ve got a group of six people walking on the beach. We’ve got a nice blue sky, with not too much cloud or sunlight to deal with. If there’s more complexity, you might need a more complex process.

Also, enough time has passed where it’s almost certainly safe to remove this person from the image, but just in case they come back into the picture – literally – create a duplicate of the original and keep that as your safety net.

So there are three main areas we’re going to look at in this process.

  1. Borrowing from other areas of the image
  2. Stacking layers and using layer masking to hide certain things
  3. Final cleanup with shadows

Here’s our original image:

Friends on boardwalk photoshop 1

Borrowing from other areas

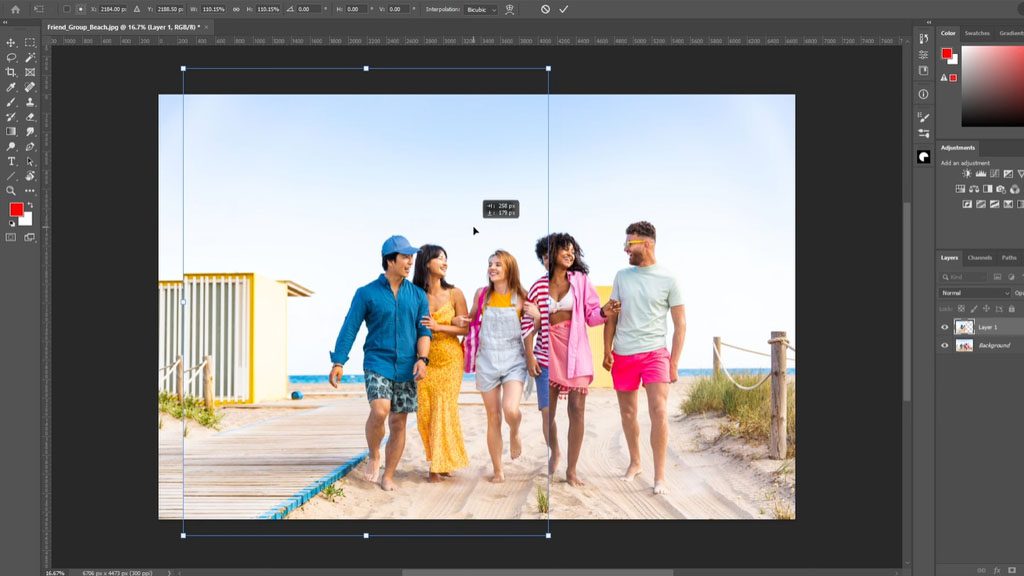
The first step is to grab the rectangular marquee tool. Grab a large selection of everybody on the left that we want to keep in the photo. Hit Cmd-J or Ctrl-J to place that selection on a new layer.

Then hit Cmd-T or Ctrl-T to to open up the transform tool. Hold shift grab a corner, and pull the people on the left over toward the people on the right, covering the “ex,” so everyone appears to be at a uniform scale. Then reposition a bit by dragging.
Friends on boardwalk photoshop 3

Stacking layers and using layer masking

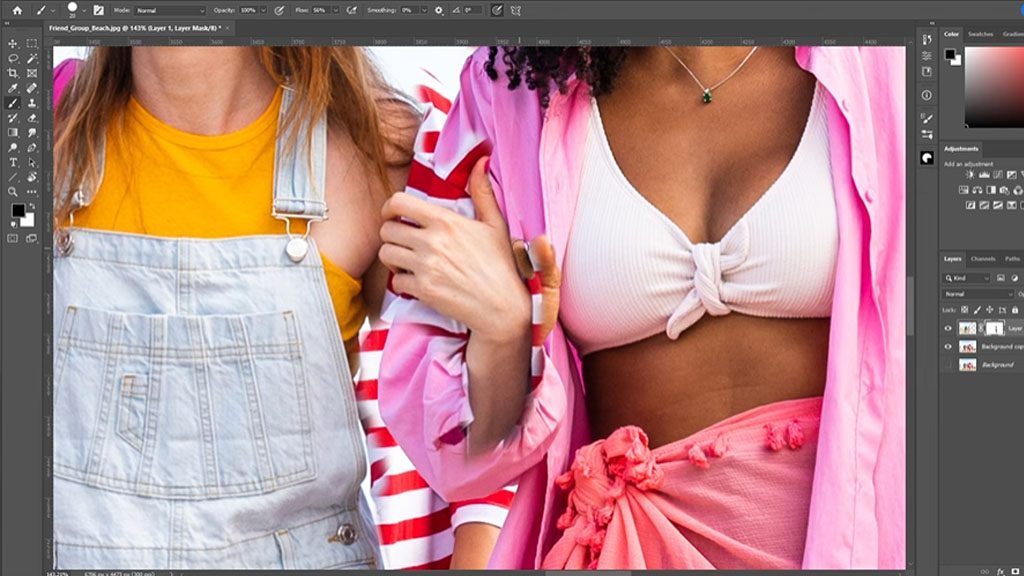
Next, add a layer mask to your new layer by clicking on new layer mask icon in the bottom right. That will reveal a white thumbnail next to that layer, which is our mask. Now with layer masks, we know that white reveals and black conceals. So we’re going to grab the black paint brush, making sure the pressure sensitivity icon is selected, which changes the size of the brush depending on how hard we’re pressing the pen down.

Zoom in a little bit and paint with the black brush to quickly hide as much of the “ex” as possible – remember we can always come back and fine tune this. Zoom back out to make sure you’re not missing any information that we want to have in the final image. And then we can sort of really zoom in and get the fine detail work around the hand. If you hide too much, switch to a white paint brush to reveal anything you didn’t want hidden.

The person is almost completely removed, but there are a couple more things – gaps between people can be solved by copying elements of the background such as the sky or, in this example, the yellow structure in the background, and using layers to keep bits and pieces of the “ex” hidden.

You’ll also have a line in the background where the initial copy and paste happened – that can be solved with some simple but diligent erasing!
Clean up shadows

Cleanup with shadows

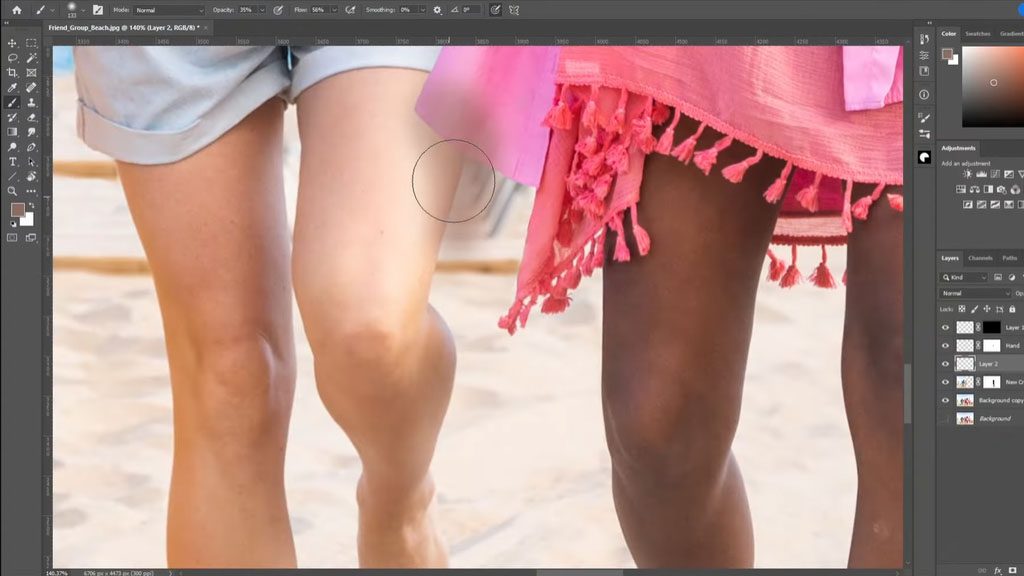
Finally, we’re going to have to work on the shadows to make the new image look realistic. Create a new layer and use a big, soft airbrush. Take a sample from an existing shadow for its color, just so that the skin tones are similar the shadow.

Based on where the sun is and where shadows already appear, you’ll just need to paint in some shadows, primarily between the two people in the middle who were smooshed together. Build up some color and some shade. You can erase with a hard eraser to cut back on the overspray. You might want to switch the layer to a multiply blend mode, as well – this does make your shadow a little bit darker, though, so we can crank down the opacity a little bit.
Clean up shadows

The final product

And there we go. The distant memory has been removed! We borrowed some elements from the pictures on either side, some sky, scaled up the three friends on the left, brought them over to the couple, used layer masks to paint and remove the person in the red and white shirt, cleaned up some of the edges, added some shadows, painted in some details.

Not all these projects are going to be as straightforward as this. Some might be way more difficult. But this is a pretty good idea of how we go about removing somebody from a photograph!

Final impage

Related posts:

What will be the top branding trends for 2025?

What will be the top branding trends for 2025?

Making the most of your Wacom, with Pablo Munoz Gomez – Tip 6: Creating Advanced Radial Menus

Making the most of your Wacom, with Pablo Munoz Gomez – Tip 6: Creating Advanced Radial Menus

Making the most of your Wacom, with Pablo Munoz Gomez – Tip 5: How to use ‘Precision Mode’

Making the most of your Wacom, with Pablo Munoz Gomez – Tip 5: How to use ‘Precision Mode’

Comparing Affinity vs. Adobe for designing a bookmark, with Vivienne Le

Comparing Affinity vs. Adobe for designing a bookmark, with Vivienne Le

Finance with Klarma

Shop now pay later with Klarna.

Only on the US eStore.

Shop now>

Connect with Wacom on social media

Today @aaronblaiseart takes us through the process of how he animated Snowbear. From story boards and rough animations to adding color and more. 🐻‍❄️
Head to Wacom's YouTube to watch the full video and get a glimpse of what it's like to animate an entire short film on your own! 
#animation #2danimation #aaronblaise #MadeWithWacom
416 11
Black Friday Deals are here 🖤🎁🛒⁣
Head to our Amazon store to discover our exclusive #BlackFriday deals. ⁣
Whether you're a beginner artist or a pro, we have something for you!⁣
Head to the link in our bio or our stories to save! ⁣
Also check out Wacom accounts in your region to find what Black Friday exclusives we have in your area. ⁣
#christmasgifts #holiday #deals #shopping #amazon #wacomsale
104 2
Hey 👋 Artists of Europe!

We’ve got some exciting news for you! 🎉 Wacom Europe now has its very own INSTAGRAM ACCOUNT — created just for YOU!

Follow @wacomeurope and get ready for:
✨ Creative tips & tricks
🎨 Get inspired by incredible artists
📅 Stay updated on local events
💡 Enjoy exclusive promotions

Let’s celebrate creativity together and join the Wacom community 🚀

Follow us here 👉 @wacomeurope 

#CreativeCommunity #WacomArtists #WacomCommunity
182 19
When the brain won't quit playing tricks 🧠👯‍♂️🖌️
Switching to digital can be hard but not impossible, right @lplucas? 
What are some of the things you struggle with as you transition from analog to digital? Tell us in the comments 👇🏼
#madewithwacom #digitalartist #digitalart #artistsoninstagram #artistlife #wacomtablet #wacomtips
1672 15
Have you ever considered becoming a jewelry designer? 

As part of #CareerDevelopmentMonth, we're excited to share a handful of diverse careers among Wacom users. ✍️⁣
⁣
Meet Quincy Vadan (@champagne_corpse), an independent jewelry designer and the artist-owner of Vadan Jewelry. Quincy shares his entire process for creating a three-piece capsule collection. His setup, including the Wacom #CintiqPro, makes it possible for him to remain completely independent and to take charge of the vast majority of his creative process.⁣
⁣
Head to the link in bio to watch the full video!⁣
⁣
#Wacom #MadeWithWacom #WacomForEducation #Jewelry #JewelryDesigner #SilverJewelry #ConnectedInk #ConnectedInk2024
149 21
Register for an amazing FREE webinar TOMORROW at 1pm PST with the amazing @aaronblaiseart! ❄️🐻‍❄️🤍

Learn from one of our favorite animation mentors as he walks us through the process of creating amazing animal characters like the main character of his animated short, Snowbear. 

Sign up through the link in our bio ☝🏼
#wacomwebinar #wacomconnectedink #digitalart #artwebinar
633 10
Want to learn how to create licenses for your artwork? @zeythehuman walks you through how to easily set up licenses* in Wacom Yuify, ensuring your work is protected. From using templates to customizing your own agreements, it has never been easier  to manage your creative rights.

Ready to protect your art?🔑
Register for free at Yuify.com
‌
*Yuify Licensing is only available in selected regions and may require additional agreements for specific cases not covered by the License Builder.

#WacomYuify #Yuify #CreativeRights #DigitalRightsManagement
114 1
Let's dive in with @alexferreiraa to learn how to improve our poses using the #WacomMovink and the 2D workflow to push them to the next level. Check out the full video through the link in our bio or head to @animationflow.academy YouTube channel. 
#animationflow #madewithwacom #characteranimation
314 4
Looking for a gift that will thrill a 7-year-old, a dad, or a co-worker? 🎁⁣
Get them a #WacomIntuos!⁣
⁣
Perfect for sketching, animation, comics, photo retouching, and note-taking, it's a gift that will keep on giving. ⁣
⁣
Now on sale on the Wacom US estore 🏷️⁣
#WacomSale
189 6
When author and @verabee had a fast deadline approaching, she was away from home and away from her usual work setup 😱

Enter Wacom Movink, a truly portable and powerful pen display she could use anywhere.

Watch the full video on our YouTube to hear her full #WacomMovink review, and to see her spot illustration process. And make sure to look out for Return to Sender, publishing in 2025!
#movink #creativeprofessionals #madewithwacom
#creativesonthego #digitalart
158 0