


Proko is a hub for artists to improve their skills and connect with a community of like-minded peers and talented mentors. They provide a wide variety of online courses that can be beneficial for both digital and traditional artists. To see all of Proko’s offerings head to their website or check out their Youtube channel, where they post free short tutorials, like the one below.
The blog post below is a summary of this video, “Solving drawing problems with digital painting,” featuring artist Jon Neimeister.
In this video, Proko teacher Jon Neimeister gives us a tutorial on how to work from a sketch to finished painting in Adobe Photoshop. This is a follow-up to a previous tutorial, How to Digitally Paint in Grayscale, but there are some differences: he followed a reference directly in the last one, but here he uses a looser brush and makes more creative decisions with the painting. And you don’t need to have watched the previous one to understand this, so let’s jump in.
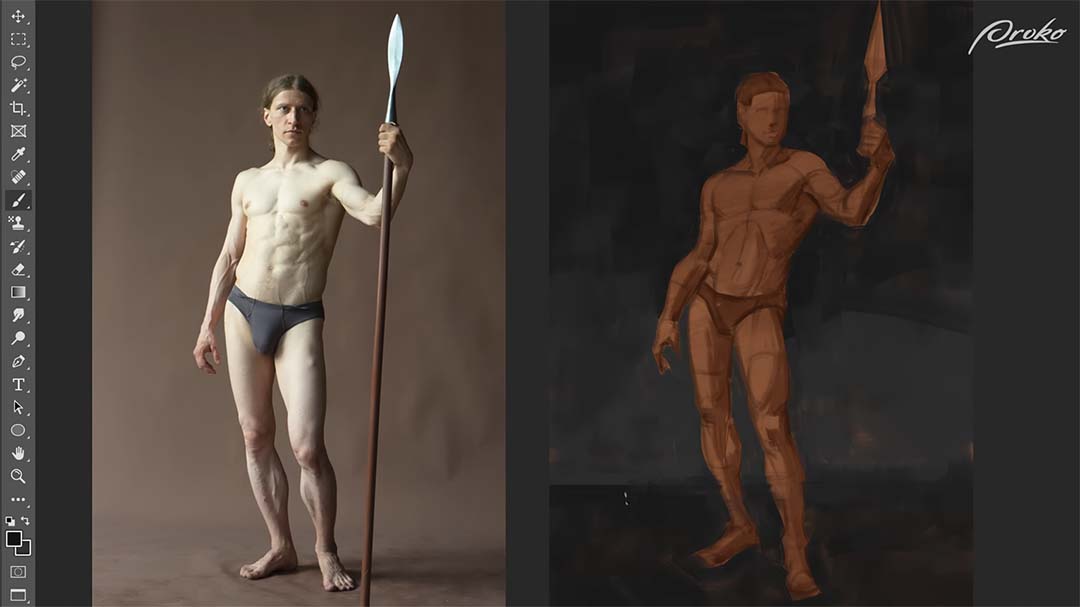
Neimeister paints a model with a spear from Grafit Studio, starting with a loose gesture drawing that he will soon refine and change in the painting stage. The drawing serves to get the general proportions and pose correct.

Key tip: When drawing from reference, feel free to take creative liberties. In Neimeister’s words: “It’s extremely important, both for studies and our original work, that we don’t become slaves to our reference. The photo is there to provide you with information. You can choose to follow that information, or you can deviate from it, depending on your own creative goals.”
His process in this tutorial is highly inspired by traditional art, so after the drawing, he paints a textured brown layer over the canvas, inspired by the undercoating that oil painters do. He pauses to roughly block in the shadow shapes on the figure, then paints another layer of dark gray over the background, leaving spots of brown peeking through to add a little visual interest to the otherwise monochrome painting.
The background done, he then starts painting light over the figure using two mid-tone gray brushes that are very similar in value. For this stage, he keeps it simple and only focuses on the broad relationships between his lights and his shadows. This will let him choose which areas he wants to refine later, he explains, as by leaving some areas less precise, he can achieve a more painterly look.
Key tip: “Pay close attention to brush stroke direction, as you can achieve a lot of edge control just by choosing carefully which direction you paint your brush strokes.”
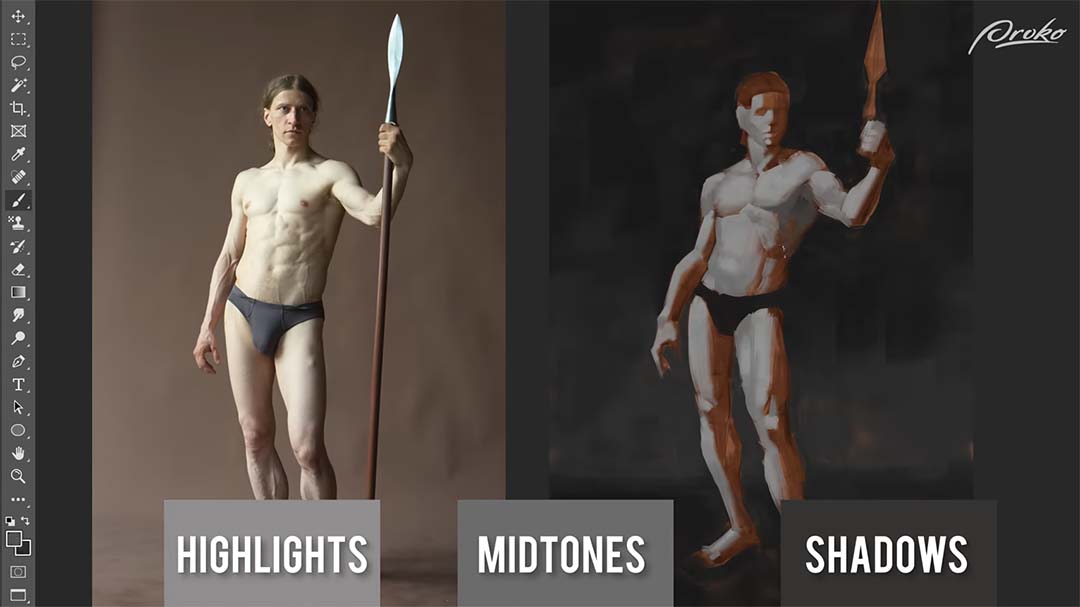
Afterward, he chooses a darker gray, but nowhere near as dark as the background, to paint in the shadows on the right side of the figure. “I also want to keep my shadows relatively simple compared to the lights,” he says. “I’m going to need to choose where I want to put my information. If I make the shadows and the lights equally detailed, the figure will appear a little more flat. But if I let my lights be more detailed and rendered and let my shadows be more simple, then the figure will feel more natural.”
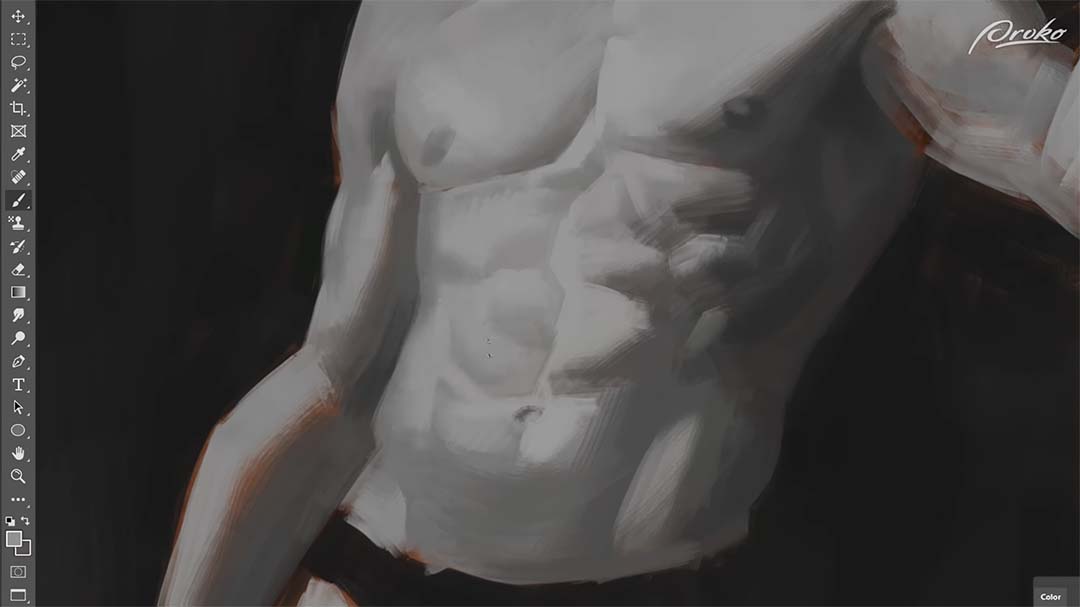
Once he has the basics of the lights and shadows established, he zooms in to start refining the painting. This is also where he starts blending with the eyedropper tool, selecting a mid-tone where light and shadow brushstrokes overlap, then painting over it to create more seamless transitions. It’s difficult to blend with the rough oil painting brush he’s using, but that’s exactly what he wants, he says: “If I’m trying to paint something that feels more traditional, it’s actually easier to achieve with a brush that’s somewhat more unpredictable, as whenever you’re painting with watercolors or oils, there’s always going to be some element of randomness or chaos that you can’t control.”
Next, he starts rendering the torso, painting in the complexities and details of the various muscles — but he still simplifies them to avoid giving the painting a cluttered look. His goal is to reduce them to cleaner, more appealing shapes. This kind of practice will be extremely useful when you start making original artwork, he explains, as you won’t have a reference to directly copy, meaning you’ll have to come up with the most appealingly stylized versions of that anatomy yourself.
Key tip: “Doing studies like this on a regular basis is one of the most helpful things you can do for your artistic development. Not only does it help you develop your skills as you’re practicing painting something with the help of a reference, but it also helps you develop your creative decision-making.”
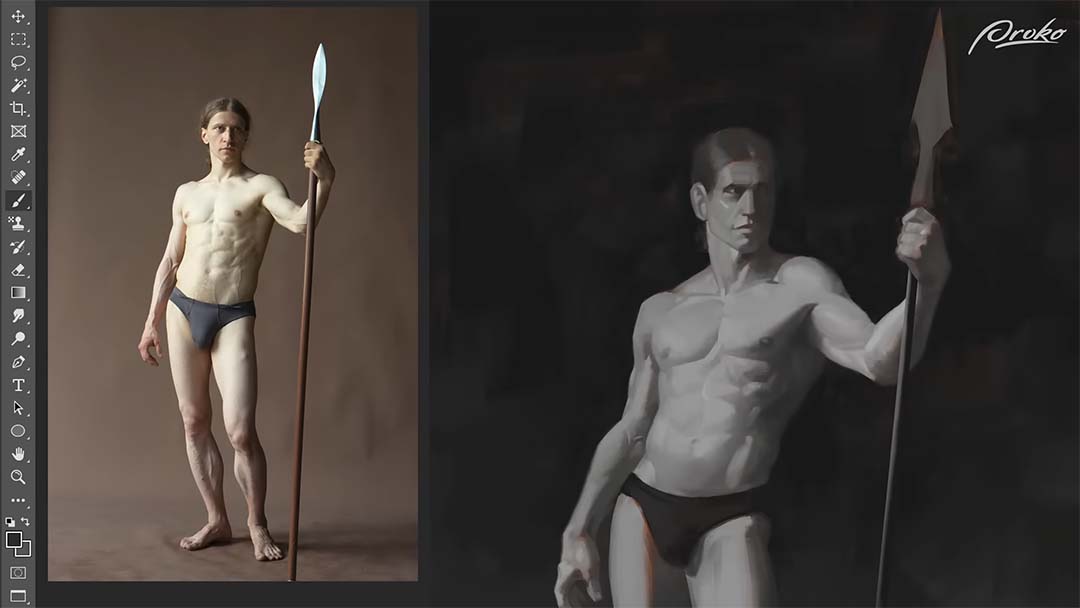
As he gets towards the bottom of the figure, he doesn’t give it as much polish, painting in looser strokes. The face and torso are the most interesting parts of the painting, so he’ll refine those more to draw the viewer’s eye towards them, then leave the legs and feet a little rougher to add to the painterly feel of the piece.
For the spear handle, he uses the pen tool to create a thick, black line on a new layer. He locks the transparency, then with a white brush, paints light onto the left side of the spear.
This completes the study, and he can zoom out and devote his last minutes to the finishing touches: cleaning up edges and making other small adjustments to really make the painting pop.

Want to learn more?
To see more of Jon Neimeister’s work, check out his website or Twitter. If you’re interested in expanding your digital painting skills even further, consider taking a full course from Proko.
This lesson is part of the Digital Painting Fundamentals course by Neimeister, but Proko has tons of courses by instructors such as Stan Prokopenko, Marco Bucci, and Trent Kaniuga.


