How do I set up my Wacom pen tablet for graphic design?
Did you get a Wacom Intuos tablet for Christmas, recently upgrade your setup, or want to start using your pen tablet for graphic design — but don’t know where to start?
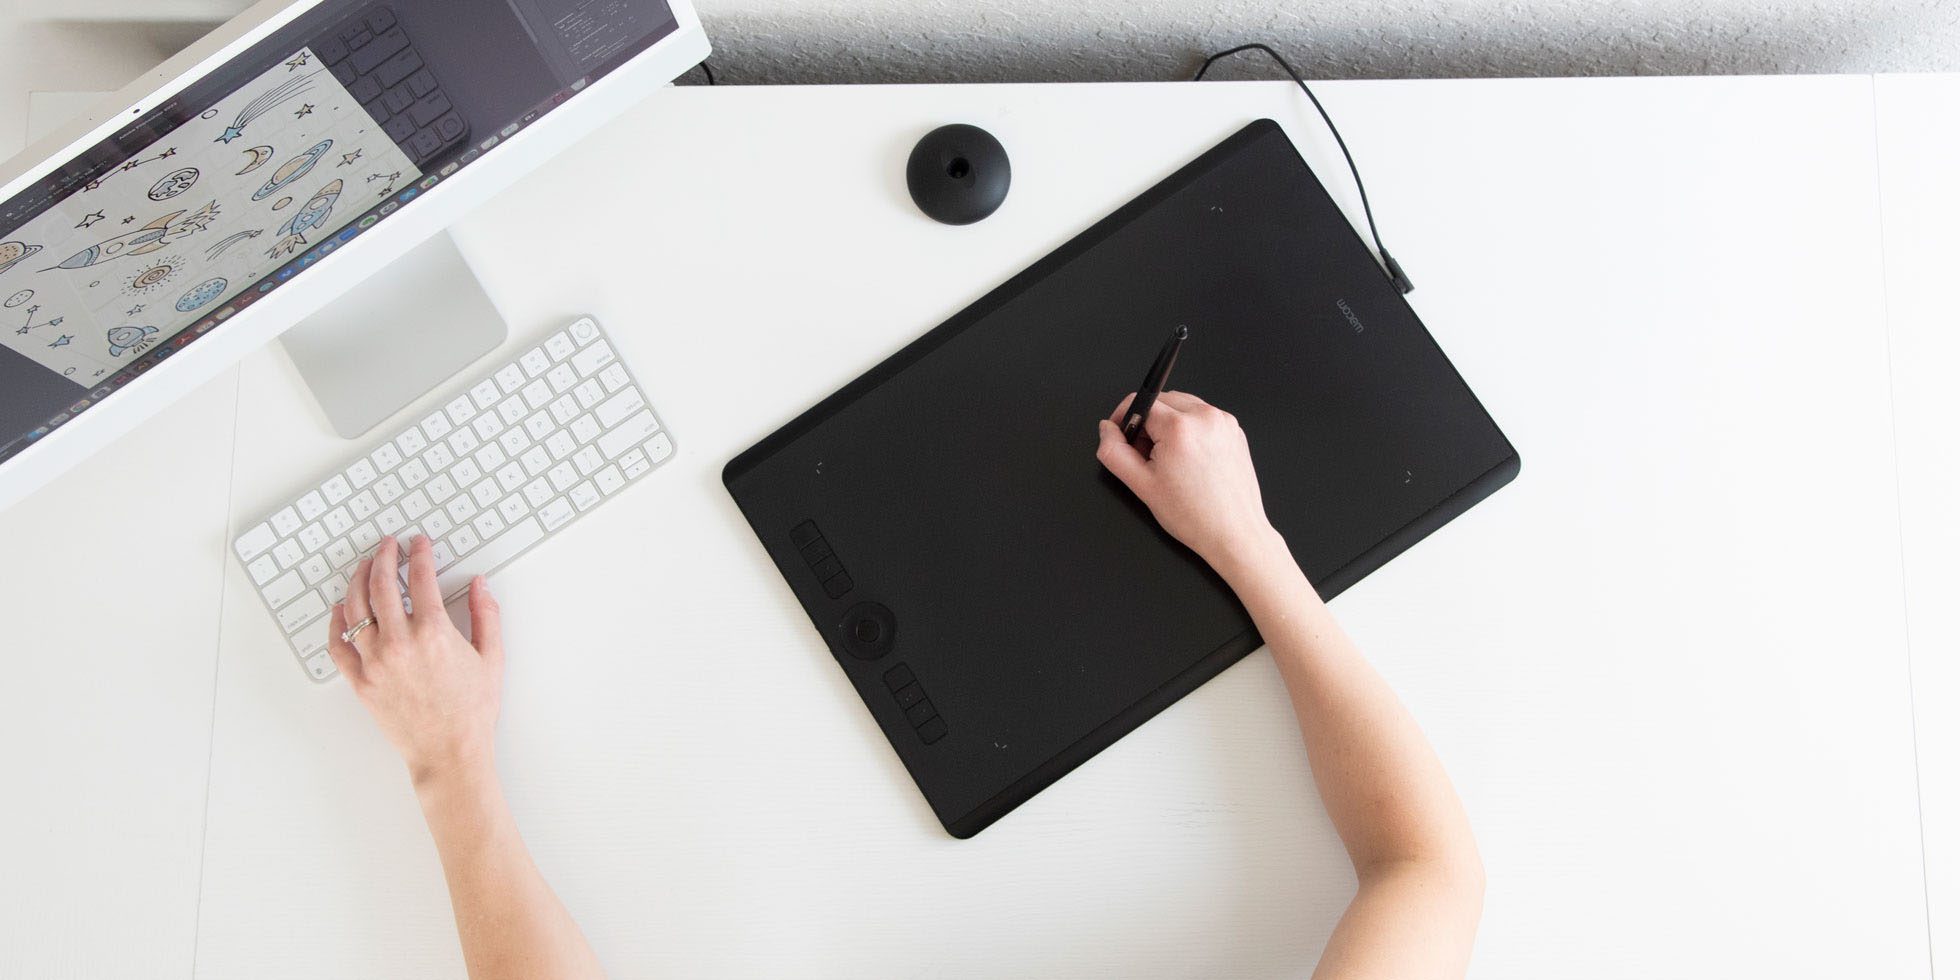
In this tutorial, Lauren Gonzalez, graphic designer and founder of 4 The Creatives, shows one of the best ways to set up your Wacom tablet for a graphic design workflow. She uses the Wacom Intuos Pro Large for this video, but the functions will be very similar between different Wacom tablets.
Check out the video below or read on for all of the details!
The basics — connecting to your computer
Different models of Wacom tablets come with Bluetooth connectivity or with a cable that you can connect to your computer. That’s the first step! If you’re having trouble, check out a step-by-step guide to getting connected at the Wacom “Getting Started” support site.
The next step is installing drivers. The link to access that is here. After you have installed the driver in your computer, you go to your System Preferences and will find the Wacom Tablet Properties icon. You are going to click on that, and you’ll be ready to set up your tablet.
For Wacom Tablet Properties, you’ll choose the device you’re setting up, the “tool” you’re using, and what programs you want the settings to apply to. If you want to configure things differently for different programs, you’ll click the little plus sign to the right of the Application row. If you just want to adjust general settings that will apply to all programs, then “All” should be selected.
Pen settings and preferences
Pen tip feel
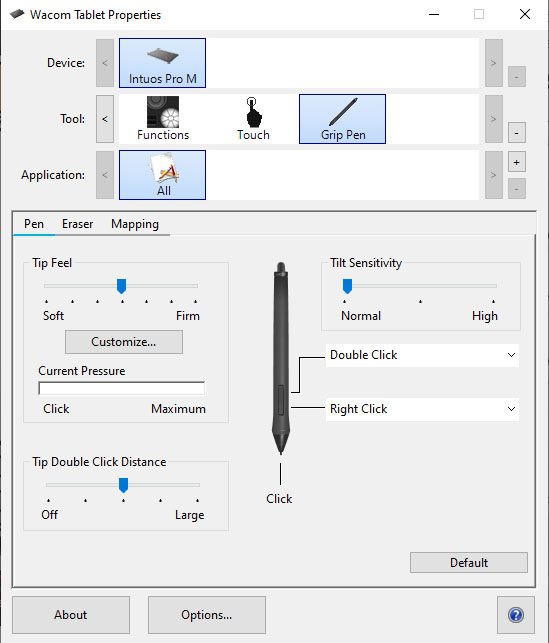
First up are the pen settings. Make sure that under “Tools,” the pen you’re using is selected, like in the screenshot above. We are going to start with the Tip Feel. This is about the pressure that you have to put down onto the pen for the computer to register the input.
So, for example when you have it on soft setting, it will be super sensitive when you press down on it. If we were to put this all the way at firm, you have to press down much harder for that input to register. So for doing brush settings, in order to make a stroke, it takes a lot more pressure and it’s not super sensitive. Some people do prefer that.
What I prefer is something in the middle. When I go to make a brush stroke in Photoshop, it’s not going to be super soft and it’s not going to be super firm.
Double click distance
After you set up the tip feel, we’re going to go to the mouse double click distance. When you are using a mouse and you double click, it’s in one location, so the computer will know that you are double clicking. But with a Wacom tablet, sometimes you’ll move a little bit from the exact spot between clicks. Double click distance is set up to detect when you are double clicking.
If you set it to “off,” that means that when you double click you’re going to be doing it in a very precise location. If you are somebody who has a greater distance between your clicks, like most people, you want to have it on large so it will detect it when you double click. Again, I prefer to have it in the middle.
Tilt sensitivity
After you set that up, you are going to set up the Tilt Sensitivity. When you are working with a brush in Photoshop for example, a different stroke is created when you tilt your pen (Access this in Photoshop by going to Window > Brush Settings > Pen Tilt). If you set this to high, it will change dramatically when you tit. Some prefer it higher, I like it at the normal setting so it is more intuitive. If you want it to be more calligraphic, then that would be the higher setting.
Pen buttons
Most Wacom pens have two buttons, a front and a back. The way I have it set up is just like a mouse — I use the front button as my right click. I set up the back one to double click, so instead of tapping the pen twice I can just click that button. You, however, can set this up to be whatever you want. You can set it up to be a keyboard command, you can do it to be a tablet setting, a navigation, or you can even have it open up an application. There’s many different things you can set up for both of these, so you can choose what works best for your own workflow.
Eraser
After we have gone to the pen we’re going to set up the eraser, if your pen has one. The eraser is literally like you’re using a pencil, and you just turn it around and erase. I prefer to just use the eraser or masking in Photoshop, as opposed to actually using this eraser, but you can set up how it feels and what the pressure would be, similar to the way the brush pressure is set up, if you prefer to use it like that.
Mapping
Mapping adjusts how the surface of your tablet correlates to your computer’s display. You can set it so that the full width of your tablet correlates to your screen, — so, for example, when you move your pen to the top of your tablet your cursor will move move to the top of your screen.
Some people prefer to instead only use a small portion of their tablet’s surface. Because I’m used to drawing and painting, I like a big canvas. You can kind of play with it and see what works best for you.
Other tablet settings and preferences
Touch
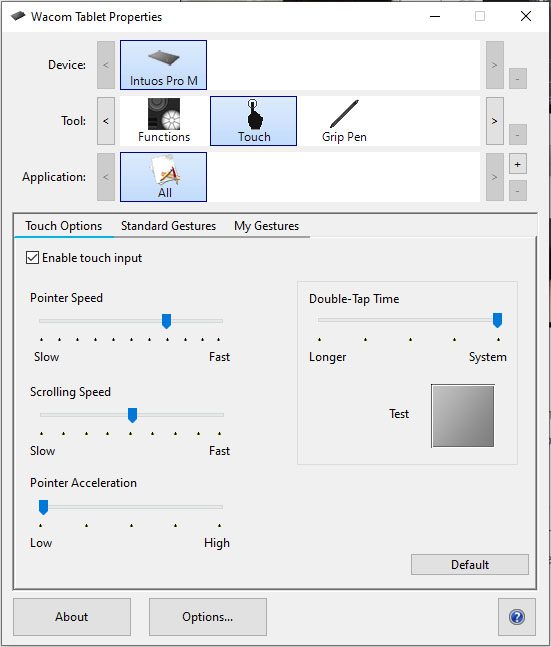
Intuos Pro tablets, as well as some other tablet models, have touch functionality. This means you can use your fingers to perform gestures on the surface of the tablet, like a trackpad or a mobile device like an iPhone. This is something that I have turned off!
To adjust these settings, click “Touch” in the Wacom Tablet Properties under “Tool.”
Some models have a physical button on the tablet to turn touch on or off, but you can also turn it on or off in the settings. Some people who use their tablet as a complete mouse replacement like this setting, and if you want to try it, you can set up all of the different settings here if you do want to treat your tablet like a pen-enabled trackpad.
ExpressKeys
Next, select “Functions” in the “Tool” row.
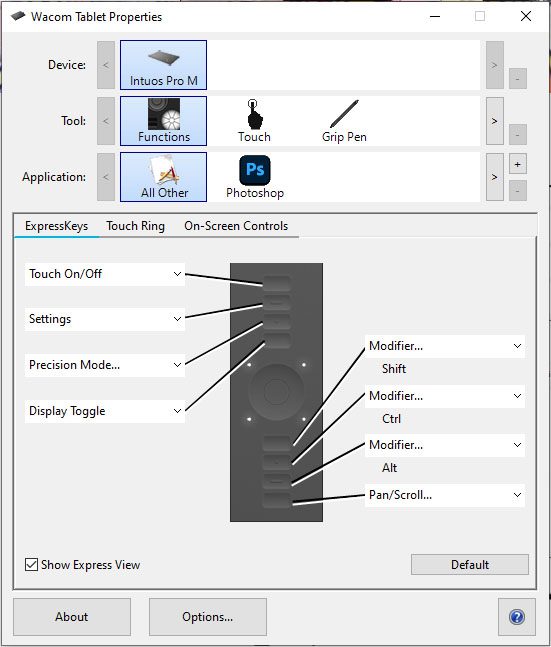
First, we’ll adjust the ExpressKeys. Wacom Intuos has four ExpressKeys, whereas Intuos Pro has eight — and a touch ring.
ExpressKeys are incredibly-useful shortcut buttons that you you can set up to do essentially anything you want!
For example, when I press the top one, it opens up the Wacom Desktop Center. The next one opens up my settings. If you want one of them to be backspace or undo, or to switch from the paintbrush to eraser, or to open up Photoshop, or take a screenshot — you can set these all up to do that! ExpressKeys can be super helpful to make your workflow incredibly efficient.
Touch Ring
Next is the Touch Ring. This is cool because it can be set to do four different things, and it acts kind of like the scroll wheel on a mouse. You just click that little middle button, which is the toggle, and it will show this little light in each of the four touch ring corners.
Then, once you’ve selected that function, rotating your finger around the touch ring will do the function you’ve selected. My favorite is to use it for scrolling and zoom. When I go to a browser I can just scroll up and scroll down and it’s really smooth. In Photoshop it will be Zoom.
This is one of the ones that it might be worth setting up differently for different applications. For example, in Finder or Windows it can be set for scrolling, but on Photoshop it can be set for Zoom. I have it set so it’s the same for all of them, which it makes it simpler so I don’t have to remember a bunch of different things — but as with all of these settings, that’s your preference!
On-Screen Controls
On-screen controls are another shortcut to make things easier for you. I don’t usually use these, but essentially you can set it so pressing an ExpressKey opens an on-screen menu that gives you more options. See the video above for a bit more about how to do this.
Summary
I’ve been using Wacom tablets for over 13 years, and they are so reliable, work extremely well with Adobe programs, and to me they are a designer’s dream come true for working digitally. It’s like you’re using a paintbrush, a pencil, or a pen — and that’s why I want you to set up yours so that it feels very natural to you.

About the author:
Lauren has been a graphic designer for over 11 years, and an artist since she was very young and has been an avid Wacom user since day one of her design career.
After working in-house as a designer and then creative director for six years, Lauren set out on her own, building a design business from scratch. After realizing how many other freelance designers were struggling out there, she created 4 The Creatives with the primary mission to stop creatives from being undervalued and provide a roadmap for them to build their own dream businesses. She continues to puts out weekly design-related tips and tricks on YouTube and Instagram as well as runs her signature course program, called the Consistent Clients Blueprint, where her students learn to set up successful design businesses of their own. Check out 4 The Creatives, or follow her on social media at the links below.

