Turn a photo into an illustration with just one Photoshop filter

Turn a photo into an illustration with just one Photoshop filter, with PiXimperfect

April 25, 2023

Maybe you’ve been using Adobe Photoshop for a while, or maybe you’re just getting started. There are many ways to do every type of edit in the software, as well as all kinds of tips, tricks, and hacks to do things more simply and easily.

Have you ever wanted to take a photograph of yourself, or a friend or loved one, and turn it into a cool illustration, perfect for a social media profile avatar or creative headshot? In this tutorial, Unmesh Dinda of PiXimperfect will use just one tool — called Cutout — and mostly adjusting just one slider, to turn a photo of himself into a vector-style illustration. Check out the video below for the Adobe Photoshop tutorial, or read on for a summary of how to achieve the effect.


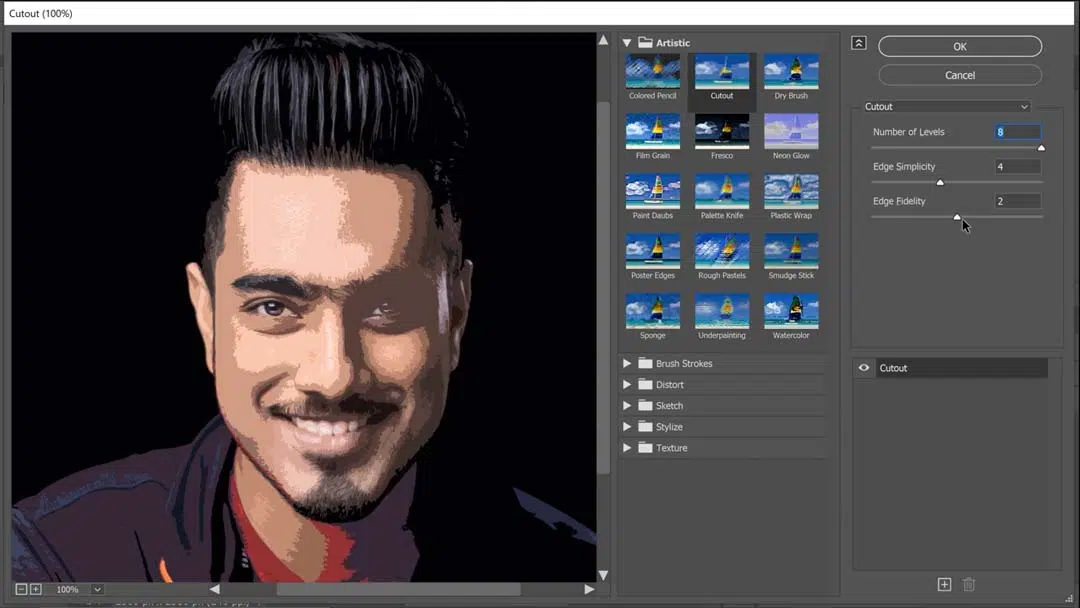
Found in the Filter Gallery, Cutout functions like an advanced version of the Posterize filter with three sliders: Number of Levels, Edge Simplicity, and Edge Fidelity. These dictate the amount of detail and the smoothness of your edges.

Step 1: Smart Objects

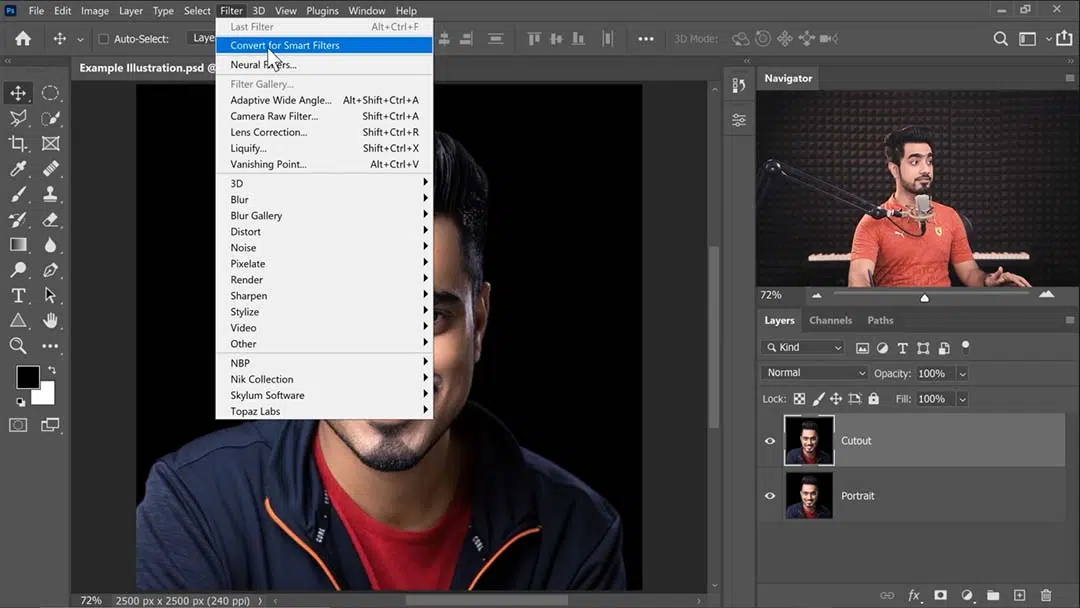
After opening the source image, the first thing Dinda does is duplicate the image’s layer, then go to the Filter menu and select “Convert for Smart Filters,” changing the new layer into a Smart Object. For those less familiar with Adobe Photoshop, this converts the layer into a “file within a file:” In order to edit it, you open it in a new window, then save and close it when you’re done just as if it were a different project. This allows you to create more complex compositions that include multiple smaller images, while keeping them all editable. Any filter put on a Smart Object is naturally applied as a Smart Filter, meaning it too can be adjusted at any time.
PiXimperfect Screentshot PixIllTut1

Step 2: Applying the Cutout filter

Key Tip: If the Filter Gallery option is grayed out, that’s because your image is in 16 or 32-bit, but the Filter Gallery can only be applied to images in 8-bit. You can convert your image to 8-bit by going to Image > Mode in the menu bar and selecting 8-bit.

On opening Filter Gallery, you’ll find Cutout under the first tab, Artistic. A guide to its sliders:

  • Number of Levels is the closest direct equivalent to Posterize; it cuts your image into sections of flat colors.
  • Edge Simplicity is exactly what it sounds like. Dinda describes this one as “the main game,” making it his primary tool for controlling the output illustration.
  • Edge Fidelity, the third slider, is mostly a supplement to Edge Simplicity, controlling exactly how much of the image’s fine details the filter tries to preserve while still reducing the number of colors. This makes the cutout’s lines more complex and jagged, though, so Dinda advises keeping it at minimum for a cartoony look.
PiXimperfect Screentshot PixIllTut2

Step 3: Layering Cutouts

Dinda goes on to make multiple duplicates of the image with Cutout filters applied at different intensities, from a highly abstract first version, which he emphasizes you should keep as minimal as possible while still capturing the resemblance, to more detailed second and third variants.

Then he creates a layer mask on the latter ones, clears them so none of the layers are showing, and with his Wacom Intuos Pro pen tablet, carefully paints on the masks so that the more detailed images will only show through on the parts of the face he wants to be more defined.

Step 4: Painting corrections and highlights

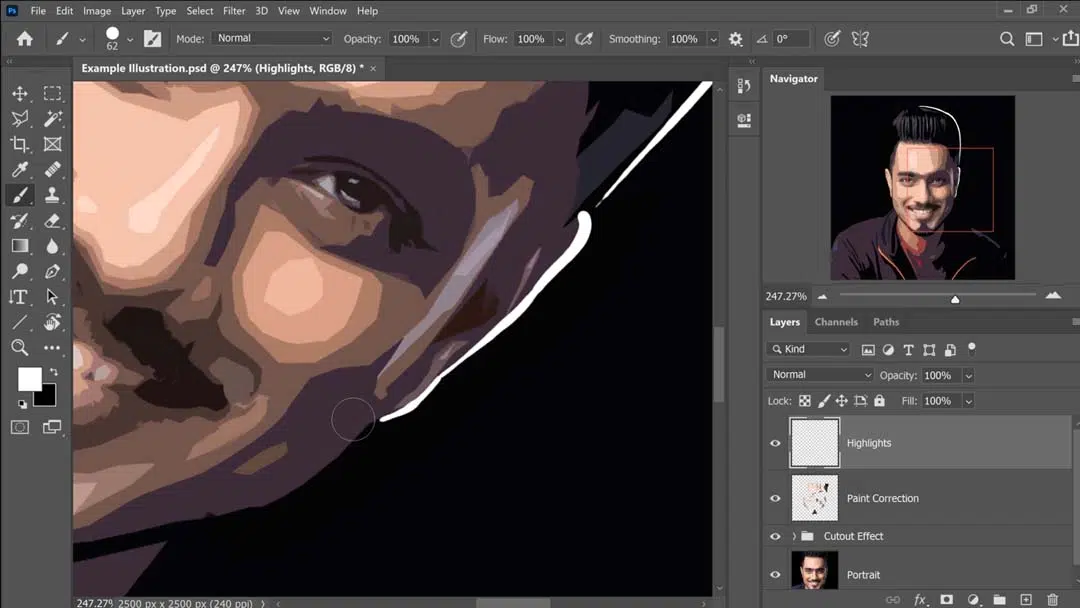
Finally, he creates a new Normal layer and uses a Hard Round Pressure Size brush to paint highlights in white to take the illustration to the next level.
PiXimperfect Screentshot PixIllTut3

The end result is a composite of multiple versions of the same image with different Cutout filter settings applied, and an extra layer to add hand-painted highlights — but it coheres flawlessly:

PiXimperfect Screentshot PixIllTut4

He also uses this technique extensively in a related tutorial, Transform Portraits to GTA Characters in Photoshop, which demonstrates a very similar process, but with more detail and extra steps. So check that out if you want to go further in depth.

Extra Tip: If you have a little digital painting experience and want your shapes to be neater, you can also eyedropper a color and then use a Hard Round Brush to fill in the lines’ jagged edges.

CS Jones avatar

About the author

Cameron “C.S.” Jones is a West-Philly-based writer and illustrator who’s been contributing to Wacom for three years now. You can see more of his work, including most of his contributions to this blog, at thecsjones.com, or follow him on Instagram or Twitter.

Related posts:

Comparing Affinity vs. Adobe for designing a bookmark, with Vivienne Le

Comparing Affinity vs. Adobe for designing a bookmark, with Vivienne Le

Making the most of your Wacom, with Pablo Munoz Gomez – Tip 4: How to Create Custom Radial Menus

Making the most of your Wacom, with Pablo Munoz Gomez – Tip 4: How to Create Custom Radial Menus

Etherington Bros’ Comics Crash Course #5: Concept art

Etherington Bros’ Comics Crash Course #5: Concept art

Making the most of your Wacom, with Pablo Munoz Gomez – Tip 3: Customizing Your Pen Buttons

Making the most of your Wacom, with Pablo Munoz Gomez – Tip 3: Customizing Your Pen Buttons

Connect with Wacom on social media

Brushstrokes, along with subject matter, color and types of media, often identify the author of a piece without a signature or overt documentation. 🖌️ The same concept applies to digital art. With Yuify, you can embed your authorship in your work, while allowing for hassle-free licensing and easy collaboration. ⁣
⁣
Join the Wacom team for a look at Yuify, including the steps for registering artwork with your unique proof of creation, retrieving and identifying the creators of pieces of art and creating and honoring licenses that you have chosen.⁣
⁣
Register via the link in bio. ☝️⁣
⁣
#Wacom #WacomYuify #Yuify #creativerights
66 0
Register for an amazing FREE webinar TOMORROW at 1pm PST with the amazing @aaronblaiseart! ❄️🐻‍❄️🤍

Learn from one of our favorite animation mentors as he walks us through the process of creating amazing animal characters like the main character of his animated short, Snowbear. 

Sign up through the link in our bio ☝🏼
#wacomwebinar #wacomconnectedink #digitalart #artwebinar
508 10
Want to learn how to create licenses for your artwork? @zeythehuman walks you through how to easily set up licenses* in Wacom Yuify, ensuring your work is protected. From using templates to customizing your own agreements, it has never been easier  to manage your creative rights.

Ready to protect your art?🔑
Register for free at Yuify.com
‌
*Yuify Licensing is only available in selected regions and may require additional agreements for specific cases not covered by the License Builder.

#WacomYuify #Yuify #CreativeRights #DigitalRightsManagement
105 1
Let's dive in with @alexferreiraa to learn how to improve our poses using the #WacomMovink and the 2D workflow to push them to the next level. Check out the full video through the link in our bio or head to @animationflow.academy YouTube channel. 
#animationflow #madewithwacom #characteranimation
279 4
Looking for a gift that will thrill a 7-year-old, a dad, or a co-worker? 🎁⁣
Get them a #WacomIntuos!⁣
⁣
Perfect for sketching, animation, comics, photo retouching, and note-taking, it's a gift that will keep on giving. ⁣
⁣
Now on sale on the Wacom US estore 🏷️⁣
#WacomSale
164 1
When author and @verabee had a fast deadline approaching, she was away from home and away from her usual work setup 😱

Enter Wacom Movink, a truly portable and powerful pen display she could use anywhere.

Watch the full video on our YouTube to hear her full #WacomMovink review, and to see her spot illustration process. And make sure to look out for Return to Sender, publishing in 2025!
#movink #creativeprofessionals #madewithwacom
#creativesonthego #digitalart
152 0
@zeythehuman reminds us that sharing your art with the world is essential, but so is protecting it. Yuify helps artists safeguard their work and identity, so you can showcase your creativity without worry.

🔒 Want to know how to protect your art? Visit Yuify.com for more info. Now available for @clipstudioofficial 

#WacomYuify #Yuify #CreativeRights #DigitalRightsManagement
130 6
Let's create a little magic this season...❄️🪄💜⁣
Art by the one and only @aaronblaiseart⁣
#animation #madewithwacom #aaronblaise #snowbear
1413 6
✍🏻 The flagship pen for the ultimate feel

Wacom Pro Pen 3 is not a generic design meant for everyone. Instead, it is the ultimate companion for professional creatives and promises the best pen experience. Wacom is committed to its claim “to deliver the best pen experience” and leaves no stone unturned to keep this promise.

Engineered for adaptability and precision, the Wacom Pro Pen 3 offers unparalleled customization options, making it an essential tool for professionals in digital art, design, and beyond. 🚀

Discover how the Pro Pen 3 is redefining creative possibilities. Link in bio.

#PrideOfWacom #WacomProPen3 #digitalink
243 15
👻 You cannot either run or hide from these digital nightmares 🏃🏻😅

Add yours in the comments below ⬇️

#HappyHalloween #WacomMovink
495 10
🎥 Tutorial: How to Create an Export on Wacom Yuify

Ready to take your creative projects to the next level? Join artist Zeynep Alpay @zeythehuman as she shows you the simple steps to export your work on Wacom Yuify! Whether you’re working on detailed illustrations or designs, knowing how to export seamlessly is essential. 💼✨

Take control of your digital rights with these easy-to-follow tips and make the most of #WacomYuify!

Register for free in Yuify.com

#Yuify #DigitalRightsManagement #CreativeRights #MadeWithWacom
87 1