One huge challenge of teaching online is that all your favourite worksheets suddenly become useless. Whilst students can view, they can’t write on them and only a few will have a printer at home. Wouldn’t it be great if they could write directly onto the resources you use? That’s where Kami comes in.
Kami is a PDF and document annotation tool, but it goes much further than that. With Kami, transform any existing document into an interactive learning experience to make online and blended learning effective for your students.
At Wacom, we’re delighted to offer a new integration with Kami to let you use our comfortable pens with this great program. Kami is one of the five exciting new partnerships we’ve added to our education software bundle, carefully chosen to help educators make the move to online learning.
Using your Wacom pen with Kami
Both the Wacom One screen and Wacom Intuos tablet work perfectly with Kami. Simply plug it in and start enjoying the benefits.
Lots of teachers who love Kami, say they struggle to handwrite on the screen. It’s no surprise, is it? Handwriting with a mouse or roller ball isn’t much fun. Using a Wacom pen means you can make the most of the wide range of drawing tools Kami offers.
Using a Wacom pen makes handwriting legible and gives you the ability to draw, annotate, highlight, and write anywhere you like on the screen. No more throwing out old resources. Now you can create interactive documents your students will love.
Using Kami with your students
By purchasing a Kami teachers’ account, your students can access it for free. Remember, with the Wacom One and Intuos, you get three months’ free premium access to try all the features before making a purchase.
Students need their own Kami account, but don’t worry, Kami’s committed to data protection. They won’t share student data with third parties, and there’s no advertising within the program. Kami can be used on any device with an internet connection. They suggest using it with a Chromebook, Mac, Windows, or Linux device, but it also works with an iPad.
How you use Kami collaboratively depends on the teaching platform you use. It works with Google Classroom, Schoology, and Canvas. You can also use it without an online classroom system.
Specific instructions for using Kami with different learner platforms:
- Instructions for Kami set up with Google Classroom
- Instructions for Kami set up with Schoology
- Instructions for Kami set up with Canvas
- Instructions for Kami set up with no online classroom system
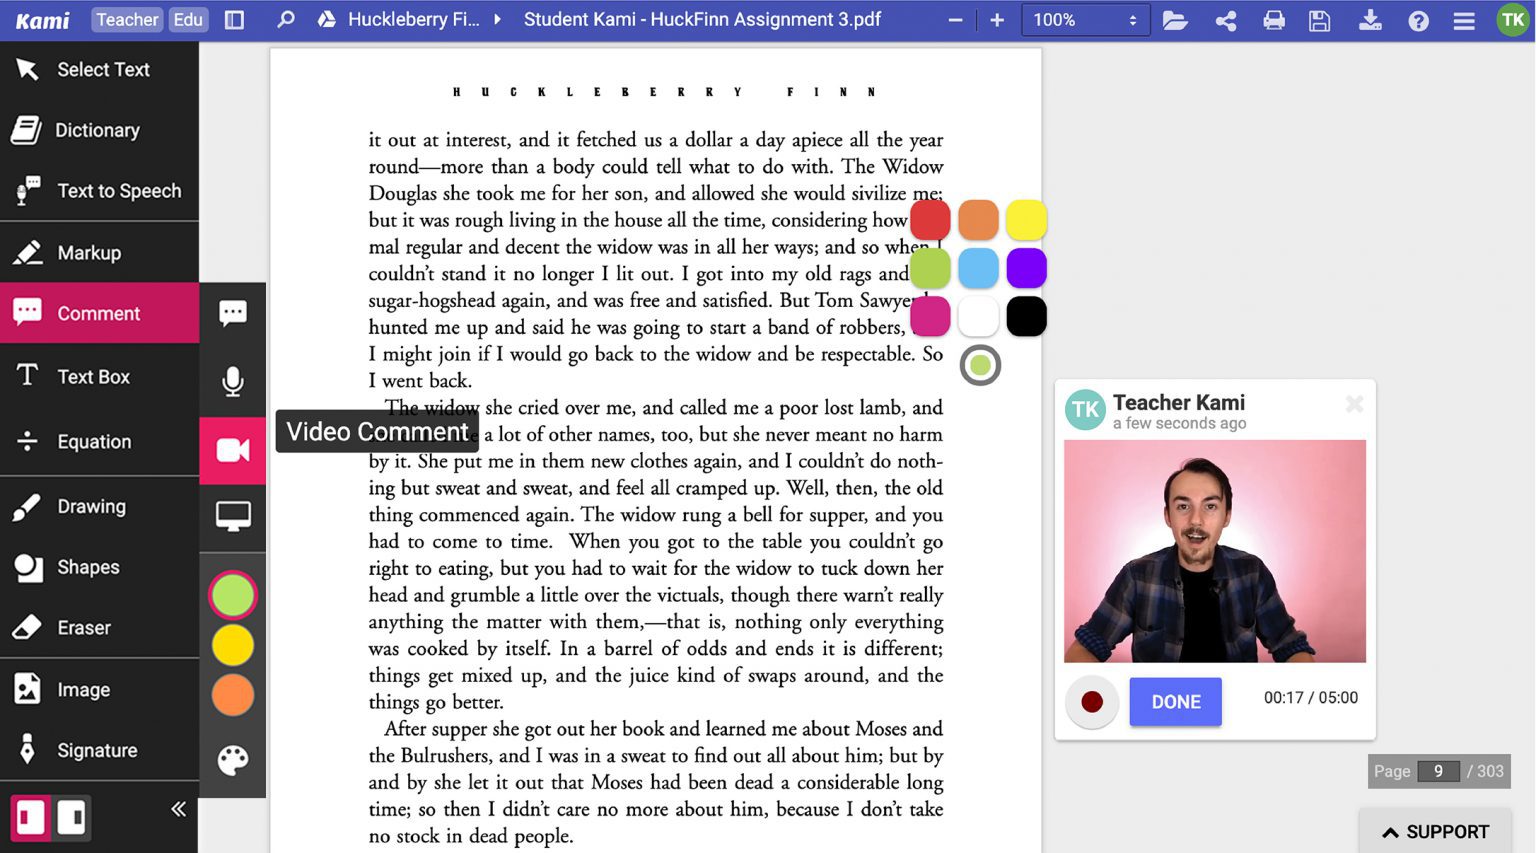
Often teachers struggle to give feedback to online work. Kami lets you capture formative assessment using different methods: adding a comment box, voice message, video comments, and screen capture. Use your Wacom pen to handwrite comments, highlight, and annotate straight on the work so students know exactly what they need to do.
How to use Kami
When you first open Kami, choose an existing document from your computer or Google drive, create a Google Classroom assignment, or open a blank page.

Whilst there’s far more you can do with Kami, let’s concentrate on three key areas you’ll use all the time:
- Upload existing documents to edit and adapt
- Set Google Classroom assignments
- Create new documents
1: Uploading an existing document
Kami converts Word documents, PowerPoints, and most image types. It holds all the formatting and keeps your hyperlinks unlike those cumbersome online file converters.

Use Kami’s tools to annotate, edit, and add information to existing documents. Your Wacom pen is particularly useful for handwriting edits directly on the screen. Make your marking and feedback clear for students, add notes to lesson resources, and write department meeting notes without having to type everything into an unwieldy Word document.
2: Linking your Google Classroom with Kami
If you’re using Google Classroom, Kami lets you streamline the process of setting assignments using the documents you’ve created and annotated.
Link your account with Kami. It will automatically find your classes. Attach files and schedule them to publish without any need to visit Google Classroom.

3: Create your own PDFs
Create engaging revision guides, worksheets, assessments, or department reports. To make a new resource, select a new page when you log into Kami. Choose a blank page, lined paper, grid, or music sheet.

So how do Kami’s editing tools work?
Left-hand tool bar
The editing tools are on the left-hand side of your screen.
Kami’s tools include:
- Dictionary: Check English word meanings in the Oxford dictionary
- Text-to-speech: Hearing the page read is useful for struggling students
- Mark-up: Highlighter tools to use with your Wacom pen
- Comment: Add text, voice, or video comments anywhere on the page
- Text box: Alter the size, font, and colour of your text
- Equation: Symbols for science, music, and maths lessons
- Drawing tools: Pen and erasure for easy annotation with your Wacom pen
- Shapes: Lines and shapes in a variety of colours, line thickness, and transparency
- Media: Add YouTube videos, Google image search, stickers, and media from your computer or Google Drive
- Signature: Use your Wacom pen to write and save your signature
Get familiar with the different tools. Your Wacom pen can replace a mouse, so you don’t have to keep switching between them.
Top menu
Every other tool you’ll need is at top right of your screen.
You can:
- Open an existing document from your computer, Google Drive, Box, or Dropbox
- Save and print your projects
- Split and merge existing PDFs and delete pages
- Share documents with full control over editing and printing rights
- Download to your computer or Google Drive choosing with or without annotations
- Menu bar for further settings and viewing options
- Help button to connect with Kami’s social media accounts, Help Center, and email support
Kami’s Educator Facebook Page
It’s worth checking out Kami’s friendly educator community on Facebook. You’ll find thousands of other teachers talking about how to use Kami for effective teaching. It’s full of helpful advice, tips and tricks from teachers already using it in their classrooms.

Not on Facebook? Kami also has an active Twitter account you can follow or connect on Instagram for advice and inspiration. If you need help, check out Kami’s Help Center. It’s full of articles that cover the essential basics. Alternatively, check out their YouTube page crammed with videos for teachers and students.
Takeaways
Kami is a fantastic tool for virtual teaching, and it’s made better with the new Wacom integration. Static, inflexible worksheets become collaborative, interactive resources you can personalise for your students.
Teachers choose Wacom because they want the comfort and ease of using a pen rather than typing onto the screen. By handwriting, comments are relevant and timely. Virtual teaching can feel distant, but with Kami and Wacom you can create a personal online learning experience.
Interested in Wacom’s other exciting new education software partnerships? Find out more about our free software bundle and claim your three-months free premium access. It’s everything you need for online teaching and learning.


