Note: this article was written many years ago. Some settings and menus in both Adobe Illustrator and Wacom Tablet Properties may have changed slightly since it was written. For up-to-date setup instructions and tutorials, please visit the Getting Started page on the Wacom Support website.
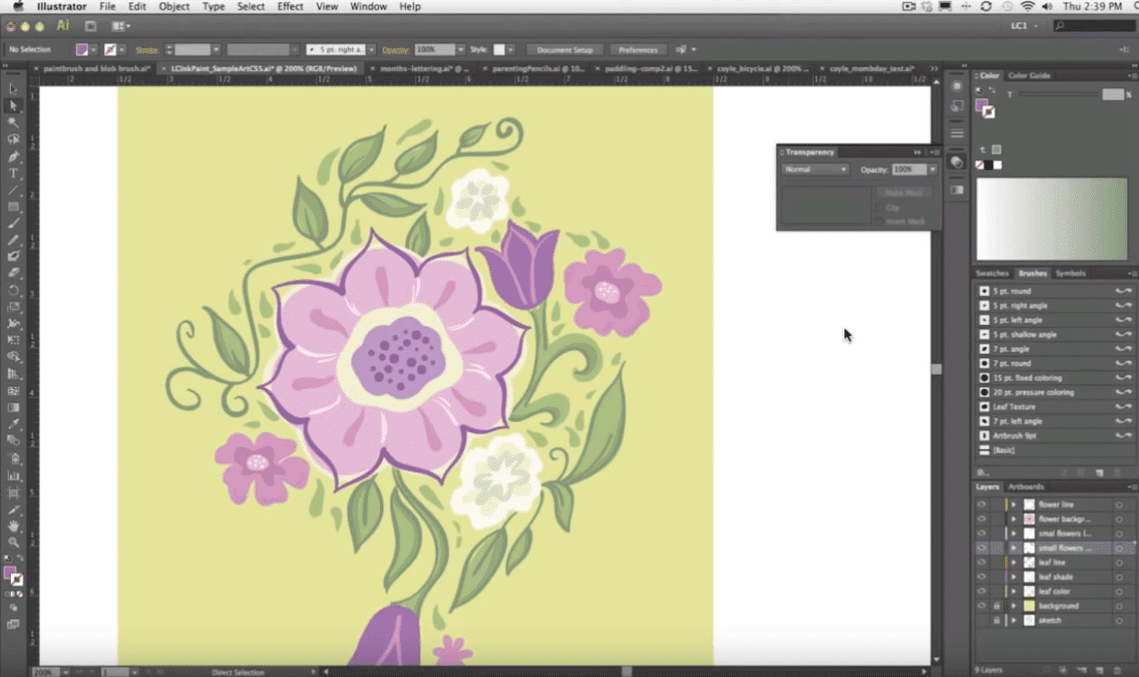
Adobe Illustrator and Wacom Intuos Pro deliver clean, extendable graphics, providing professional designers and illustrators with a better way to create. Featuring a host of creative tools, Adobe Illustrator has long been a program of choice for designers and illustrators alike. Advanced software capabilities enable users to produce elaborate designs and illustrations that capture their creativity with greater ease.
With a number of features like path editing, point alignment, and precise positioning, Adobe Illustrator allows users to work more efficiently with custom workspaces by taking advantage of the easy-to-use interface, featuring space saving and custom viewing options.
Taking Adobe Illustrator to a new level
The Intuos Pro pen tablet offers today’s digital artists an ergonomic device that combines pressure-sensitive pen and multi-touch capabilities, delivering precision and control that’s optimized to work with Adobe Illustrator to speed workflow.
For professionals, the Intuos Pro delivers improved performance and customization with better resolution, sensitivity and pen-tilt recognition. The workspace offers broad strokes and fluid arm movements, while the multi-touch surface lets you zoom, scroll and position work using intuitive gestures, allowing for more realistic strokes.
The Intuos Pro also offers customizable ExpressKeys, which can be assigned to application-specific settings, as well as a Radial Menu that works with Adobe Illustrator, putting your favorite shortcuts and menu options at your fingertips.
Getting the most out of Adobe Illustrator with Intuos Pro
Of the many tools that are available in Adobe Illustrator, there are a handful that are specifically optimized for Intuos Pro. Tools that offer brush-like functionality, including Paintbrush, Blob Brush and the Eraser as well as specialty tools such as the Symbol Sprayer and Liquify take advantage of pen-pressure, tilt and in some cases even rotation. When paired with the Intuos Pro, these tools allow designers and artists to bring freeform shapes and stylized looks to life.
How to set up your pen for Illustrator
First, open the Wacom Tablet Properties (on a Mac, go to the Apple menu, select ‘system preferences,’ then choose ‘Wacom Tablet’. On a PC, click ‘start menu,’ then select ‘all programs,’ then ‘Wacom Tablet,’ then ‘Wacom Tablet Properties’). Next, select the tablet you want to customize; in this case, Intuos Pro.
Select the “tool” you want to set up. In this case, the Grip Pen. In the application row, add Illustrator as an application that you would like to customize. To do so, make sure Illustrator is open and running in the background, then click the “plus” sign to the right of the application row, select Illustrator and click “OK.” With Illustrator added to the application row, you are now ready to customize your Grip Pen.
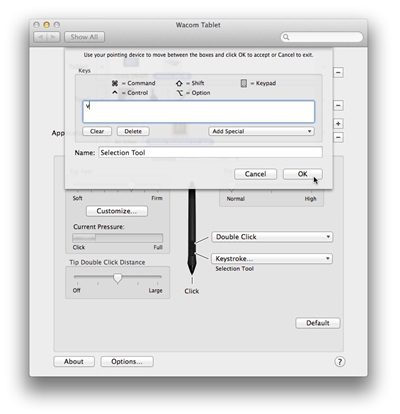
Many designers and illustrators use the “hand tool” more than any other, so we’ll set up the side switch on the pen to perform this function. With the Grip Pen and Adobe Illustrator selected in their respective row within the Wacom Tablet Properties, a diagram of the pen appears.
Next to the pen, select the dropdown menu for the lower end of the side switch, closest to the pen tip, and change the function to “keystroke.” Now tap the space bar as though you were working in Illustrator. You will notice the word “Space” in the Keys field. Click “OK.” At this point, you can name the function something descriptive, such as “Hand Tool”. Repeat the steps to set up the back portion of the side switch in the same way.
How to set up ExpressKeys for Illustrator
Beyond advanced pen support, the benefit to using Intuos Pro in Illustrator is the ease with which you can access Illustrator’s menu-driven interface with tablet functions, including ExpressKeys and Radial Menus.
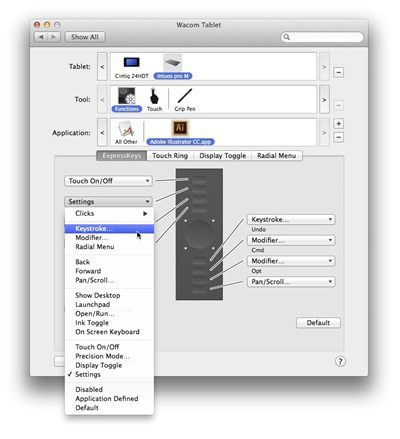
ExpressKeys are physical buttons that can be mapped to functions in the applications that you prefer. You can use these to perform almost any task, such as applying keystrokes, navigation functions or launching apps.
To customize ExpressKeys for use with Illustrator, start by selecting Functions in the tool row of the Wacom Tablet Properties. (ExpressKeys are found within Functions.) Next, repeat the steps for adding Illustrator as an application that you wish to customize, as noted above for the Grip Pen. Once Illustrator is added to the application row, you are now ready to customize your ExpressKeys.
With the Functions selected in the tool row, ensure that the ExpressKeys tab is selected and a diagram of the ExpressKeys on your tablet are visible. Make sure that you have the Adobe Illustrator icon selected in the application row. Now you are ready to customize your ExpressKeys.
Similar to setting up the side switch of the Grip Pen, click on the dropdown menu next to any ExpressKey and select a preferred function, such as keystroke. Similar to the Grip Pen example, you can assign any keystroke—or series of keystrokes—that you prefer to an ExpressKey. Alternatively, you can assign specialty functions such as modifiers or Radial Menu, which is discussed in the next section. Set up your ExpressKeys around your specific workflow, assigning them to your most commonly used keyboard shortcuts and functions.
How to set up the radial menu for Illustrator
Another powerful function of the Intuos Pro tablet is Radial Menu. Like ExpressKeys, the Radial Menu makes commonly used keyboard shortcuts and functions quickly accessible. Radial Menu is in essence an extension of ExpressKeys. Whereas ExpressKeys are physical buttons, the Radial Menu is an on-screen equivalent: Eight functions assigned to “slices” arranged in a radial fashion on-screen can be performed with the tap of your pen to the tablet.
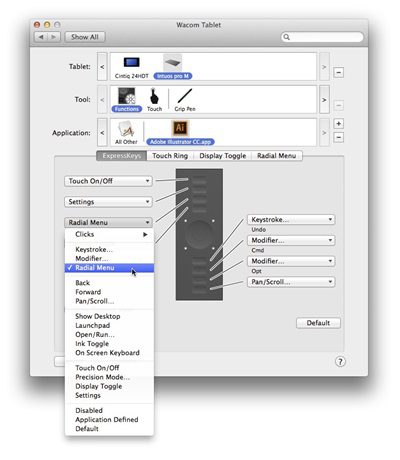
To set up a Radial Menu for Illustrator, start first by assigning an ExpressKey or the side switch on the Grip Pen to Radial Menu. Next, select Functions in the tool row. Now tap the Radial Menu tab to find a diagram of the Radial Menu. Make sure that you have the Adobe Illustrator icon selected in the application row. Now you are ready to customize your Radial Menu.
A default Radial Menu offers some general functions, however you can maximize its potential by assigning functions that are part of your everyday workflow. To do so, tap on any “slice” and select a function from the Function dropdown menu. This step should look familiar as it is nearly identical to those used in setting up the side switch on the Grip Pen and ExpressKeys on the tablet.
Select a keystroke or specialty function for each of the slices. To see your Radial Menu in action when you are finished, return to Illustrator and press the ExpressKey or side switch button that you assigned to Radial Menu. In place of your cursor on the screen appears your custom Radial Menu. To perform the functions that you assigned to the Radial Menu, simply tap the appropriate slice. From there, your function is applied and the Radial Menu disappears.
Intuos Pro is the tablet of choice for professional designers and Illustrators around the world. When it comes to creating stand-out, award-winning designs and illustrations, artists depend on a device that can work seamlessly with leading design programs like Adobe Illustrator. The Intuos Pro pen tablet and Adobe Illustrator provides an all-in-one solution that equips today’s artists with the performance, control and creative tools that they demand.
