Make It Snow In Summer with Adobe Photoshop: A PiXimperfect Tutorial

January 24, 2024

Maybe you’ve been usingΒ Adobe PhotoshopΒ for a while, or maybe you’re just getting started. There are many ways to do every type of edit in the software, as well as all kinds of tips, tricks, and hacks to do things more simply and easily.

Unmesh Dinda, the creator behind PiXimperfect, is known for tutorials featuring some of the most dramatic and striking transformations possible with Adobe Photoshop — such as previous tutorials we’ve featured on this blog including Turning Day into Night and Cutting Out Hair From A Busy Background. In the below video and tutorial, Dinda pulls out another one of his stunning tricks: Turning summer into winter. Watch the video or read on to see how he does it.


This tutorial is short but dense, as he uses relatively few steps to completely overhaul the entire image. Similar to the turning day into night tutorial, he reverses the colors of the scene, transforming a summer scene full of greens and yellows into a white winter scene with a dusting of snowfall.
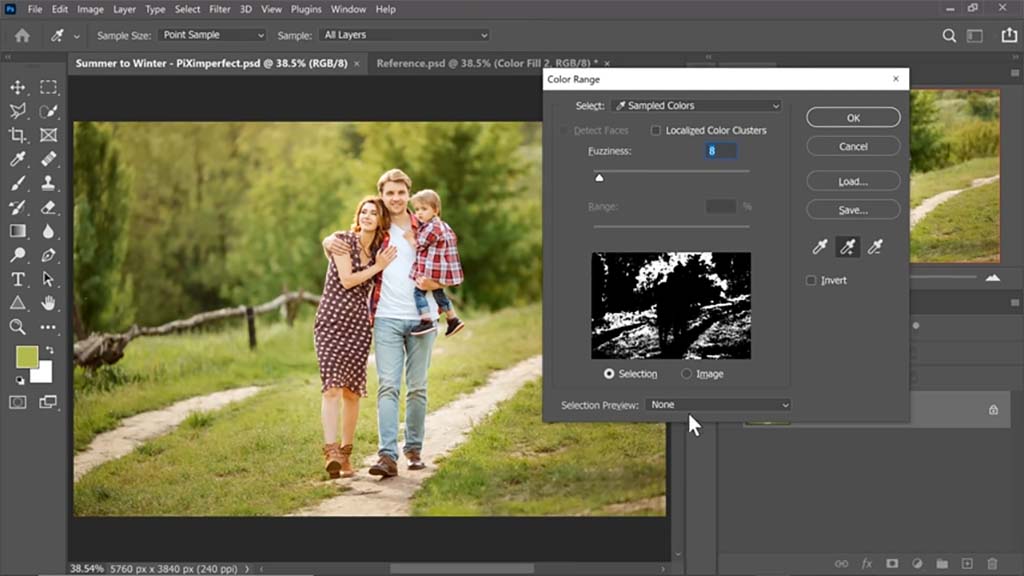
Color selection

The first thing Dinda does is select everything green in the image using the Select > Color Range tool, encapsulating all of the grass and foliage.Β He adds area to the selection multiple times with the Eyedropper, incorporating multiple shades of green.Β Then he drags up the Fuzziness slider, so almost everything surrounding the immediate areas will be included, giving him a more complete selection with edges that won’t be as sharp.

Pix Snow Summer 1

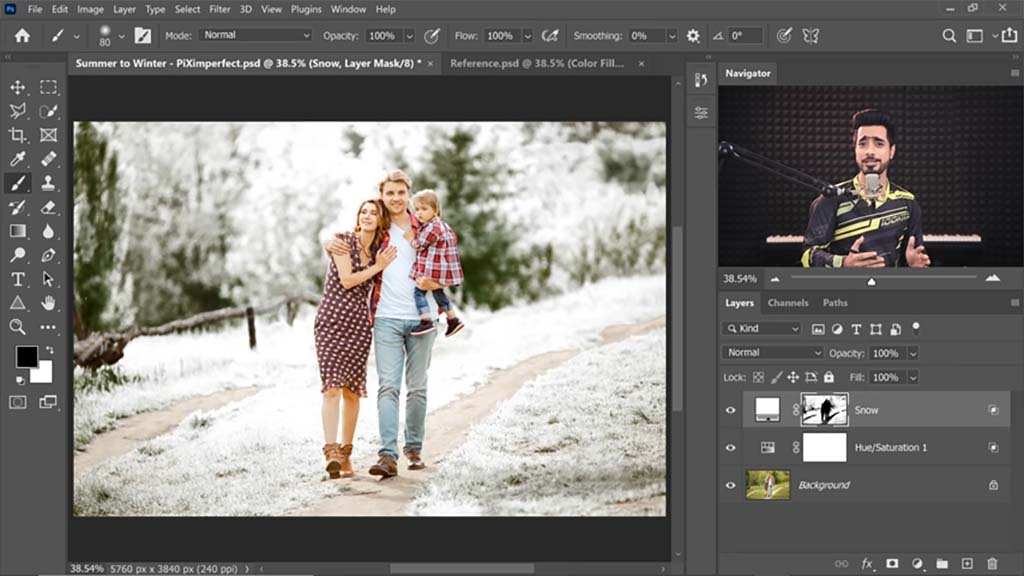
Changing the foliage

With the selection active, he creates a white Solid Color Adjustment Layer.Β This will turn the trees in the background white so they look like they’re coated with snow.Β β€œWe only want it in the bright areas,” he says, though.Β β€œWe don’t want to absolutely blow it out with snow.” So to achieve a nice balance, he uses β€œBlend If,” a slider in the Layer Styles panel that he often uses for various effects in his tutorials, to make some of the underlying layer β€” the greens of the trees β€” show through.

Pix Snow Summer 2

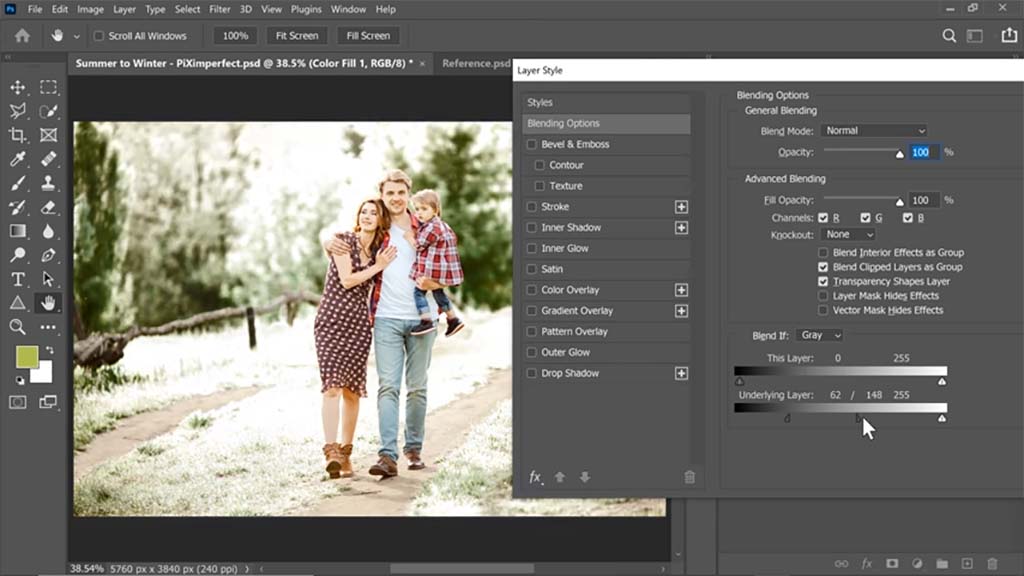
Key tip: Alt-clicking a slider will break it into two parts so that you can set a range of values instead of just one.

Pix Snow Summer 3

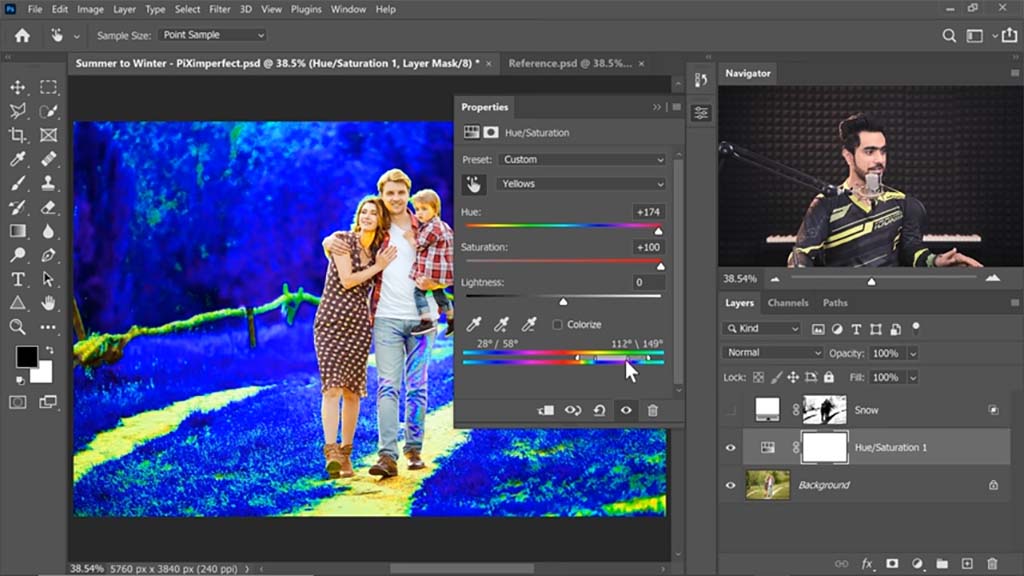
He then turns off the Solid Color Adjustment Layer and creates a Hue/Saturation Adjustment Layer on top. In order to decrease the saturation of the green areas, he has to increase it first. After using the Eyedropper on the grass to select the color range of the foliage, he cranks the Hue and Saturation sliders up to max, turning it bright blue, then turns the Saturation down and the Lightness up so it becomes more of a snowy light gray.

Pix Snow Summer 4

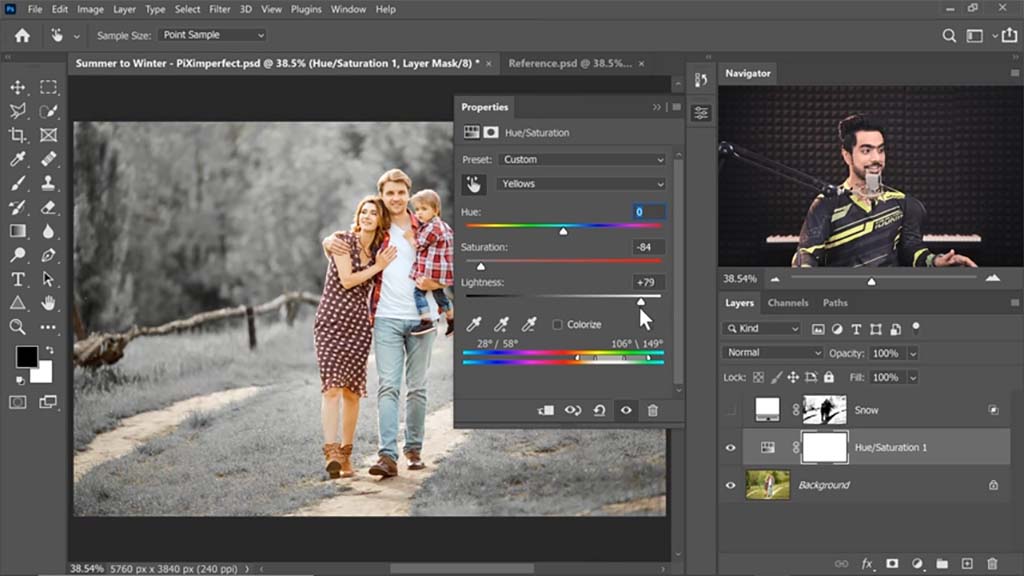
And when he turns the white Solid Color Adjustment Layer back on, it looks as if the trees are entirely coated in snow, except for a few darker areas at the bottom he intentionally leaves green.

Pix Snow Summer 5

Corrections

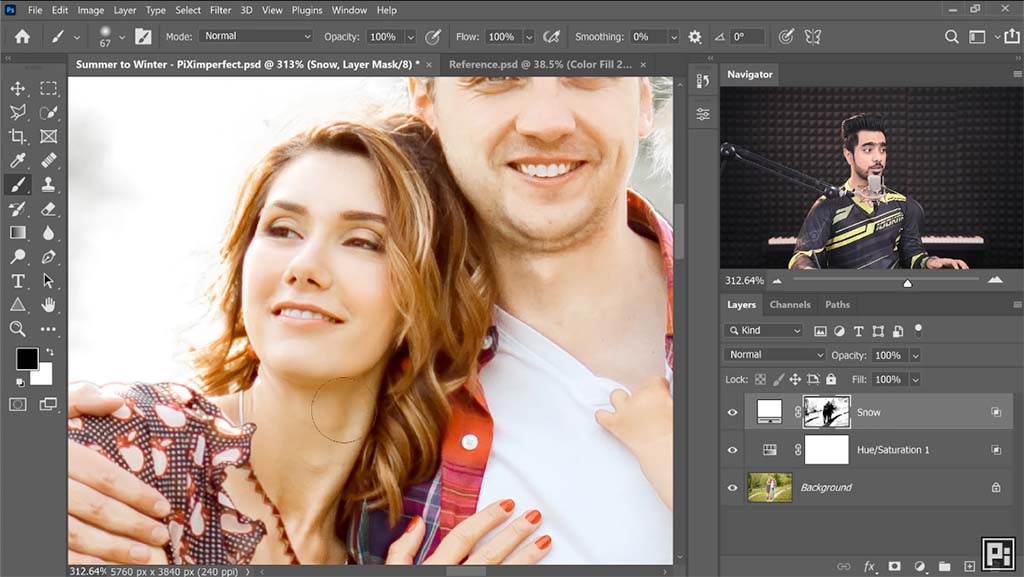
A small detail: Some of the lighting and color changes encroach onto the subjects, making them appear more exposed and paler than they should be.Β This is where your Wacom pen tablet or pen display comes in — Dinda uses a Wacom Intuos Pro — for these locations in the faces and hair, he subtly paints them out using a Mask.Β For where they encroach onto the woman’s leg, he uses the Quick Selection tool to select her calf, then paints black over the mask to erase it.

Pix Snow Summer 6

Adding Snow

This is when Dinda adds the actual snowfall we’ll see drifting in front of and behind the subjects.Β He divides the process into two sections: background snow and foreground snow.Β For the background snow, he uses two snow assets β€” pictures of white snow on black backgrounds β€” that he downloaded from Envato Elements.

Pix Snow Summer 7

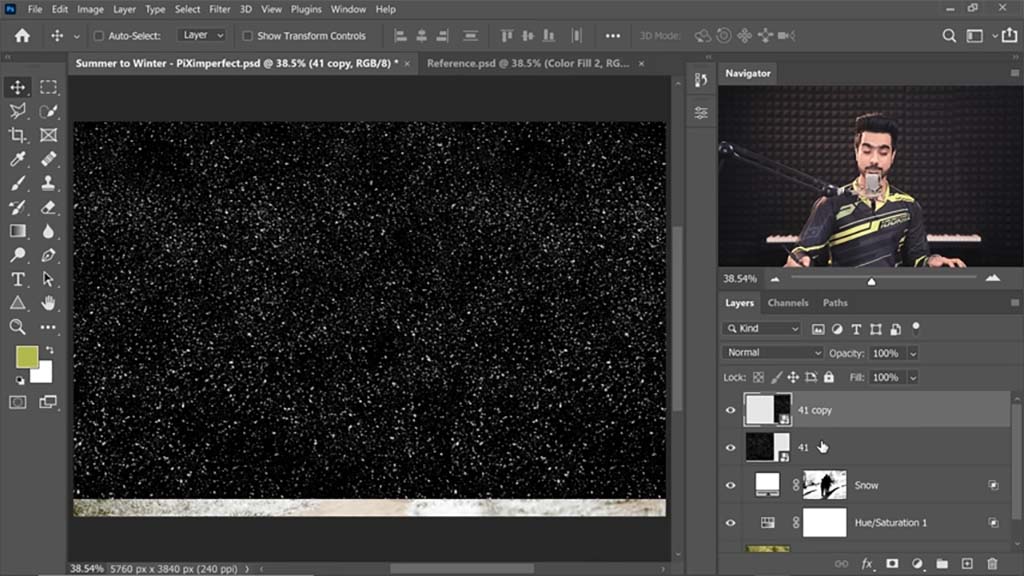
To cover the background, he converts the merged two images to a Smart Object, and sets the Blend Mode to Screen, which makes it so only the white shows through.Β This being for the snow behind the subject, he paints black on the Layer Mask to remove all the snow that crosses over the foreground of the subject. He also uses Gaussian Blur slightly so the snow will appear out of focus.

Pix Snow Summer 8

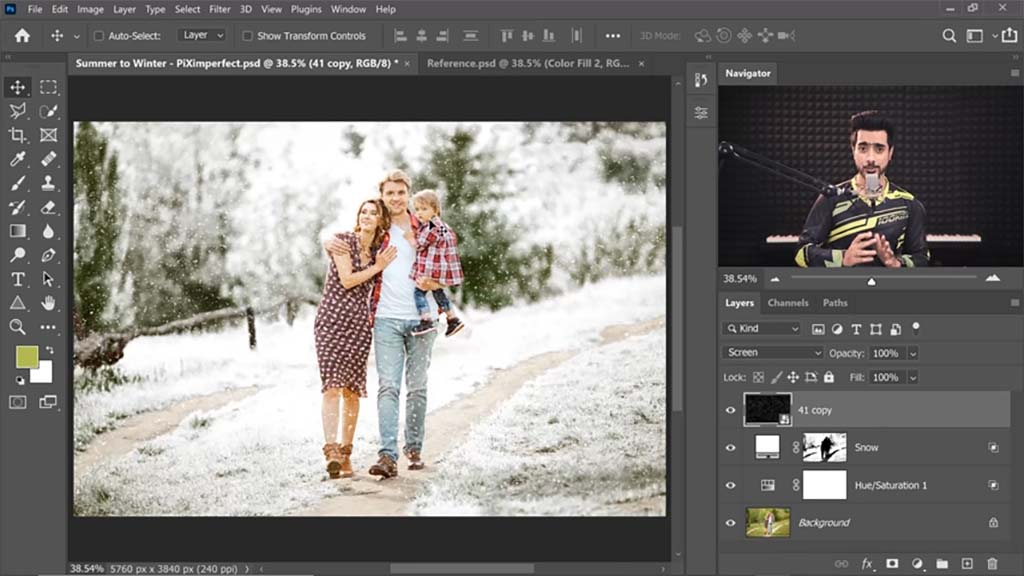
For the foreground snow, he does basically the same thing, except with an image of much larger falling snowflakes.Β And since the asset he uses doesn’t quite cover the entire image, he gradients the mask up from below to erase some of the bottom, creating a smooth transition into the snowflakes at the top.Β He also judiciously erases some of the more distracting snowflakes from overtop the subjects.

The final image:

Pix Snow Summer 9 1

CS Jones avatar

About the Author

Cameron β€œC.S.” Jones is a West-Philly-based writer and illustrator who’s been contributing to Wacom for four years now. You can see more of his work, including most of his contributions to this blog, atΒ thecsjones.com, or follow him onΒ InstagramΒ orΒ Twitter.

Wacom Movink pen display

Related posts:

Drawing confidently: Why Sam Yang always draws with references

Drawing confidently: Why Sam Yang always draws with references

How to “magically” remove glare from glasses in Adobe Photoshop, with PiXimperfect

How to “magically” remove glare from glasses in Adobe Photoshop, with PiXimperfect

How to draw a dragon, with Monika Zagrobelna

How to draw a dragon, with Monika Zagrobelna

Three ways to use your Wacom One pen tablet, with Joli Noelle David

Three ways to use your Wacom One pen tablet, with Joli Noelle David

Connect with Wacom on social media

Meet the NEW Wacom Movink πŸ†•πŸ’₯ first of its kind OLED pen display perfect for creative professionals on the go!

A professional device that you can easily pack and carry with you anywhere, everywhere.

If you  switch workstations, visit clients,  travel frequently or work in different locations and studios, this device is all you need.

Follow the link in our bio and discover all of the benefits of our NEWEST product: Wacom Movink

Now, get ready to Make your move! 😎

#WacomMovink #CreativeProfessionals #CreativesOnTheGo
1579 81
Introducing Wacom Movink: our first OLED pen display and our thinnest and lightest Wacom pen display ever. πŸš€

Unite the art of drawing and inking with mobility and portability with Movink’s brilliant 13.3”, full HD OLED display. This super slim, ultra-light, highly versatile, sturdy device is designed to meet the needs of creative professionals, digital artists and creative students. πŸ™ŒπŸ»

Are you ready to go? Learn more about Movink in our stories and through the link in bio! ✨

#WacomMovink #Movink #WacomNews
1612 77
Curious about which program is best for drawing vector graphics in 2024? Visual artist @studio_viv has you covered! πŸ™Œβ£
⁣
Head to the #WacomBlog to see how Vivienne designs a book cover in Adobe Illustrator vs. Affinity Designer using Wacom One M. ✍ ⁣
⁣
Link in bio!⁣
#wacom #design #designer #graphicdesign #vector #digitalart #artprocess⁣
237 9
WACOM HACK UNLOCKED πŸ”“

Learn how to customize your pen and change the brush size in just two  steps ✍️

Discover all the amazing features about your Pen in the link in bio!

#WacomOne #WacomPen
445 3
For a creative professional team like @parasolisland , efficiency and productivity is key to deliver the best results to their clients πŸš€

For years they were using pen tablets and pen displays in combination with high-end monitors, and today they can reduce all of that into one single device: the New Wacom Cintiq Pro.

Thanks to the excellent colour accuracy of the Cintiq Pro 27, this makes a big difference on their workflow.

Get in touch with our enterprise team in the link in bio.

#WacomCintiqPro #Animation
196 5
Exciting news for all creatives! πŸš€

πŸ’« Join Wacom at Playgrounds for a celebration of design, animation, and gaming craftsmanship! @tad.playgrounds @weareplaygrounds 

πŸ’‘ Dive into artist talks, demos, screenings, and live sketching sessions.

✍️ Swing by our booth to test out our cutting-edge pen-displays and tablets, meet Wacom experts, and pick up some pro tips!

Meet us in:
πŸ“… Eindhoven (April 18th-19th)
πŸ“…  Berlin, DE (May 25th-26th)

For more info visit @tad.playgrounds πŸ’«

#Wacom #Playgrounds #CreativeCommunity
170 2
πŸŒ€ City Doodling: Amsterdam edition 🚲

This time creativity strikes us directly from the Amsterdam canals in the hands of @fragileart πŸ’«

#Doodling #Creativeinspiration #MadeWitjwacom
507 0
Two ways of scrolling in the same display βœοΈπŸ‘€

Which one is your favourite move? πŸ‘‡

Customize your Wacom One and see where it takes you!

#WacomOne #WacomPen #CreativeInspiration
467 3
We chat with @adansilvart, illustrator and artist who has been working in branding & illustration projects for different brands. πŸš€

Join us while Adan shares insights into his creative journey and the vital role Wacom products has played in his career. ❀️

#ArtistInterview #illustration #DigitalArt
343 42
Today, we celebrate World Pencil Day πŸŽ‰

Wacom has been at the forefront of innovation, creating a digital pen that allows you to bring all your creations to life and have thousands of colors and textures in a single pen. ✍️

One of the features we love most about our Wacom One is that you can use any Wacom pen or any compatible pen with it.

Have you tried any of these? Let us know in the comments. πŸ‘‡

Check out our special offers in the link in bio!

#WorldPencilDay #WacomOne
586 15
Friday with F like Finished work πŸ’«

We want to see your finished pieces, feel fry to join our artwork chain using the hashtag #MadewithWacom πŸš€

How are you ending the week?

#MadewithWacom #CreativeInspiration
327 1