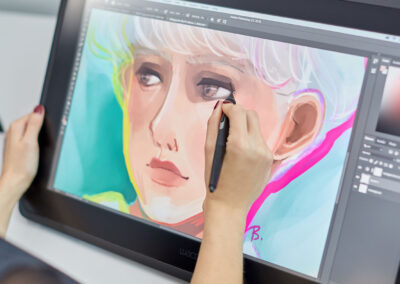
Wacom had the opportunity to work together with Polish artist Magdalena Proszowska and company Corel on this great video tutorial series in which we take you through the full portrait creation of a stylised character using the Wacom Intuos. This character, created by Magdalena, is also the cover art for the latest Corel software: Painter Essentials 6. Painter Essentials 6 is a great software for beginners or artists who would like the chance to get used to the software before checking out the full Corel Painter version.
This tutorial series is made of 4 episodes which you can watch below. We´ve also summarized some important tips from each episode for you.
So, let´s paint a character!
Painting a full character
In this first episode, Magdalena teaches you how to create a character, starting with a few sketches to visualize different ideas and compositions, making colour choices and finishing with adding the final details in this video.
During the sketch stage, she discusses how to carefully draw the line art to get rid of anatomy problems from the start, but says that the sketch is still a work in process and will be changed throughout the creation process.
She recommends flipping the canvas regularly to keep eye on symmetry issues and to see the image with fresh eyes.
Tips:
- Take your first sketch and use different colour versions to get an idea for what looks good before deciding on the final colour composition.
- Use layers to be safer so you can get rid of bits you don’t like if you make mistakes.
- The fewer brushes used, the more consistent the picture.
- Flip your canvas to keep an eye on the symmetry and anatomy of the picture, and to get a fresh look.
- When colouring, use one base colour to fill the whole canvas and harmonise the composition, then build up the other colours until you are happy with how the colours work together.
- Choose colours that contrast each other for effect.
- If you focus on the details too soon, the painting will suffer.
How to paint flowing hair
In this video, Magdalena gives you some tips on how to paint flowing hair using Painter Essentials 6. She discusses using a sketch to make sure that the shapes are correct, before blocking the rough colours and primary shapes.
To get realistic looking highlights and shading in the hair, Magdalena says that you should imagine that the hair works like ribbons. The bits that are directed upwards will catch light and those facing downward will be shaded.
Tips:
- Add some light shining through hair particularly at the ends of the hair so it doesn’t look fake.
- Hair will put shadow on the face so don’t forget to add that in.
- When drawing, start to draw from the bigger shapes to the smaller shapes. This means you should start by using a big brush and slowly use smaller and smaller brushes to add details.
- Think about the ribbon effect. Which direction is the motion of the hair, and what is the direction of the face? Use this to get the shading right.
How to paint realistic lips
Magdalena discusses how to draw realistic-looking lips in this video. She recommends putting some references as floating windows on your desktop to constantly use a references throughout the process. She discusses the shape of the face and how you can use ovals to understand how shading and highlighting works around the lips and chin.
One of her main tips is to always block out the colours before focusing on the details, and don’t rely too heavily on shadows to create the wrinkles in the lips. Later on in the process, you can add wrinkles using highlights in order to make the image more realistic.
Tips:
- The chin is an oval shape. A second oval comes from top of the nostrils, touching the corner of the lips and touching the top of the chin’s oval – these two ovals are separate shapes and are highlighted differently. Shade between the ovals to give the highlight and shadows.
- Direction of the corner of the lips is towards light so they will be highlighted.
- Teeth are in the shadow of lips so will not be white, but will be darker grey.
- Flip your canvas to check the symmetry of the lips
- Don’t use white for highlights – go for a warmer colour first, and put white on very few spots at the end. Using white desaturates the other colours so avoid it as much as possible.
How to paint realistic eyes
In this video, Magdalena teaches you about the secrets behind painting realistic eyes and why certain shadows and reflections are necessary to give an impression of reality.
She talks about using references such as makeup tutorials to create the style of the make-up on her character’s face, and keeping a mirror nearby so she can use her own face to get references for lighting and shadows.
She also discusses hard and soft edges for different parts of the face, and which colours and brushes to use to achieve these different edges.
Tips:
- It’s very important to understand the anatomy of the eyes in order to make it look realistic – the eyeball is a sphere and the iris is a cavity
- Eyelids surround the eyeball, so they follow the geometry of the sphere.
- Keep a mirror nearby to look into and get different references for the surface of the facial feature you are painting.
- Use stroke direction to emphasise the surfaces that you are painting.
- Eyelids have a thickness, so the top eyelid will drop a shadow on the eyelid and the bottom eyelid will reflect light.
- The eyeball itself is not white.
About Magda Proski
Magdalena was born and raised in Tarnów, Poland where she finished OSSP (Middle and Secondary school with art profile).
Currently she works as a Senior Concept Artist at Ubisoft Blue Byte in Dusseldorf, Germany.
Magda considers art her career and her hobby and she spends every possible moment cultivating it.
Follow Magdalena on social media:
Behance – Artstation – Youtube – Twitter – Facebook – Tumblr


