PiXimperfect Day Into Night feature image

How to turn day into night in Adobe Photoshop, with PiXimperfect

April 12, 2023

Maybe youโ€™ve been using Adobe Photoshop for a while, or maybe youโ€™re just getting started. There are many ways to do every type of edit in the software, as well as all kinds of tips, tricks, and hacks to do things more simply and easily.

In this tutorial, Unmesh Dinda of PiXimperfect demonstrates how to overhaul a photographโ€™s lighting in Adobe Photoshop โ€“ literally turning a photo from day into night! Check out the video below for the Adobe Photoshop tutorial, or read on for a summary of how to achieve the effect.


Lighting is one of the most important skills for photomanipulation, right up there with basic perspective. Knowing how to match light and color grading with an existing scene, or create an entire new lighting scheme over the objects youโ€™ve photoshopped together, is essential for photo editing.

This 21-minute masterclass on creative adjustment layer use by Piximperfectโ€™s Unmesh Dinda goes deep into developing the skill. He covers the whole process of altering a photoโ€™s lighting by pulling off the most dramatic change possible: turning day into night. Then he paints extra light over the subject himself with a neat trick involving the Curves tool โ€ฆ and a Wacom tablet.

1. Creating the base

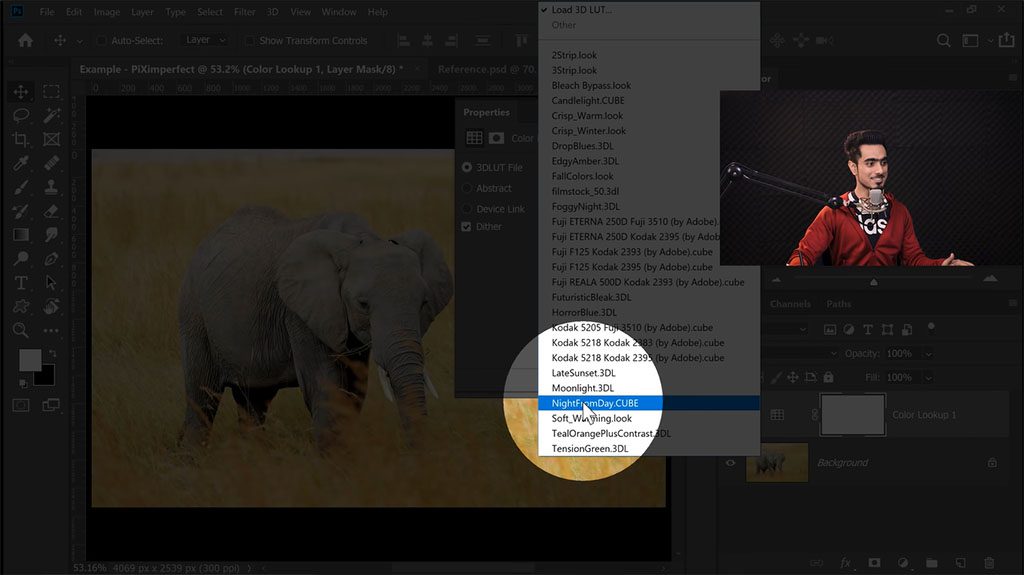
Before you start painting in details by hand, you essentially need to relight and recolor the whole image first. One thing to remember with photomanipulation is that although some changes can be very complicated, any light and color adjustments are as simple as adding a few adjustment layers and tweaking the sliders, so donโ€™t be afraid to experiment with various lighting scenarios.

Although there are myriad ways to do it in Adobe Photoshop, Dinda relies on adjustment layers to make the changes nondestructively. Specifically, he uses Color Lookup Tables along with the โ€œBlend Ifโ€ function. By doing this a few times and adjusting the settings, you can get the exact effect youโ€™re looking for.

Day Into Light tutorial image 1

2. Painting the light

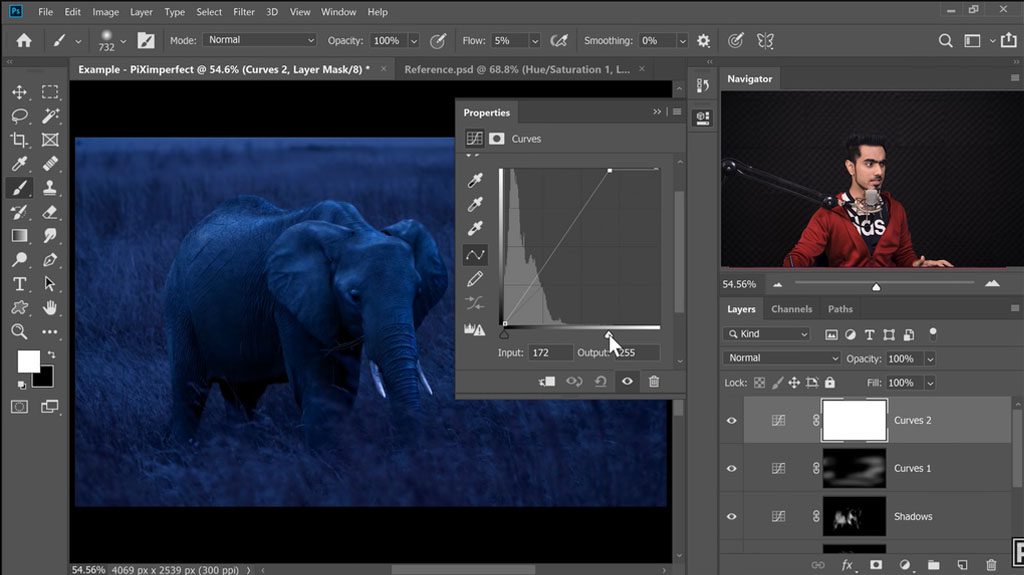
Dindaโ€™s method for painting in the light areas is so simple youโ€™ll wonder why you didnโ€™t think of it: first, he creates a Curves Adjustment layer and cranks up the brightness until the picture is overexposed. Then he adds a layer mask, clears it so none of the effect is visible, and paints in only the parts where there should be highlights. Just as if he was painting, he uses pen pressure to control flow, as well as his impressive knowledge of lighting and form to define the elephantโ€™s face with light and shadow placement. And at the end, he does the same thing, just with the curves turned down, for the shadows.
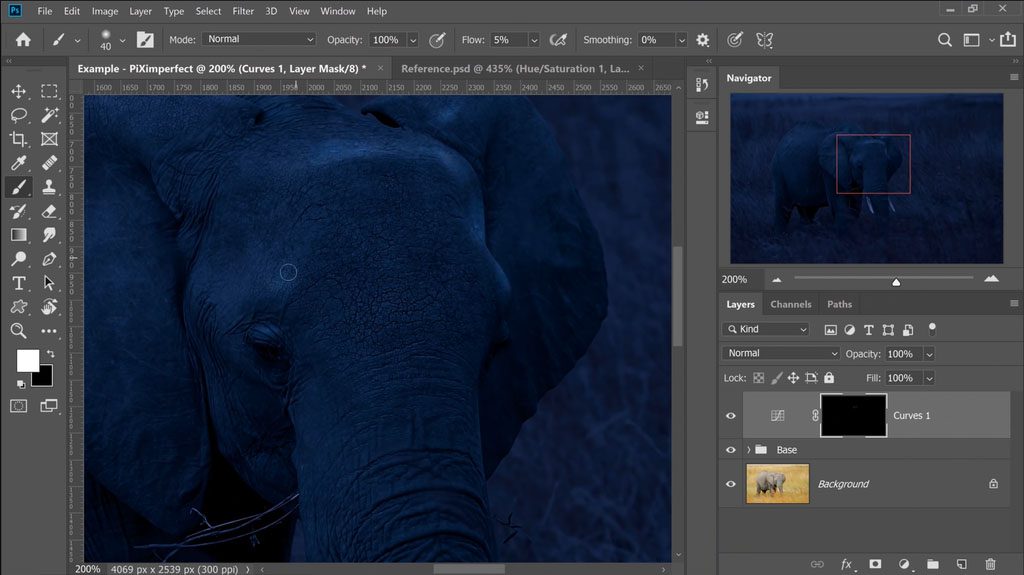
Day Into Light tutorial image 2

3. Adding more brightness and shadow

In the subsequent section, he does the same thing to the background, creating a Curves adjustment layer over it with the elephant masked out, then using large, soft brushes to paint light across swaths of the grass behind it.
Day Into Light tutorial image 3

4. Calibration overlays

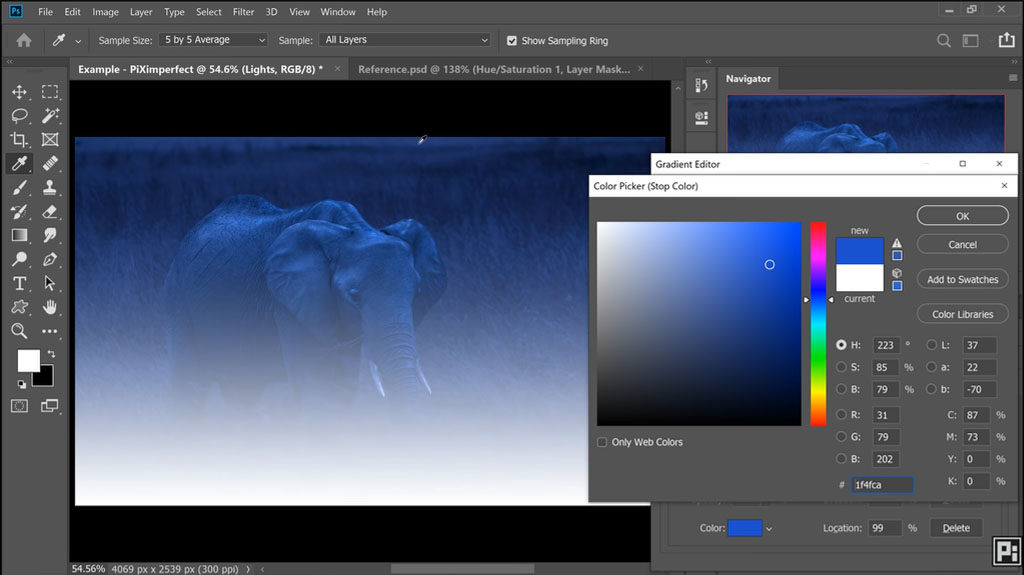
This is a fancy term for โ€œmore adjustment layers.โ€ For this step, Dinda shows us another adjustment layer hack commonly used to create ambient light: he creates a white-to-transparent gradient on a new layer, then moves the top above the frame so it looks like thereโ€™s moonlight coming down from off-camera.
Day Into Light tutorial image 4

5. Dramatic mist brush

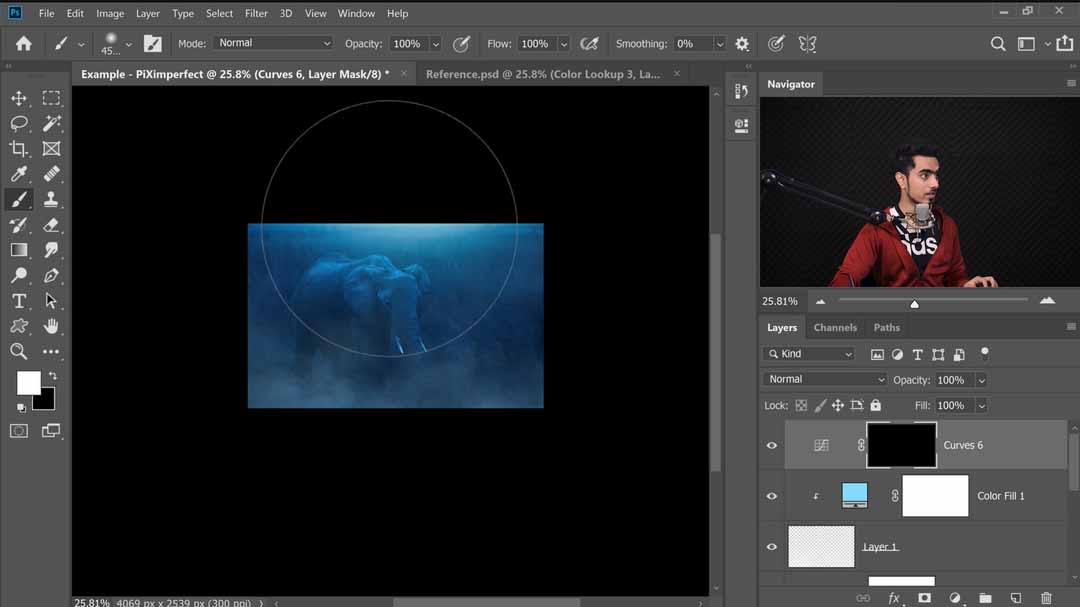
Finally, he shows us how to paint mist with some very judicious use of a fog brush from an Envato Elements pack. Effective use of these kinds of subtle, transparent brushes is a crucial skill for expert Adobe Photoshop users, but he demonstrates how simple it can be, enlarging the brush size up to the size of the canvas itself, then clicking just once to add a cloud of vapor over the whole image.
Day Into Light tutorial image 6

Final words

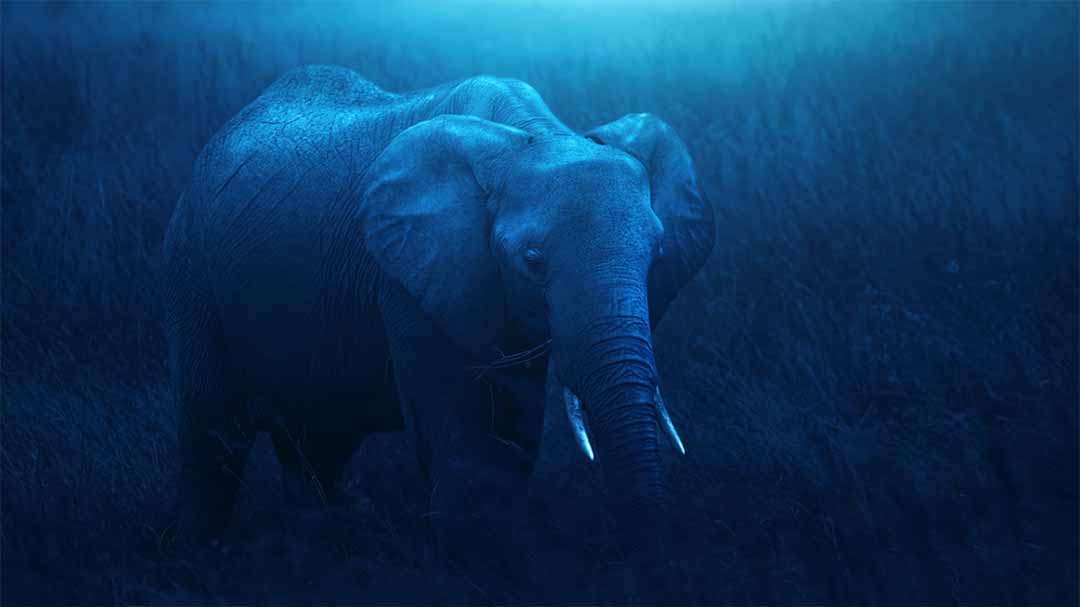
By the end of this process, Dinda has turned a neutrally-lit daytime shot into a dramatic foggy moonlit night. This being one of the most dramatic overall lighting transformations possible, each of the individual techniques he teaches here will also be useful in making smaller adjustments to other photographs. Just remember how much of your lighting Curves and Color Adjustment Layers can handle on their own.

Key tip:

While it is possible to do edits like this with a mouse or trackpad, it is much more difficult โ€“ using a Wacom tablet will make everything much more feasible. Adobe Photoshop brushes are very sensitive, so the best Flow setting for digital painting is just 5 to 10%, depending on how fast you want to apply color. Pen pressure can also be set to control Opacity and Flow at once, so that when you press it to the tablet lightly, the resulting stroke will be even fainter and subtler than if it were only controlling one.

Before:

before

After!

Day Into Night After

Related posts:

How to build an impressive blended photo collage in Adobe Photoshop

How to build an impressive blended photo collage in Adobe Photoshop

The complete guide to Adobe Photoshop brushes, Part 4: Making your own brushes

The complete guide to Adobe Photoshop brushes, Part 4: Making your own brushes

How to ensure your electronic signatures are legally binding and enforceable

How to ensure your electronic signatures are legally binding and enforceable

How to “magically” remove glare from glasses in Adobe Photoshop, with PiXimperfect

How to “magically” remove glare from glasses in Adobe Photoshop, with PiXimperfect

Connect with Wacom on social media

Mental health awareness month is upon us and we want to give a shout-out to anyone out there struggling, yet creating. โฃ
We see you and you're absolutely wonderful. ๐Ÿ˜โฃ
โฃ
Art by @chibirdart ๐Ÿค๐Ÿ’“โฃ
#MentalHealthAwareness #webcomic #comic #webtoon
374 6
๐Ÿ†• Alex Wรคtzel @dgtlcraft_postproduction , High-end photo retoucher & video editor with more than 10 years of experience on the creative industry, tried the NEW Wacom Movink! 

Watch his first impressions of our new amazing pen display ๐Ÿคฉ

Nowโ€™s your turn! Follow the link in our bio and discover all the amazing benefits of our new Wacom Movink๐Ÿ’ฅ

#WacomMovink #CreativeProfessionals #CreativesOnTheGo #MovinkMakers
116 6
Meet the NEW Wacom Movink ๐Ÿ†•๐Ÿ’ฅ first of its kind OLED pen display perfect for creative professionals on the go!

A professional device that you can easily pack and carry with you anywhere, everywhere.

If you  switch workstations, visit clients,  travel frequently or work in different locations and studios, this device is all you need.

Follow the link in our bio and discover all of the benefits of our NEWEST product: Wacom Movink

Now, get ready to Make your move! ๐Ÿ˜Ž

#WacomMovink #CreativeProfessionals #CreativesOnTheGo
2345 107
Introducing Wacom Movink: our first OLED pen display and our thinnest and lightest Wacom pen display ever. ๐Ÿš€

Unite the art of drawing and inking with mobility and portability with Movinkโ€™s brilliant 13.3โ€, full HD OLED display. This super slim, ultra-light, highly versatile, sturdy device is designed to meet the needs of creative professionals, digital artists and creative students. ๐Ÿ™Œ๐Ÿป

Are you ready to go? Learn more about Movink in our stories and through the link in bio! โœจ

#WacomMovink #Movink #WacomNews
1745 78
Curious about which program is best for drawing vector graphics in 2024? Visual artist @studio_viv has you covered! ๐Ÿ™Œโฃ
โฃ
Head to the #WacomBlog to see how Vivienne designs a book cover in Adobe Illustrator vs. Affinity Designer using Wacom One M. โœ โฃ
โฃ
Link in bio!โฃ
#wacom #design #designer #graphicdesign #vector #digitalart #artprocessโฃ
243 9
WACOM HACK UNLOCKED ๐Ÿ”“

Learn how to customize your pen and change the brush size in just two  steps โœ๏ธ

Discover all the amazing features about your Pen in the link in bio!

#WacomOne #WacomPen
451 3
For a creative professional team like @parasolisland , efficiency and productivity is key to deliver the best results to their clients ๐Ÿš€

For years they were using pen tablets and pen displays in combination with high-end monitors, and today they can reduce all of that into one single device: the New Wacom Cintiq Pro.

Thanks to the excellent colour accuracy of the Cintiq Pro 27, this makes a big difference on their workflow.

Get in touch with our enterprise team in the link in bio.

#WacomCintiqPro #Animation
197 5
Exciting news for all creatives! ๐Ÿš€

๐Ÿ’ซ Join Wacom at Playgrounds for a celebration of design, animation, and gaming craftsmanship! @tad.playgrounds @weareplaygrounds 

๐Ÿ’ก Dive into artist talks, demos, screenings, and live sketching sessions.

โœ๏ธ Swing by our booth to test out our cutting-edge pen-displays and tablets, meet Wacom experts, and pick up some pro tips!

Meet us in:
๐Ÿ“… Eindhoven (April 18th-19th)
๐Ÿ“…  Berlin, DE (May 25th-26th)

For more info visit @tad.playgrounds ๐Ÿ’ซ

#Wacom #Playgrounds #CreativeCommunity
174 2
๐ŸŒ€ City Doodling: Amsterdam edition ๐Ÿšฒ

This time creativity strikes us directly from the Amsterdam canals in the hands of @fragileart ๐Ÿ’ซ

#Doodling #Creativeinspiration #MadeWitjwacom
509 0
Two ways of scrolling in the same display โœ๏ธ๐Ÿ‘€

Which one is your favourite move? ๐Ÿ‘‡

Customize your Wacom One and see where it takes you!

#WacomOne #WacomPen #CreativeInspiration
471 3
We chat with @adansilvart, illustrator and artist who has been working in branding & illustration projects for different brands. ๐Ÿš€

Join us while Adan shares insights into his creative journey and the vital role Wacom products has played in his career. โค๏ธ

#ArtistInterview #illustration #DigitalArt
350 66