Video Thumbnail: Magically Remove Glare from Glasses in Photoshop!

How to “magically” remove glare from glasses in Adobe Photoshop, with PiXimperfect

April 8, 2024

Maybe you’ve been using Adobe Photoshop for a while, or maybe you’re just getting started. There are many ways to do every type of edit in the software, as well as all kinds of tips, tricks, and hacks to do things more simply and easily. 

Unmesh Dinda, the creator behind PiXimperfect, is known for tutorials featuring some of the most dramatic and striking transformations possible with Adobe Photoshop — such as previous tutorials we’ve featured on this blog including Turning Day into NightCutting Out Hair From A Busy Background, and Making it Snow in Summer.

While eyeglasses help people see the world better, they also make it harder for the world to see one of the most important features of a subject — their eyes. In the below video and tutorial, Dinda shows you how to “magically” remove the glare from glasses in photos in Adobe Photoshop. Watch the video or read on to see how he does it.

The absolute best way to fix glare is through using two photographs of the subject in the same position, with and without glasses, and overlaying them in Adobe Photoshop. But if the only image you have has some detail around the eyes, we can make it work. Otherwise, removing glare from glasses in Photoshop is impossible when the eyes are entirely obscured.

For the past three years, I’ve relied on the Wacom Intuos Pro medium, which has accompanied me on numerous journeys worldwide. We’re gonna be doing a lot of dodging and burning, and the kind of precision and speed that we need for this is gonna be very hard to achieve with a mouse. Using Wacom’s drawing tablet for employing techniques used in this tutorial makes it an invaluable tool.

First we should desaturate the image, so its color doesn’t distract us from matching the brightness. Create a Solid Color adjustment layer, select a color with zero saturation, and set the blend mode to Color.

LensGlare 02

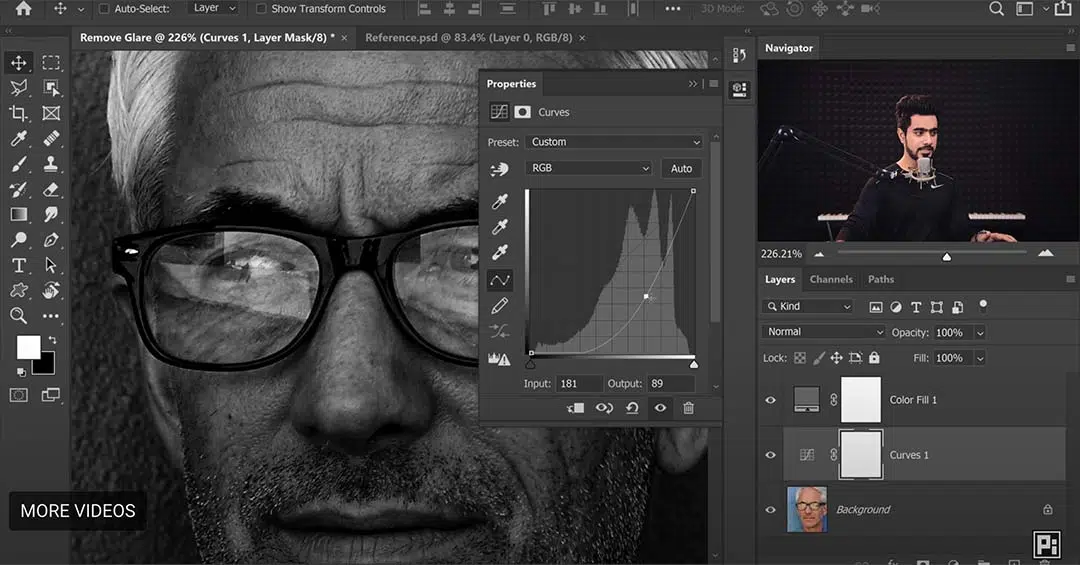
Next, let’s correct the brightness using curves. Create a curves adjustment layer, adjust the middle node downwards until bright areas appear natural, then invert (Ctrl/Cmd+I) the mask selection. Before the mask was white, and now all of it is black – this means changes will only show up on areas we paint white. Use a soft round brush with low flow to paint white on areas requiring adjustment.

Start painting. If you have practice and a tablet, this process will be faster than you think. Don’t worry about the glare edges, our focus right now is to use a basic burn to match the brightness. 

LensGlare 03

For further refinement, create additional dodging and burning layers to enhance results. Use an empty layer with Soft Light blend mode and adjust brush flow between 1-2 percent for precision.

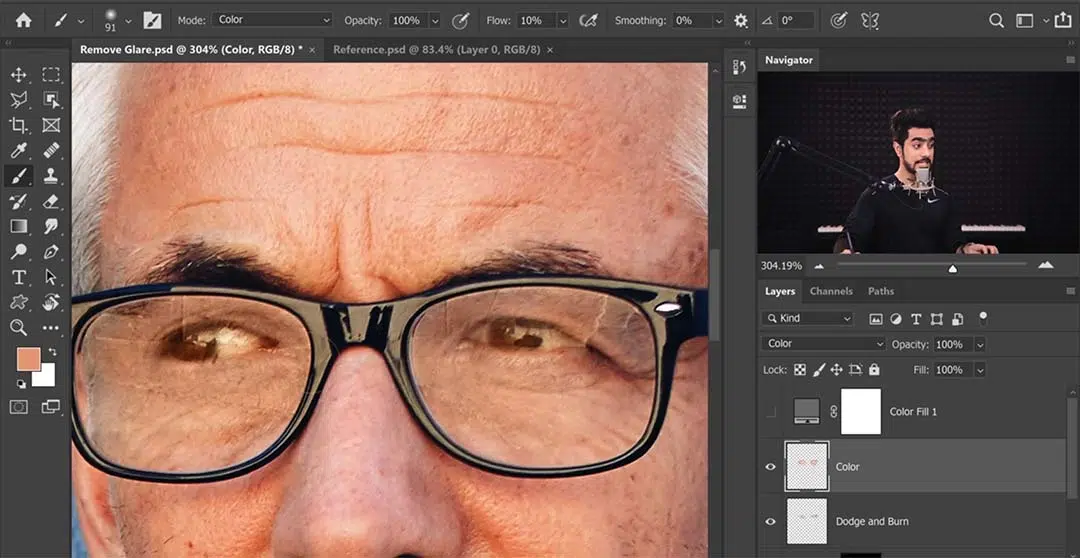
Next we must match the glare color to the surrounding image. If you disable the desaturation, you’ll see the colors don’t match at all. Easily fix this by creating a new layer, choosing a brush with 5-10 percent flow, and setting blend mode to Color. Use the eyedropper tool to sample nearby colors and paint over mismatched areas.

LensGlare 04

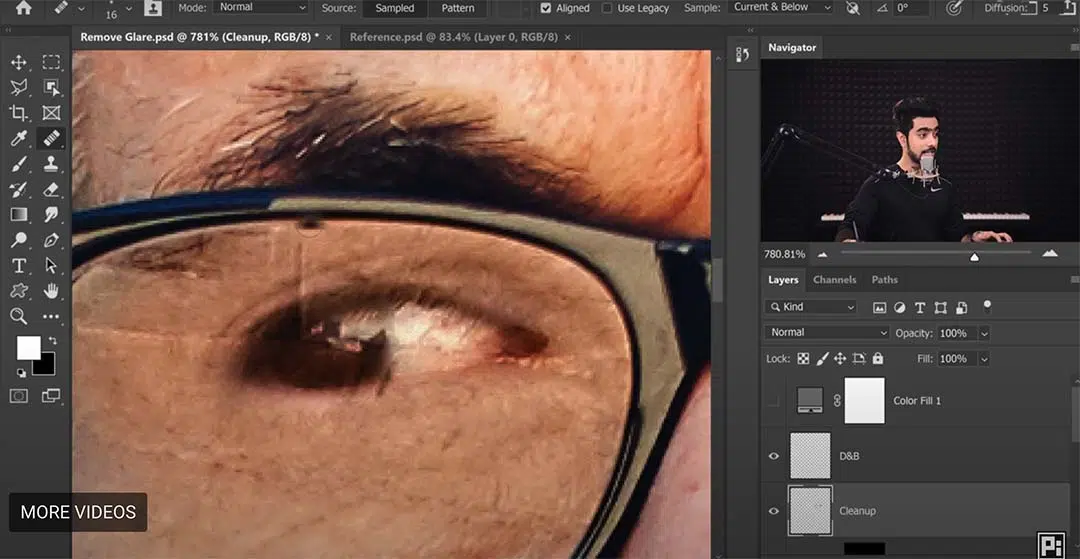
Darken the eyes using another curves adjustment layer, focusing on eye areas and painting with white on the inverted mask. Now, the last thing we need to fix are glare edges. Create a new layer and use tools like the Healing Brush or Spot Healing Brush to fix imperfections. 

Keep in mind the Stamp tool doesn’t work on an empty layer, so we’ll have to create a visible layer for it. Ensure alignment of spectacle edges by sampling adjacent areas and painting carefully. For other areas, create another dodge and burn layer with a soft light blend mode.

LensGlare 05

To avoid overcorrection, maintain natural features by adjusting layers as needed. If desired, retain a hint of glare by grouping adjustment layers and reducing opacity.

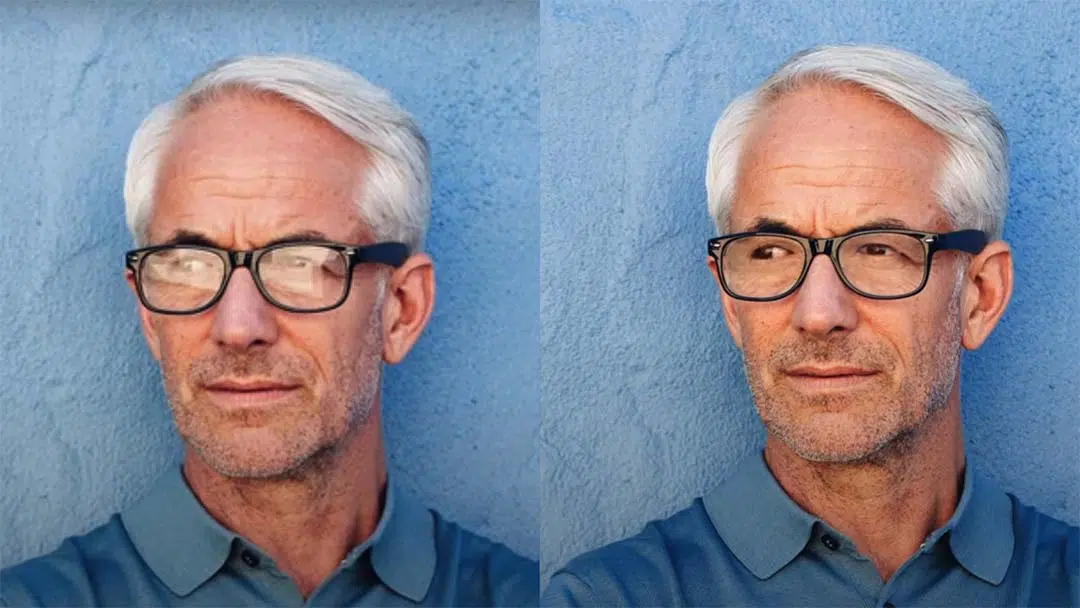
To recap: First, match brightness using curve and dodge/burn layers. Second, correct colors with a Color blend mode layer to sample from surrounding areas and paint to match. Third, clean the edges with tools like Clone Stamp, Healing Brush, and Spot Healing Brush. Continuously adjust layers to maintain natural appearance throughout the editing process.

And that’s it! Let’s take a look at the before and after:

LensGlare 01

Unmesh Dinda from PiXimperfect

About PiXimperfect

PiXimperfect is one of the premier free online resources for learning Adobe Photoshop and Lightroom. With over five million subscribers on YouTube, it’s clear that his high quality tutorials are some of the best.

Related posts:

Connect with Wacom on social media

Where are you working from these days?⁣
The coffee shop? The airport? Or are you soaking up sun and getting creative  on a beach somewhere? 🥐🌴☕🎒⁣
#CreativesOnTheGo #WacomMovink #CreativeProfessionals
🎬 “Time is a luxury I don’t have as a director. With Wacom Intuos Pro, I can sketch my ideas in seconds.” – @hazdazzle , filmmaker, game director & co-founder of HaZimation⁣
⁣
From storyboarding films to directing game cinematics, HaZ needs tools that match his fast-paced workflow. The new Wacom Intuos Pro gives him the precision and speed to bring his vision to life, exactly how he imagines it.⁣
⁣
Tap the link in bio to learn more!⁣
⁣
#WacomIntuosPro #IntuosPro
What's the best piece of advice you've ever received professionally as a creative? ⁣
For @ricardoalvesj the best advice he ever received was to invest in personal work.⁣
⁣
Balancing a full-time job while dedicating time to your own projects can be challenging, but it’s key to developing your artistic voice. Personal work allows you to showcase your true potential beyond collaborative projects and stand out in your field.⁣
#CreativeJourney #CreativeProfessionals #Wacom
With the latest Wacom Intuos Pro, fluidity is at your fingertips, empowering you to create seamlessly, elevate your retouching, and boost productivity.⁣
⁣
For high-end retoucher and digital artist @sefmccullough success lies in minimizing friction, getting the work done with as little resistance as possible.⁣
⁣
Check out how the new Wacom Intuos Pro is an essential part of reducing that friction in digital work. ⁣
⁣
Ready to upgrade your toolkit and let your creativity flow? Head to the Wacom estore. 💻🎨⁣
#WacomIntuosPro #IntuosPro #PenTablet #WacomTablet
🚨 Unboxing the Wacom Movink 🚨⁣
Get an up-close look at Wacom's cutting-edge portable pen display! 🎨✨⁣
⁣
🔹 Ultra-Portable Design – Light & slim for artists on the go.⁣
🔹 Stunning OLED Display – 13.3" Full HD with 95% Adobe RGB accuracy.⁣
🔹 Wacom Pro Pen 3 – Customizable switches & 60° tilt for precision.⁣
🔹 Enhanced Multi-Touch – Smooth navigation and interaction.⁣
🔹 ExpressKeys – Quick access to shortcuts.⁣
🔹 Simple USB-C Connectivity – Easy setup with just one cable.⁣
⁣
Perfect for artists looking for performance and portability in one sleek package! ⁣
⁣
Thank you @collinchan for the video. ⁣
#WacomMovink  #DigitalArt #drawingtablet
Creative block? Nah, let’s break free! ✨ Shake up your routine and let spontaneity fuel your flow with a trusty companion by your side. Whether you’re outdoors or in a new spot, #WacomMovink’s vibrant colors and seamless portability bring your studio with you, wherever inspiration takes you! 🎨💡⁣
Learn more about Movink through the link in our bio!⁣
#Movink #DigitalArt #CreativeLife #ArtOnTheGo #CreativesOnTheGo #CreativeProfessionals
Don't be shy, ADMIT YOU HAVE A TINY PENCIL! 🙈⁣
⁣
There aren't too many rules to being an artist but, here are some you should probably think twice about. Thanks @lplucas for always reminding us that even in art you've got to do the time if you do the crime. ⁣
⁣
#createwithwacom #wacom #wacommovink #movink
Taking a moment to reflect on some lessons learned with @allisonoliviamoon. 🫖📷
What are some lessons you've learned in your creative journey? What has helped you keep it magical?
#madewithwacom #wacomone #photoediting #artistlife #artistsoninstagram
Need help controlling your Wacom pen pressure? We got u? ⁣
#WacomPen #WacomTablet #DrawingDisplay #PressureSensitivity
How to draw lips with @lplucas 👄💋🤭😆
Do you have any cool tips for achieving amazing lips? 
#drawingtips #madewithwacom #digitalart #artistlife
Take control of your creative work.

With Wacom Yuify, securing your art is effortless. 

Track,  manage, and protect your artwork with just a few clicks. 

Don't let your work go uncredited! ❗❗❗

Safeguard your creativity registering for free here at yuify.com


#WacomYuify #CreativeRights #digitalrightsmanagement
This error message is only visible to WordPress admins
Error: There is no connected account for the user 17841445048021802.