
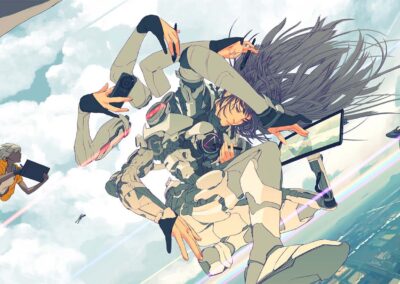
Concept artist Trent Kaniuga draws monsters for AAA video games from the likes of Blizzard and Riot Games. Coming up with character designs is not easy. Trent takes us through his process from idea to sketch to the finishing touches and gives valuable tips along the way.
If you placed the first few brush strokes of one of his concept art characters next to the final product, you’d be hard pressed to see how a few blobs of color can transform into a complete and very detailed character. Trent shows you his process for a Cyborg Heavy in this time-lapse video with a voice-over:
We also asked Trent to break it down for us as a quick written tutorial for those of you who prefer step-by-step written tutorials. His YouTube channel is an excellent resource if you want to improve your concept art skills. He’s entertaining as all get out, but even better than that he unloads tip after tip as he draws, with lots of great commentary about the games and characters that provide him with inspiration.
Step 1: Sketch Thumbnails

You can grab any brush out of the box, and just start getting ideas down in blobs. Don’t be critical of your ideas. Everything you think of is okay. Just doodle some fun cyborg ideas and number them.
Step 2: Set up your canvas

Pick a thumbnail and set your canvas to about 4800×3500, and drop the opacity on your thumbnail sketch to about 25%. Then, create a new layer on top of that. This will be the active line art layer.
Step 3: Define your blobs

With your blob thumbnail in the background, while drawing on the active top layer, pick a nice pencil and start defining those shapes. Any pencil will be good to use. Try out all of them until something feels right for you.
Step 4: Define interesting details and construction

You can create more layers on top of all of that and just try stuff out. If you don’t like it, you can delete that layer, or erase from just that layer. Dig up references of other cool cyborg designs that you like, and notice how they are constructed. Look at the joints and the connecting points. Apply any engineering knowledge that you have, but don’t get caught up in over-explaining everything. Keep it just believable enough. Don’t do anything with color yet. We will colorize our line art and values later.
Step 5: Color flats

I use a combination of color layers, multiple layers, and darken/lighten layers to get the colors that I want for my flats. I’m not worrying about lighting too much. I’m mostly just focused on the material color. In this case, there is a lot of gray, but I want it to be a cool gray, not a warm gray.
Step 6: Color adjustments

You can adjust your colors after placing them by going to Image > Adjust > Hue and use the sliders to change the colors you’ve laid down. Make sure you’re on the layer with the colors that you want to change!
Step 7: Paint color details

This is where I start the real process of painting. I’ve set my colors already, so I just color pick using the Alt key and add details and some lighting. I can also modify my brushes using the advanced brush options to get the kind of texture that I want in the final look and style of the piece.
Step 8: Get crazy with details

I’m going in further than just a medium level of detail. I want to push myself to do something that gives the viewer something interesting to look at for a while. There are small mechanical details in clusters and flat larger areas where the eye can rest. Watch your clustering of details! Too many tiny pieces make it hard to focus on any one element, and it just looks cluttered.
Step 9: Fake it till you make it

I have no idea how to power a cyborg in real life, but I know that this arm felt too plain and empty as a flat panel. So I’ve used the same shape language as other areas of his design to fake a kind of armored plating on his arm and done a similar “shape language” pass across the entire design.
Step 10: Final touches and glow

You can use a layer effect to create a glow, or you can use the built-in “glow brush” to enhance your small lights throughout your image. Don’t get carried away with glow and saturation, and make sure your focal point has a unique color to the rest of the image. In this case, I’ve given him a bit more of a purple glow around his eyes.

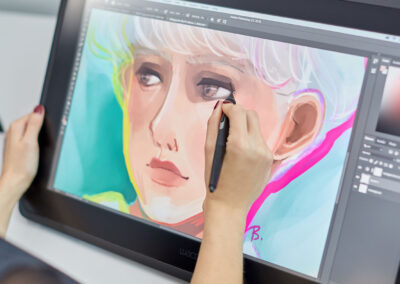
Trent working on his Wacom Cintiq Pen display
More from Trent
Trent’s YouTube channel is definitely worth following. If you like watching him draw, check out his Hearthstone Video Walkthrough for a really in-depth tutorial, or follow him on ArtStation if you want to see more of his art.
Love that beautiful, big screen Trent uses in his videos? Check out the new Wacom Cintiq pen displays.

