
We understand it can be difficult working with colors and lighting, so here are some insights from the talented and lovely Maria Poliakova. Maria is an artist from Kiev who sometimes goes a little crazy with the colors, to great effect.
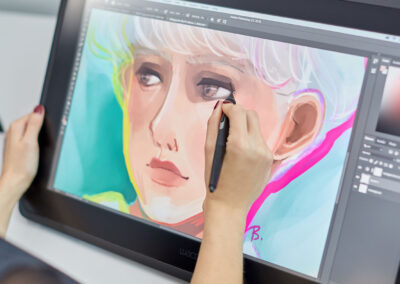
In this tutorial, Maria gives a step by step process of creating a colourful portrait using her Wacom Cintiq Pro 13. She´s excited to share with you some tips, explanations and technical details, so you too can learn to draw a portrait with vibrant colours, make colour adjustments and organize your workspace.
You can read each step below or watch her process in the quite extended video.
Take it away Maria!
Step 1: How to get inspiration
I believe that inspiration is not something you need to catch or wait for. This is something that you can do yourself. For example, I have a folder called References with many subfolders inside: faces, ‘sculptures’, ‘traditional art’, ‘nature’, ‘animals’, ‘bugs’, ‘light’, ‘colour’, ‘cloth’, ‘flowers’ etc. I’ve been collecting them for years and continue to do so.
To organize the references I usually use PureRefAnd keeping in mind the theme of the future illustration, I quickly look through some folders. I look at various beautiful sculptures, multi-coloured beetles and butterflies. I browse through the works of old masters, some beautiful photos, and then I feel how inspiration appears.
Now I see my future illustration more clearly and move on to the next stage.

Step 2: Rough sketching
While doing the first sketches, I try not to get stuck in details, and I only do light flow lines and values. Everything I need now is to create simple basic forms and keep the silhouette clear and readable.

Step 3: Defining the sketch
Now, after I’ve chosen the sketch I like best, I reduce the opacity of this layer, then I create a new layer atop and draw a clear sketch with more details and refine it.
Usually, I use extension Lazy Nezumi on this stage. It helps me to do my lines smoother.

Step 4: Colour sketch
The most fun part of sketching. You can open your reference folder ‘bugs’ or ‘insects’ or ‘butterflies’ and see their beautiful combination of colours. So, I take a big soft brush, pick a vibrant color and start to combine colors.
Also, on this stage, I often use ‘Hard Light’ blending mode.

Step 5: Prepare your workspace
Now I can start to add details, but before that, I always prepare my workspace in Photoshop.
I open multiple views of my work: Go to Window-Arrange-New window for…(name of your file). Then do it one more time. To set up one of the window in B&W go to View – Proof Setup – Custom – Device to Simulate – sGrey.
Now I have three windows with my picture. I place them as shown on the image. This allows me to see my work constantly from the distance and check my values and see my mistakes easily.

Step 6: Brushes
At the beginning, I usually use the combination of two brushes: soft for big values and texture for details.
All my favourite brushes are from these packs: Speedpaint Brush Panel by Jonas de Ro and Kylo Watercolor Brushes.

Step 7: Using references
Proper use of references is a very important thing for an artist. They should be used as a guide in anatomy and lightning. In this work, I was inspired by some face references, and also I took a photo of my hand.

Step 8: Color adjustments
For making vivid, bright colors I often use this blending mode: Overlay, Soft Light and Hard Light.
For correcting colours go to Image – Adjustments – Selective color. Also, don’t forget about shadows, they shouldn’t be only of dark grayish colour. Pick deep and saturated colors from your color wheel.

Step 9: How to draw a face
Face is different to paint, but once I started thinking about the face as a geometric object, everything became easier. For better understanding, I started with a plane head and an Ecorche head.
After I learned muscles and big shapes, it became clearer how to draw a face. Now, except for the large folder with references, I also have a mirror and a lamp on my desk, so I can check how light works on my face at any time.

Step 10: Have fun
Usually, I analyze everything I paint, trying to not to do any extra work. But I also try to relax, enjoy the flowing lines, colours and see the beauty of everything I do.
Sometimes, when I’m stuck on something, I experiment with blending modes or with Color Lookup, or with Selective colours etc. I move sliders in different ways and it helps me to refresh my vision and see which places in my illustration are too dark or too gray.

Step 11: Final touches
Now, it’s time to make final touches.
I merge all layers and make a layer with Soft Light, and I do strokes with a soft brush. Sometimes they are dark strokes, sometimes colorful, or I might highlight something from time to time. I do all this to make the picture look whole. I need the viewer to look at the main object, the main story and all my strokes should work to achieve that.
Also, I have a small tip: if you want to see how your illustration works – send it to your phone. For some reason, I immediately see all the problematic places on a smaller display. And at the end, I usually add Filter-Noise-Add noise-Amount 2.5

We hope you enjoyed the read and learned something 🙂
Follow Maria on social media:
Artstation – Behance – DeviantArt – Instagram – Youtube – Facebook – Tumblr – Linkedin


