Painting Tips Proko Part 2 Feature Image

Painting tips for digital artists from Proko, Part Two

February 26, 2024

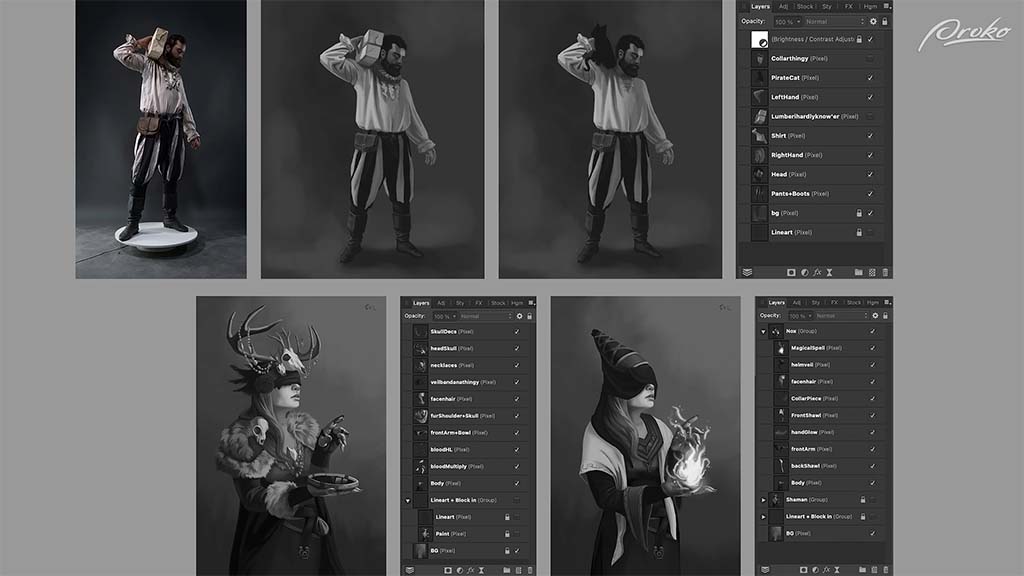
Over the years, Proko has grown from a Youtube channel primarily featuring founder Stan Prokopenko to an art education empire with 116 instructors. The phenomenal concept artist Jon Neimeister, artist behind the below tutorial, is one of them.

In this two-part series, he gives advice to aspiring artists on their own monochrome studies and overpaints their work. He covers four students’ work in total across the series’ two parts. This is Part Two; click here to see Part One.


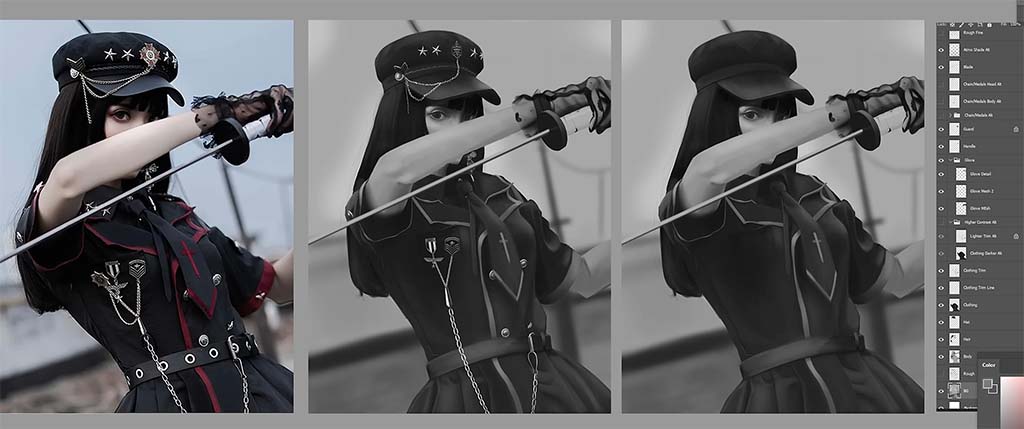
To begin Part Two, Neimeister critiques the students’ layer organization as well as their use of light and shadow. It starts with a study by β€œChris:”

7 Painting Tips for Digital Artists PART 2 0 21 screenshot
L to R, original photo, grayscale conversion, then painting.

Chris, he says, has done a great job not just separating the dark clothes from the light skin and background, but his layer structure is on point too, with him keeping the body, hair, clothing, and hat all on their own layers.

One issue, however, is that he’s only painted the hair up to where the arm covers it. That works in this piece, but if he wanted to adjust the arm’s position later, this would leave a big gap in the painting.Β Instead, Neimeister suggests, one way he could solve this is by painting the entirety of the hair, including what’s not visible, on a separate layer, then using a layer mask to block out the areas of hair that are covered by the arm.

The other way Chris could handle it is to create a separate layer for every part of the image, meaning not just a separate one for the main swath of hair, but one for the face, and another for the bit of hair that falls behind the face. He’d paint the hat and the clothing on layers above that, then finally the arm and sword on a layer above all of them since they overlap everything.
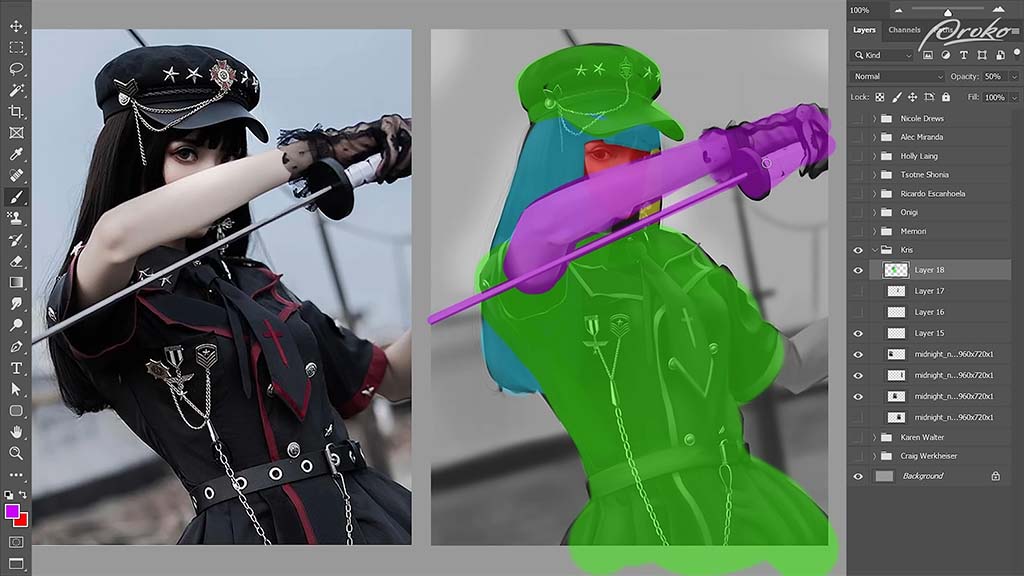
8 Painting Tips for Digital Artists PART 2 0 21 screenshot
His breakdown of where he’d divide up the layers.

This might seem like a lot of work across too many layers, but for more complicated characters and poses, β€œyou’ll often have to start adjusting your posing and your proportions to get things to look right, especially if you’re working from imagination.”  So having the parts on separate layers will save you a lot of time having to repaint things compared to if multiple elements are painted onto the same layer.

Next up are three assignments from β€œNicole:”

9 Painting Tips for Digital Artists PART 2 4 17 screenshot

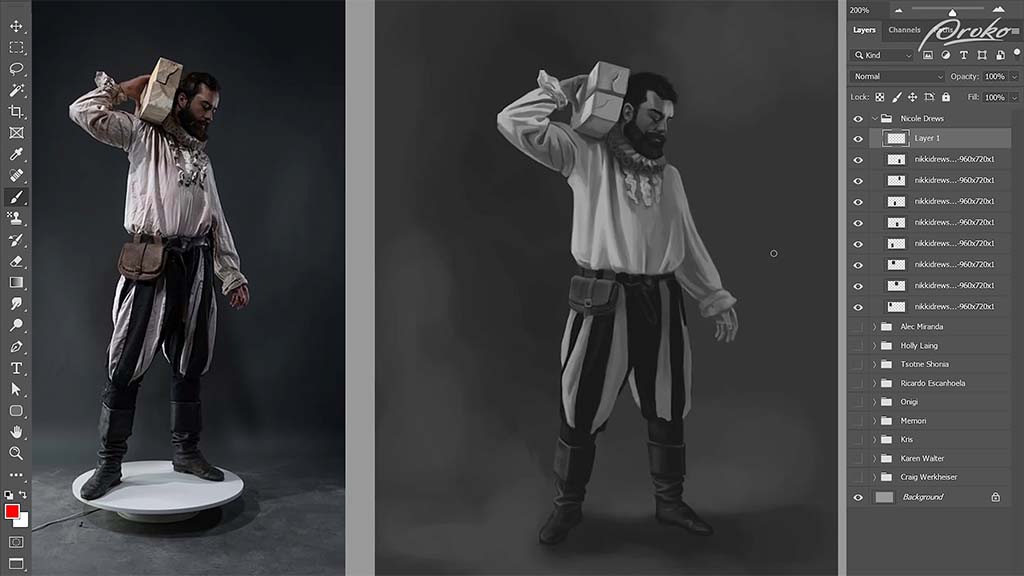
Overall, he says, her paintings are really good, which they are: β€œYou’ve got a great grasp on your value control and are very clearly separating your light and your dark shapes, which makes these super easy to read.” He also compliments her layer structures and how she’s separated every element of the characters onto their own layers.Β He dedicates the rest of the video to her first study:
10 Painting Tips for Digital Artists PART 2 5 14 screenshot

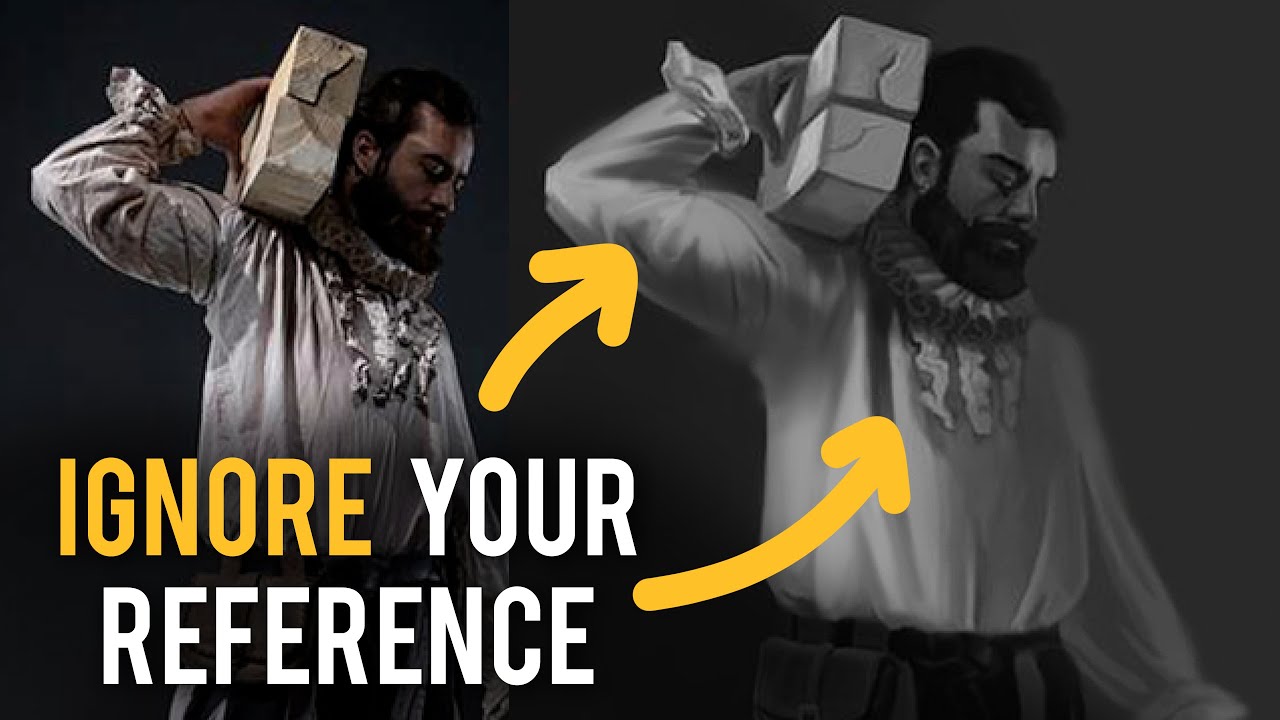
Unlike previous studies, instead of advising her to follow the reference more closely, he suggests she deviate a little more from it for the sake of a stronger composition.

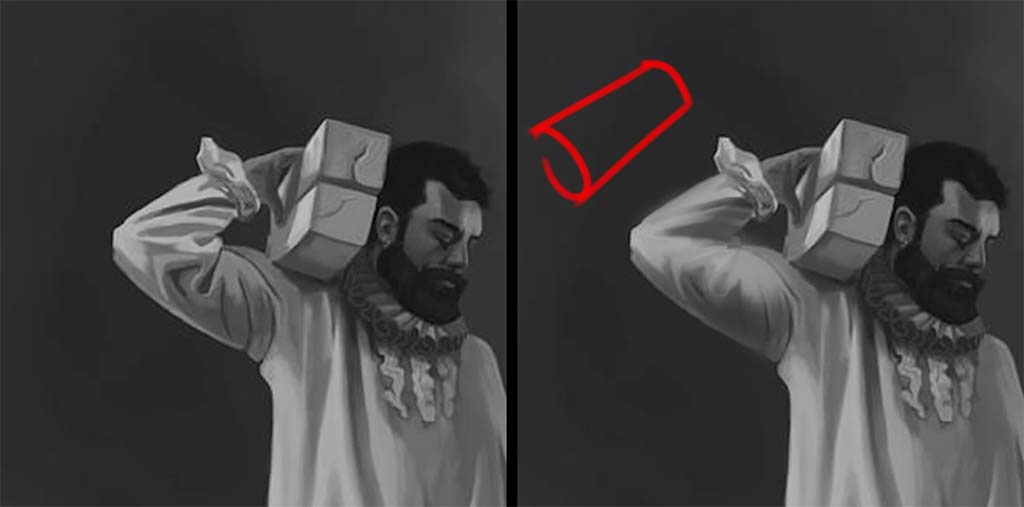
He starts with the arm. The folds on the sleeve are too contrasty, he says, creating a distraction.Β And although that’s how it is on the reference, she can paint more shadow over them to make them stand out less. The upper arm also appears too flat, so she should β€œput a little less emphasis on the folds of the fabric and a little more on the cylinders of the arm.” 
11 before and after
Before and after

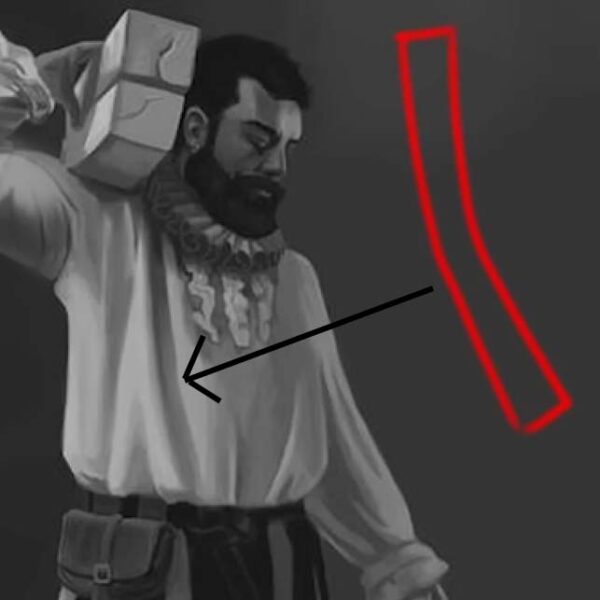
His next lesson is one in subtle shape design, as demonstrated by the clothing folds, which he then critiques. This one, he says, is β€œtoo parallel and even.”

12 arrow

Although it’s accurate to the reference, it’s too boxy for his liking. So he tapers the bottom, turning it into a triangular shape.Β  She also hasn’t fully captured the cast shadow falling over the arm, so he paints a darker value over the armpit to complete it.

In addition, he suggests deviating from the reference on the side of the shirt that’s cast into shadow. Although she’s captured it correctly, she could achieve a more atmospheric effect by darkening it so that it fades more into the background.Β  Same with the bottom of the pant legs, to emphasize their cylindrical shape as they tuck into the boots.


proko logo

Want to learn more?

To see more of Jon Neimeister’s work, check out his website or Twitter. If you’re interested in expanding your digital painting skills even further, consider taking a full course from Proko.

This lesson is part of theΒ Digital Painting Fundamentals courseΒ taught by Neimeister, but Proko hasΒ tons of coursesΒ by instructors such asΒ Stan Prokopenko,Β Marco Bucci, andΒ Trent Kaniuga.

Related posts:

Digital calligraphy for beginners, with Joli Noelle David

Digital calligraphy for beginners, with Joli Noelle David

How to draw a bird, with Monika Zagrobelna

How to draw a bird, with Monika Zagrobelna

Why your art teacher hates your anime art

Why your art teacher hates your anime art

The complete guide to Adobe Photoshop brushes, Part 4: Making your own brushes

The complete guide to Adobe Photoshop brushes, Part 4: Making your own brushes

Connect with Wacom on social media

You got this! ✍️ Never stop creating. 🀘⁣
Animation made by the wonderful @javadoodles⁣
#MentalHealthAwareness #madewithwacom #TVPaintAnimation⁣
318 12
πŸ†• Alex WΓ€tzel @dgtlcraft_postproduction , High-end photo retoucher & video editor with years of experience on the creative industry, also tried the NEW Wacom Movink!

Now’s your turn! Follow the link in our bio and discover all the amazing benefits of our new Wacom MovinkπŸ’₯

Ph: @akazie.photography 

#WacomMovink #CreativeProfessionals #CreativesOnTheGo #MovinkMakers
123 2
Mental health awareness month is upon us and we want to give a shout-out to anyone out there struggling, yet creating. ⁣
We see you and you're absolutely wonderful. 😍⁣
⁣
Art by @chibirdart πŸ€πŸ’“β£
#MentalHealthAwareness #webcomic #comic #webtoon
818 10
Meet the NEW Wacom Movink πŸ†•πŸ’₯ first of its kind OLED pen display perfect for creative professionals on the go!

A professional device that you can easily pack and carry with you anywhere, everywhere.

If you  switch workstations, visit clients,  travel frequently or work in different locations and studios, this device is all you need.

Follow the link in our bio and discover all of the benefits of our NEWEST product: Wacom Movink

Now, get ready to Make your move! 😎

#WacomMovink #CreativeProfessionals #CreativesOnTheGo
2370 109
Introducing Wacom Movink: our first OLED pen display and our thinnest and lightest Wacom pen display ever. πŸš€

Unite the art of drawing and inking with mobility and portability with Movink’s brilliant 13.3”, full HD OLED display. This super slim, ultra-light, highly versatile, sturdy device is designed to meet the needs of creative professionals, digital artists and creative students. πŸ™ŒπŸ»

Are you ready to go? Learn more about Movink in our stories and through the link in bio! ✨

#WacomMovink #Movink #WacomNews
1782 81
Curious about which program is best for drawing vector graphics in 2024? Visual artist @studio_viv has you covered! πŸ™Œβ£
⁣
Head to the #WacomBlog to see how Vivienne designs a book cover in Adobe Illustrator vs. Affinity Designer using Wacom One M. ✍ ⁣
⁣
Link in bio!⁣
#wacom #design #designer #graphicdesign #vector #digitalart #artprocess⁣
244 9
WACOM HACK UNLOCKED πŸ”“

Learn how to customize your pen and change the brush size in just two  steps ✍️

Discover all the amazing features about your Pen in the link in bio!

#WacomOne #WacomPen
455 3
For a creative professional team like @parasolisland , efficiency and productivity is key to deliver the best results to their clients πŸš€

For years they were using pen tablets and pen displays in combination with high-end monitors, and today they can reduce all of that into one single device: the New Wacom Cintiq Pro.

Thanks to the excellent colour accuracy of the Cintiq Pro 27, this makes a big difference on their workflow.

Get in touch with our enterprise team in the link in bio.

#WacomCintiqPro #Animation
207 5
Exciting news for all creatives! πŸš€

πŸ’« Join Wacom at Playgrounds for a celebration of design, animation, and gaming craftsmanship! @tad.playgrounds @weareplaygrounds 

πŸ’‘ Dive into artist talks, demos, screenings, and live sketching sessions.

✍️ Swing by our booth to test out our cutting-edge pen-displays and tablets, meet Wacom experts, and pick up some pro tips!

Meet us in:
πŸ“… Eindhoven (April 18th-19th)
πŸ“…  Berlin, DE (May 25th-26th)

For more info visit @tad.playgrounds πŸ’«

#Wacom #Playgrounds #CreativeCommunity
174 2