

It should come as no surprise that if you want to draw really amazing characters you have to know the anatomy of the figure. This is especially true when it comes to the portrait. Humans are designed to seek out faces and it’s incredibly jarring when a portrait doesn’t look quite right.
You can forgive a lot of anatomical mistakes on the figure but the same doesn’t hold for the face. You need to make sure that you draw it well.
Most teachers would teach you the proportions of the skull and how to draw them, but the ideal measurements of the head will only take you so far. What you want is to make that knowledge flexible so you can mold the skull into any structure. That way, you can create the characters that you’re visualizing in your head (no pun intended).

Get a feel for proportion
Here are three of the most basic head poses that you’ll see: the front, profile (or side view), and three quarter. What you want to observe as you look at these skulls are the three masses that stack on top of each other:
- The forehead
- The cheekbone
- The jaw
When you think of the skull structure like this, it’s a lot easier to break down the individual components. You don’t have to worry about proportion. The unique pieces of the skull simply play within the areas that you’ve designated in each slice. For example, you’ll never make a major screw-up like drawing the eyes where the jaw should be. You know those are two different masses of the skull structure.
If you’re still worried that proportion will be your arch enemy, know that you’ll get a feel for it over time. It’s the same way you get a feel for driving a car or balancing on a bike. With enough practice, proportions will become second nature. It’s understanding how these forms move in space that will trip you up the most. Thankfully, there’s a solution for that too.

Add complexity for flexibility
The only way to become extremely flexible with your knowledge is to test it in a variety of ways. If you’re drawing skulls, draw from all sorts of different perspectives and positions. Turning the skull and trying to draw it from below or above will test your knowledge of those forms. The more you understand, the easier it will be to draw a portrait in any pose you desire.
There are some unique poses when learning about the skull on its own. You’re not going to see the underside of the skull when you start drawing a real head because the neck will be there. It’s still good practice for visualizing turning forms in your head. And you’ll get more familiar with how each slice of the skull works in concert with the others.
Proportions are overrated
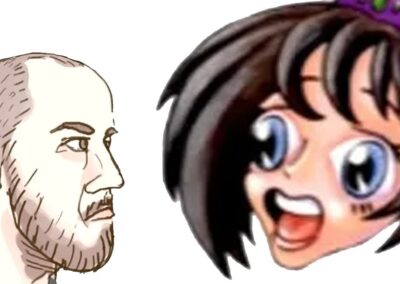
The reason I focus on learning the masses of the skull over proportions is that I don’t think they’re necessary. George Bridgman said it best:
“There are many conceptions of measuring, scientific and ideal, and they all differ. If given proportions were used, even though these proportions were the ideal average, they would result in a drawing without character.”
If you use the same proportions every single time and you master them perfectly, your faces will all look the same. It would be a drawing without character. There would be no life to it.
It’s the same way I feel about using shortcuts for straight lines. You lose the character in your linework if you let the computer make all your straight lines for you. You’ll do the same thing for your characters if you memorize and regurgitate the same proportions for heads. You’ll have the same head every single time.
If you learn the masses of the skull, you can mold them into different shapes that create unique characters. You can always find proportion references if you need them.

Design the skull to create unique character designs
When you have a grasp on the masses of the skull and you’ve tested your knowledge in various positions, it’s time to draw / design a skull of your own.
I’m using the knowledge I have of the three sections of the skull to sculpt my character’s head with unique characteristics. You can see I’ve given my character a robust jaw, made the forehead a little more round, and gave him chunky cheekbones. The skull itself almost looks muscular. In my head, I’m starting to visualize a strong male portrait.
You can see how this starts to develop and turn into its character. You would never get here if you just drew the same skull proportions over and over again. I’m able to design a character because I know the forms. I know what it looks like when they overlap because I studied the masses of the skull in various positions. My understanding of the forms is solid enough that I can make unique iterations on my own.
There’s more to learn
This is just the basics of how to learn the skull and sculpt it into character designs from your imagination.
When you start moving into rendering, with light and color, you’re going to need to know the planes of the skull. That can become a little bit more complicated. But if you take it one step at a time, you’ll find the skull a lot easier to learn.
Learn the skull the right way to bring flexibility and freedom to your ability to draw amazing character designs and portraits.

About James Joyce
James is an artist from Maine and resides in California. He’s been drawing for over 10 years and knows that learning to draw feels like a long and hard journey. That’s why he created Zephyer – to give artists a healthy creative process that nurtures their growth. He aims to create a new educational framework designed to help you discover the best ways to learn to draw. James uses traditional tools along with his Wacom Cintiq 16 and Wacom Intuos Pro to improve and create his designs.

